By Ed Malaker
Posted 09/22/2020
In a recent article, we discussed a guitar modification called the Lindy Fralin partial tap resistor. This alters the pickup splitting modification to allow you to use it with weaker pickups. Without this modification, you might not ordinarily split a low output pickup, because the volume dropoff would be too great.
In the Lindy Fralin partial tap resistor article, we showed you how to install the modification and shared some ways to make it more useful. This time, we’ll show you how to improve the modification even further, to the extent that it will enhance any pickup splitting modification, no matter how much gain the pickup creates.
Short Recap
Let’s recap what we already know, so we’re on the same page. If you don’t understand something, take a second to review one of our many articles concerning humbucker splitting or our article covering the Lindy Fralin Partial Tap Resistor.
Standard Installation
In coil-splitting, we use a push-pull pot or a mini-toggle switch to shut off one of the coils in a humbucker. To do this, you need a humbucker pickup with four colored wires and one bare wire installed into your guitar. With the pickup correctly installed, two of the colored wires are twisted together and taped off.
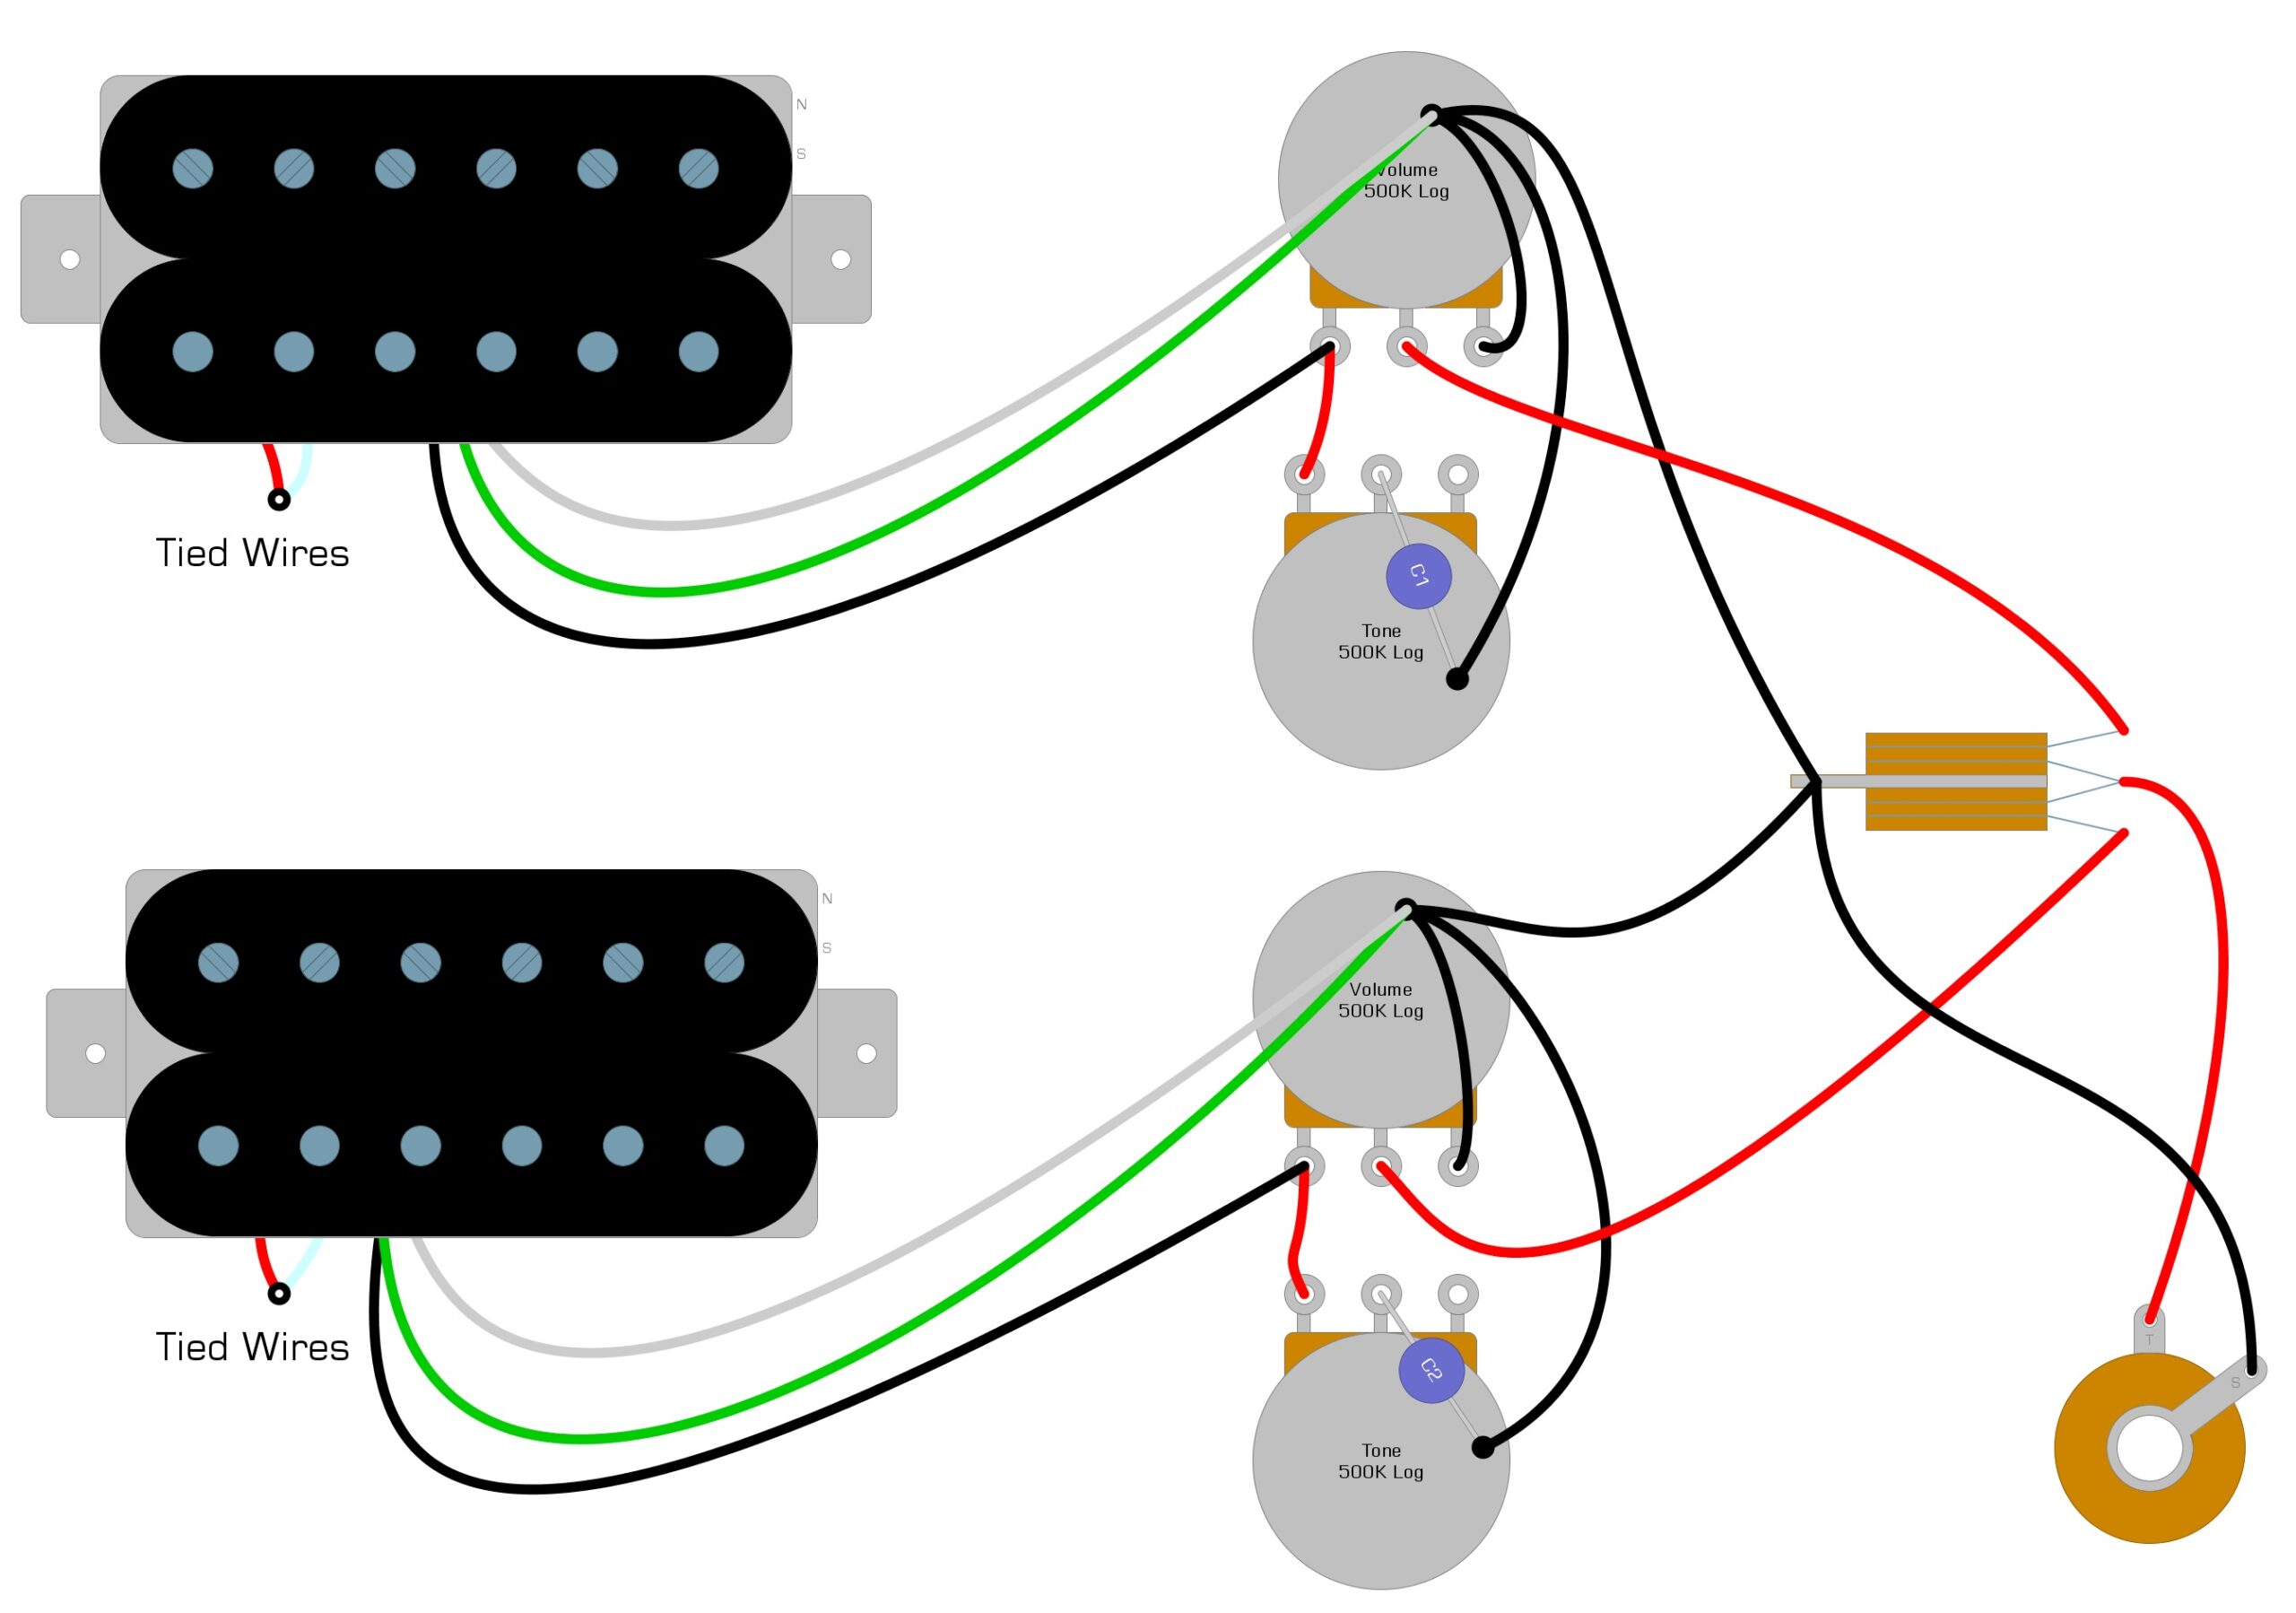
Example 1 shows what a typical standard wiring diagram might look like for a Gibson Les Paul with two humbuckers. Notice that each humbucker has two wires connected, instead of going to a component like the other two.
Example 1
Coil-Splitting
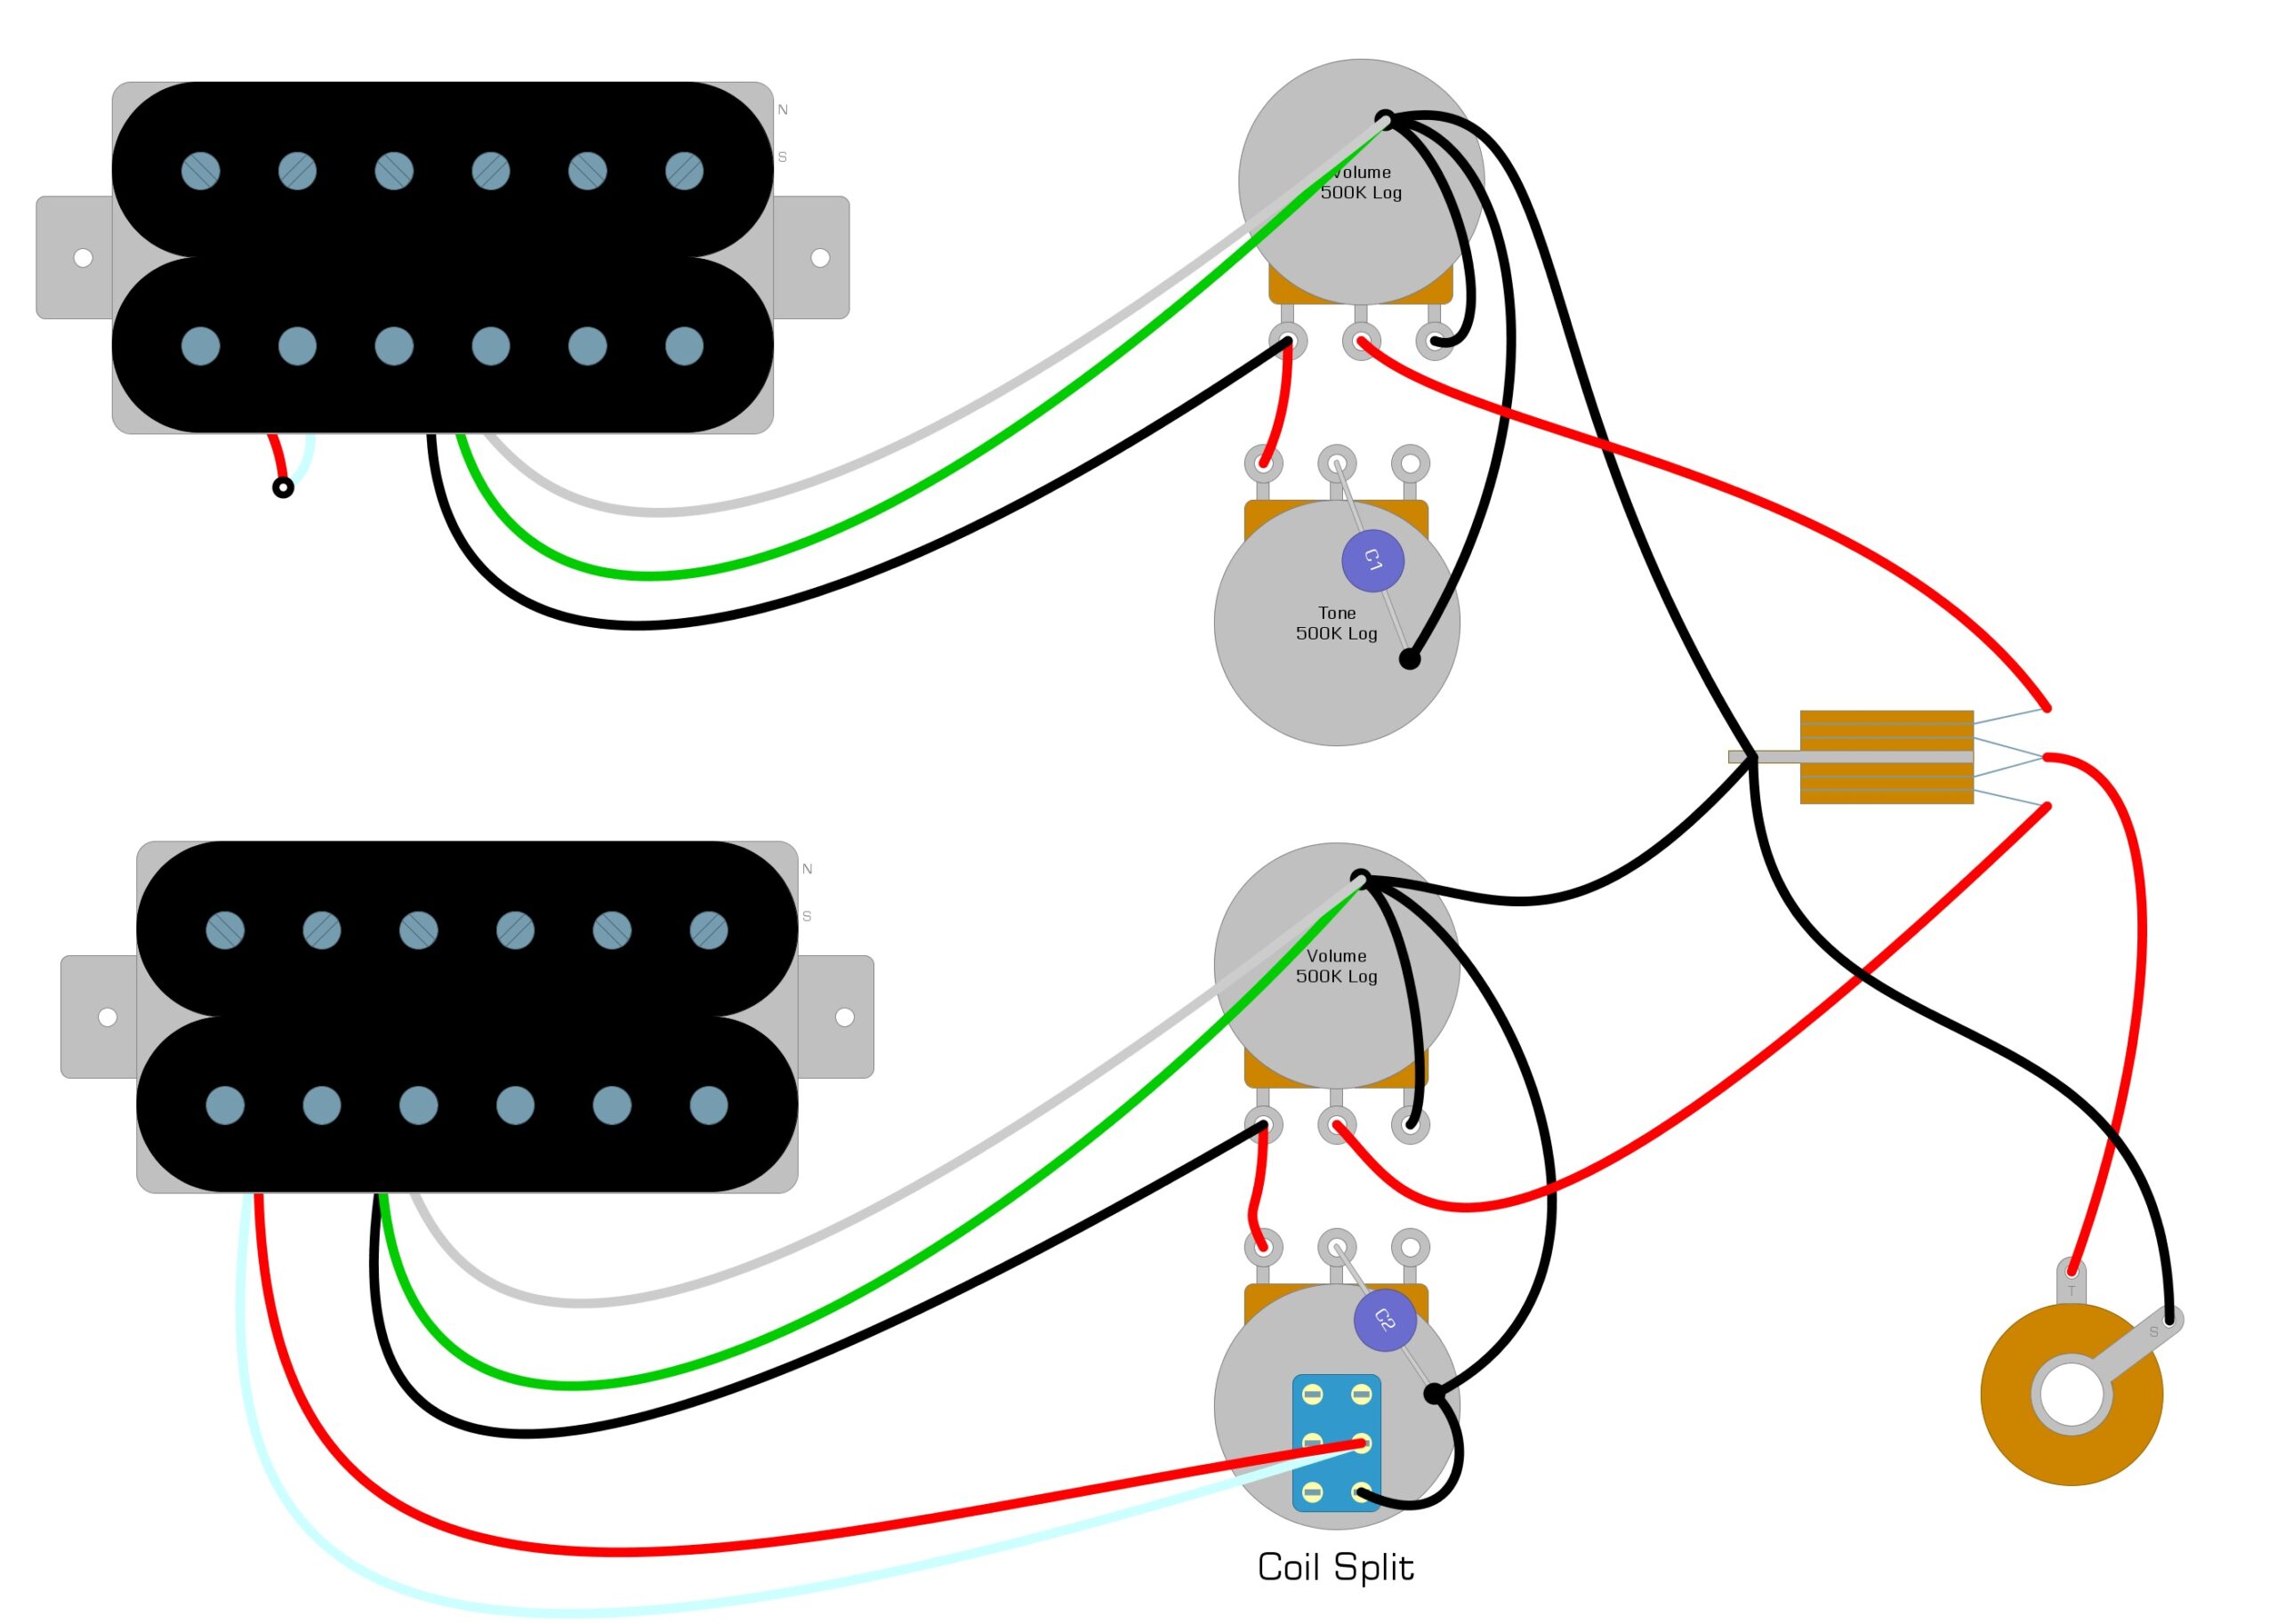
To add the coil-splitting modification, we change one of the standard pots to a push-pull pot. It doesn’t matter which pot you convert, but we like to use a tone pot because there are fewer wires soldered to them, and they are easier to convert. Once the pot is changed, you connect the two colored wires that were twisted together and taped off in Example 1 to the switch of the push-pull pot. Then connect a wire from the switch of the push-pull pot to Ground, and the modification is complete.
Example 2 shows what it might look like if we added the coil-splitting mod to the bridge pickup of the guitar as in Example 1. Notice that the original circuit is still in place. The push-pull pot gives us a way to add additional wiring.
Example 2
Lindy Fralin Partial Tap
It’s worth mentioning that humbuckers are supposed to have both coils working together to create the sound and provide humbucking capabilities. Quite a lot of thought and research goes into the number of windings and other factors that create the final sound. At this time, no manufacturer designs a pickup to sound good when coil-split! Let that statement sink in while you think about the technology behind single-coil pickups designed to sound good.
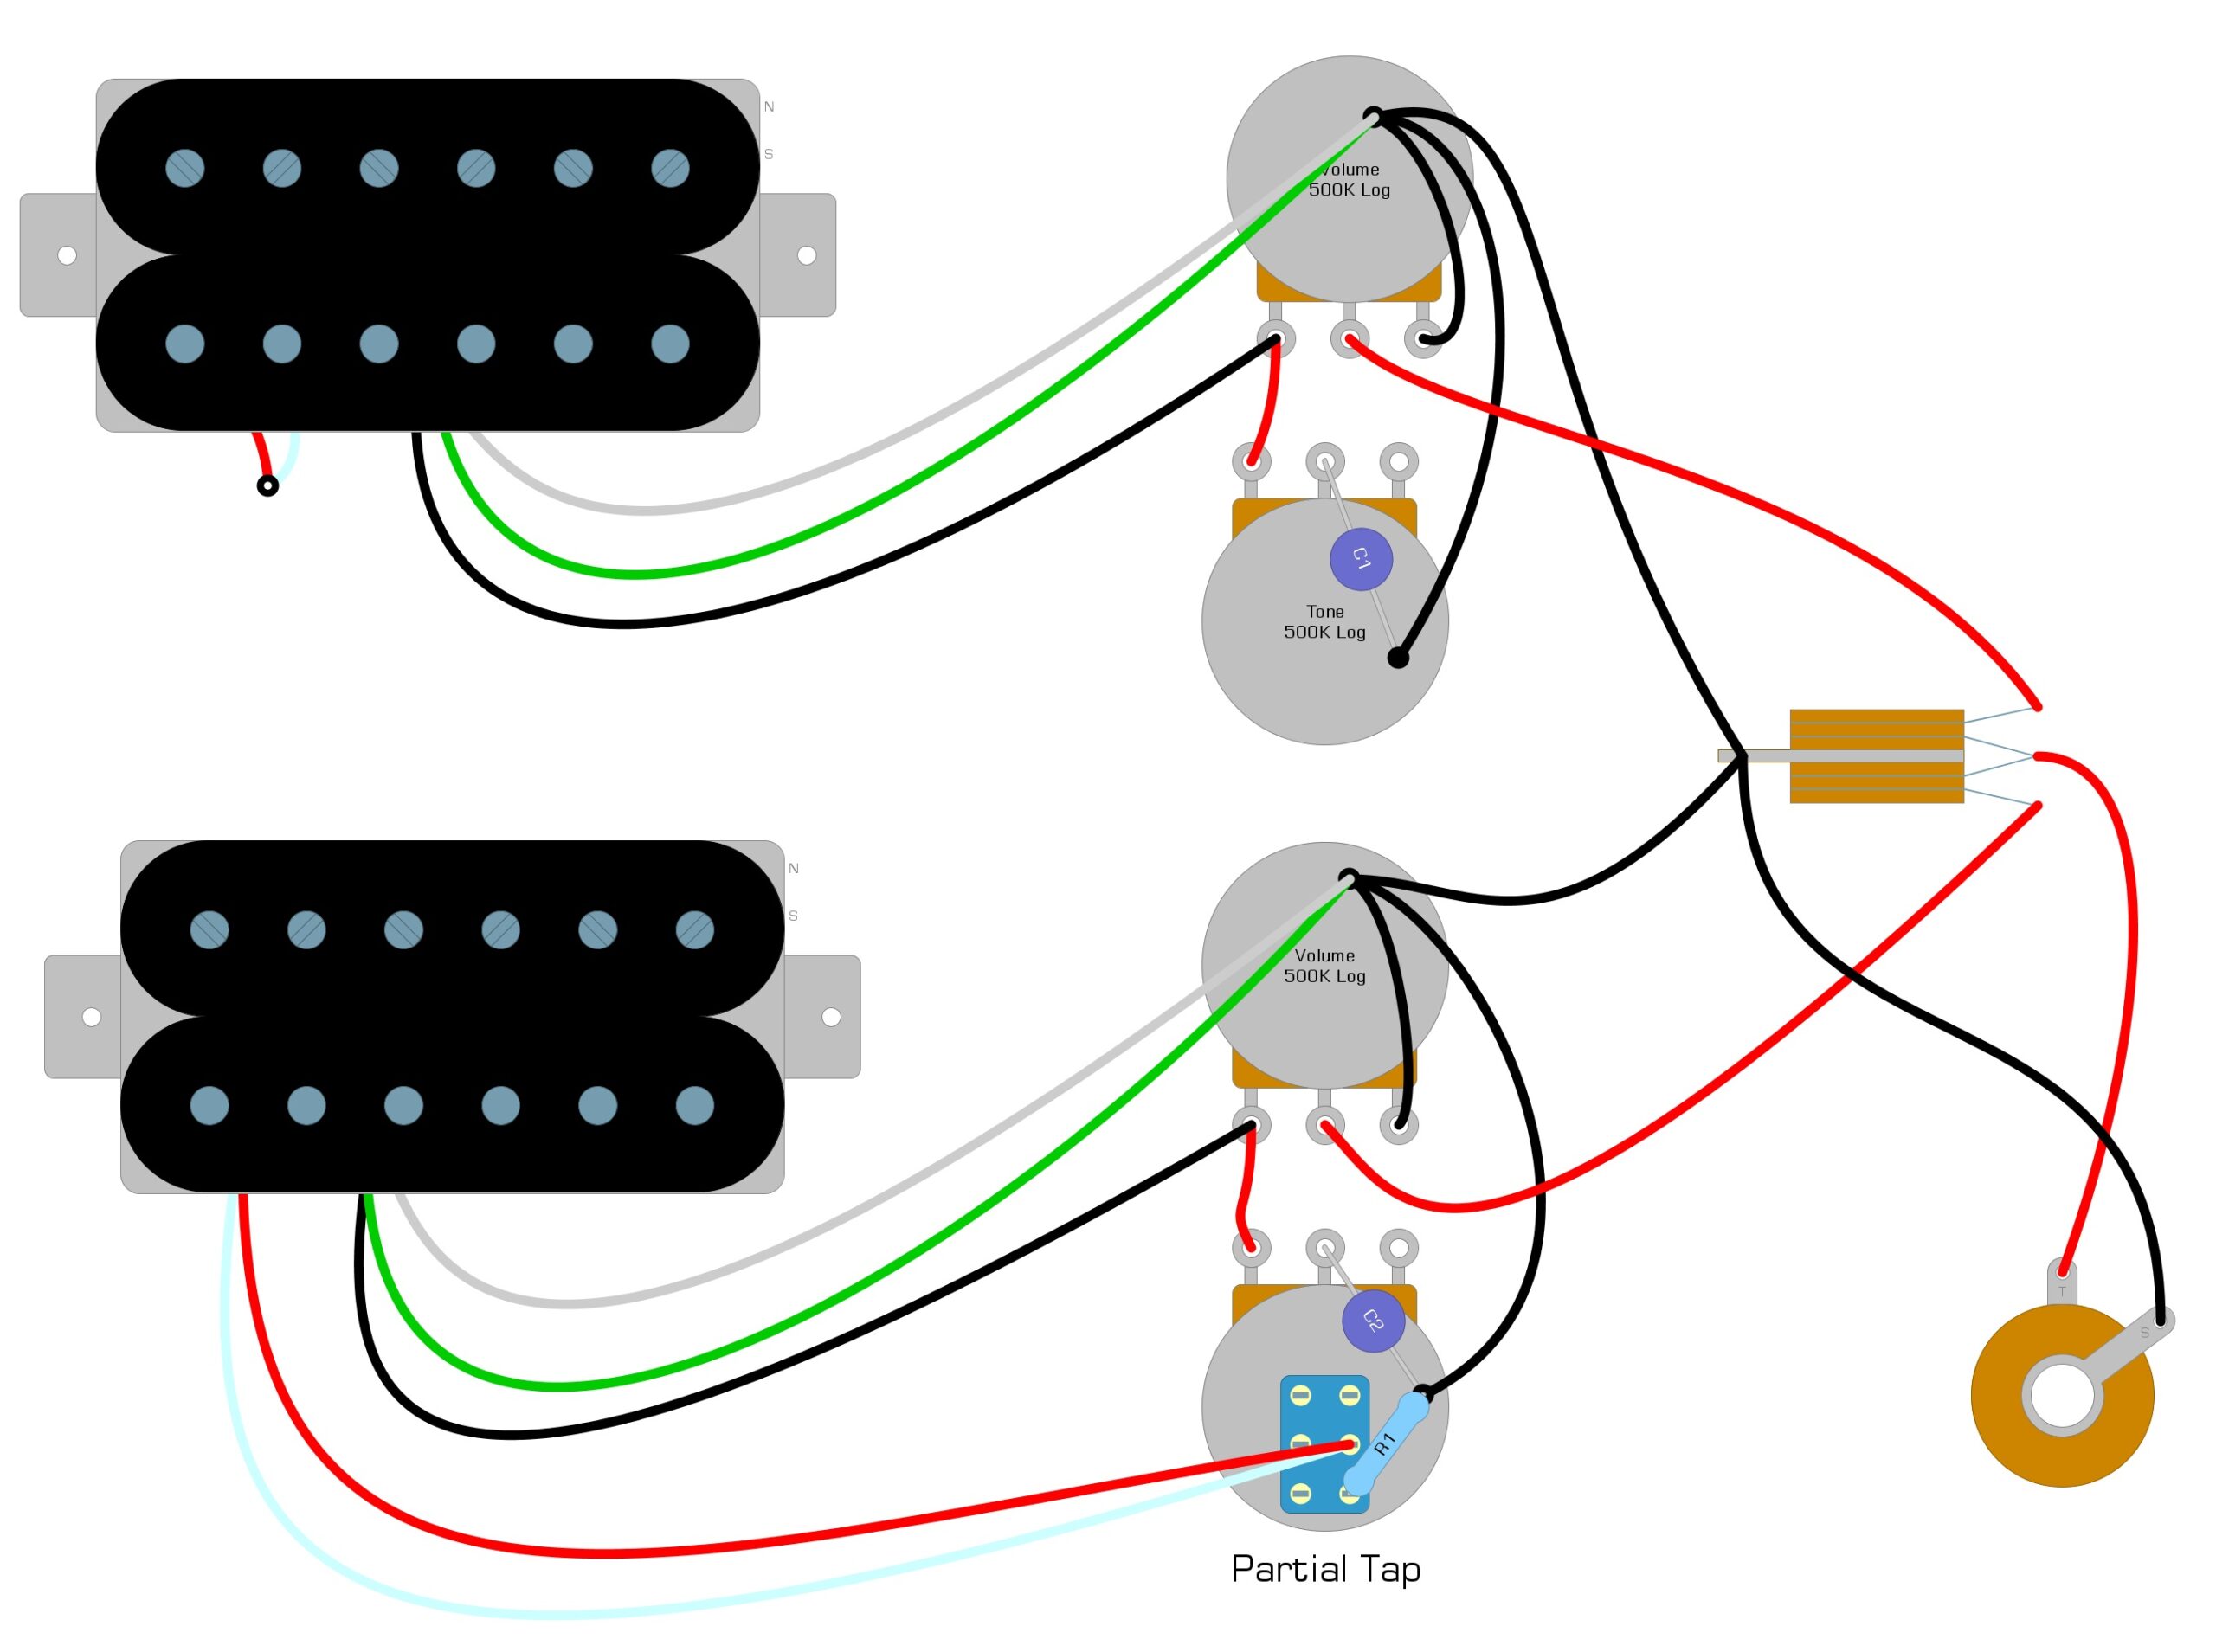
Quite often, turning off one of the coils will result in a bad or thin sound, and it will always result in a significant volume drop. It’s the volume drop that caused Lindy Fralin to invent the Partial tap. This modification is even easier than the coil-splitting mod because it only requires changing the ground wire from the push-pull switch to a resistor.
Example 3 shows you what this would look like if we applied it to the circuit we used in Example 2. Notice everything stays the same, except the resistor replaces the wire.
Example 3
Lindy Fralin recommends using this modification when splitting low output humbuckers. They recommend using a 7k resistor in this spot, and the idea is that instead of turning off the second coil completely, the resistor forces some of the signals to pass through, resulting in a ratio of 100% first coil and 20% second coil, for example.
Allowing some signal to pass through the second coil will reduce the amount of volume lost when you engage the modification. We suggested in our tutorial showing you how to install this mod that a 7k resistor was a great starting point, but that you can adjust the tone by changing the value of the resistor to allow more or less signal to pass through the second coil.
The Ultimate Partial Tap Coil-Split Modification
While we were discussing some resistor values we could present to you to try out, we came up with what we think is the best solution. Instead of using several resistors, the best answer is to use a 10k trim pot.
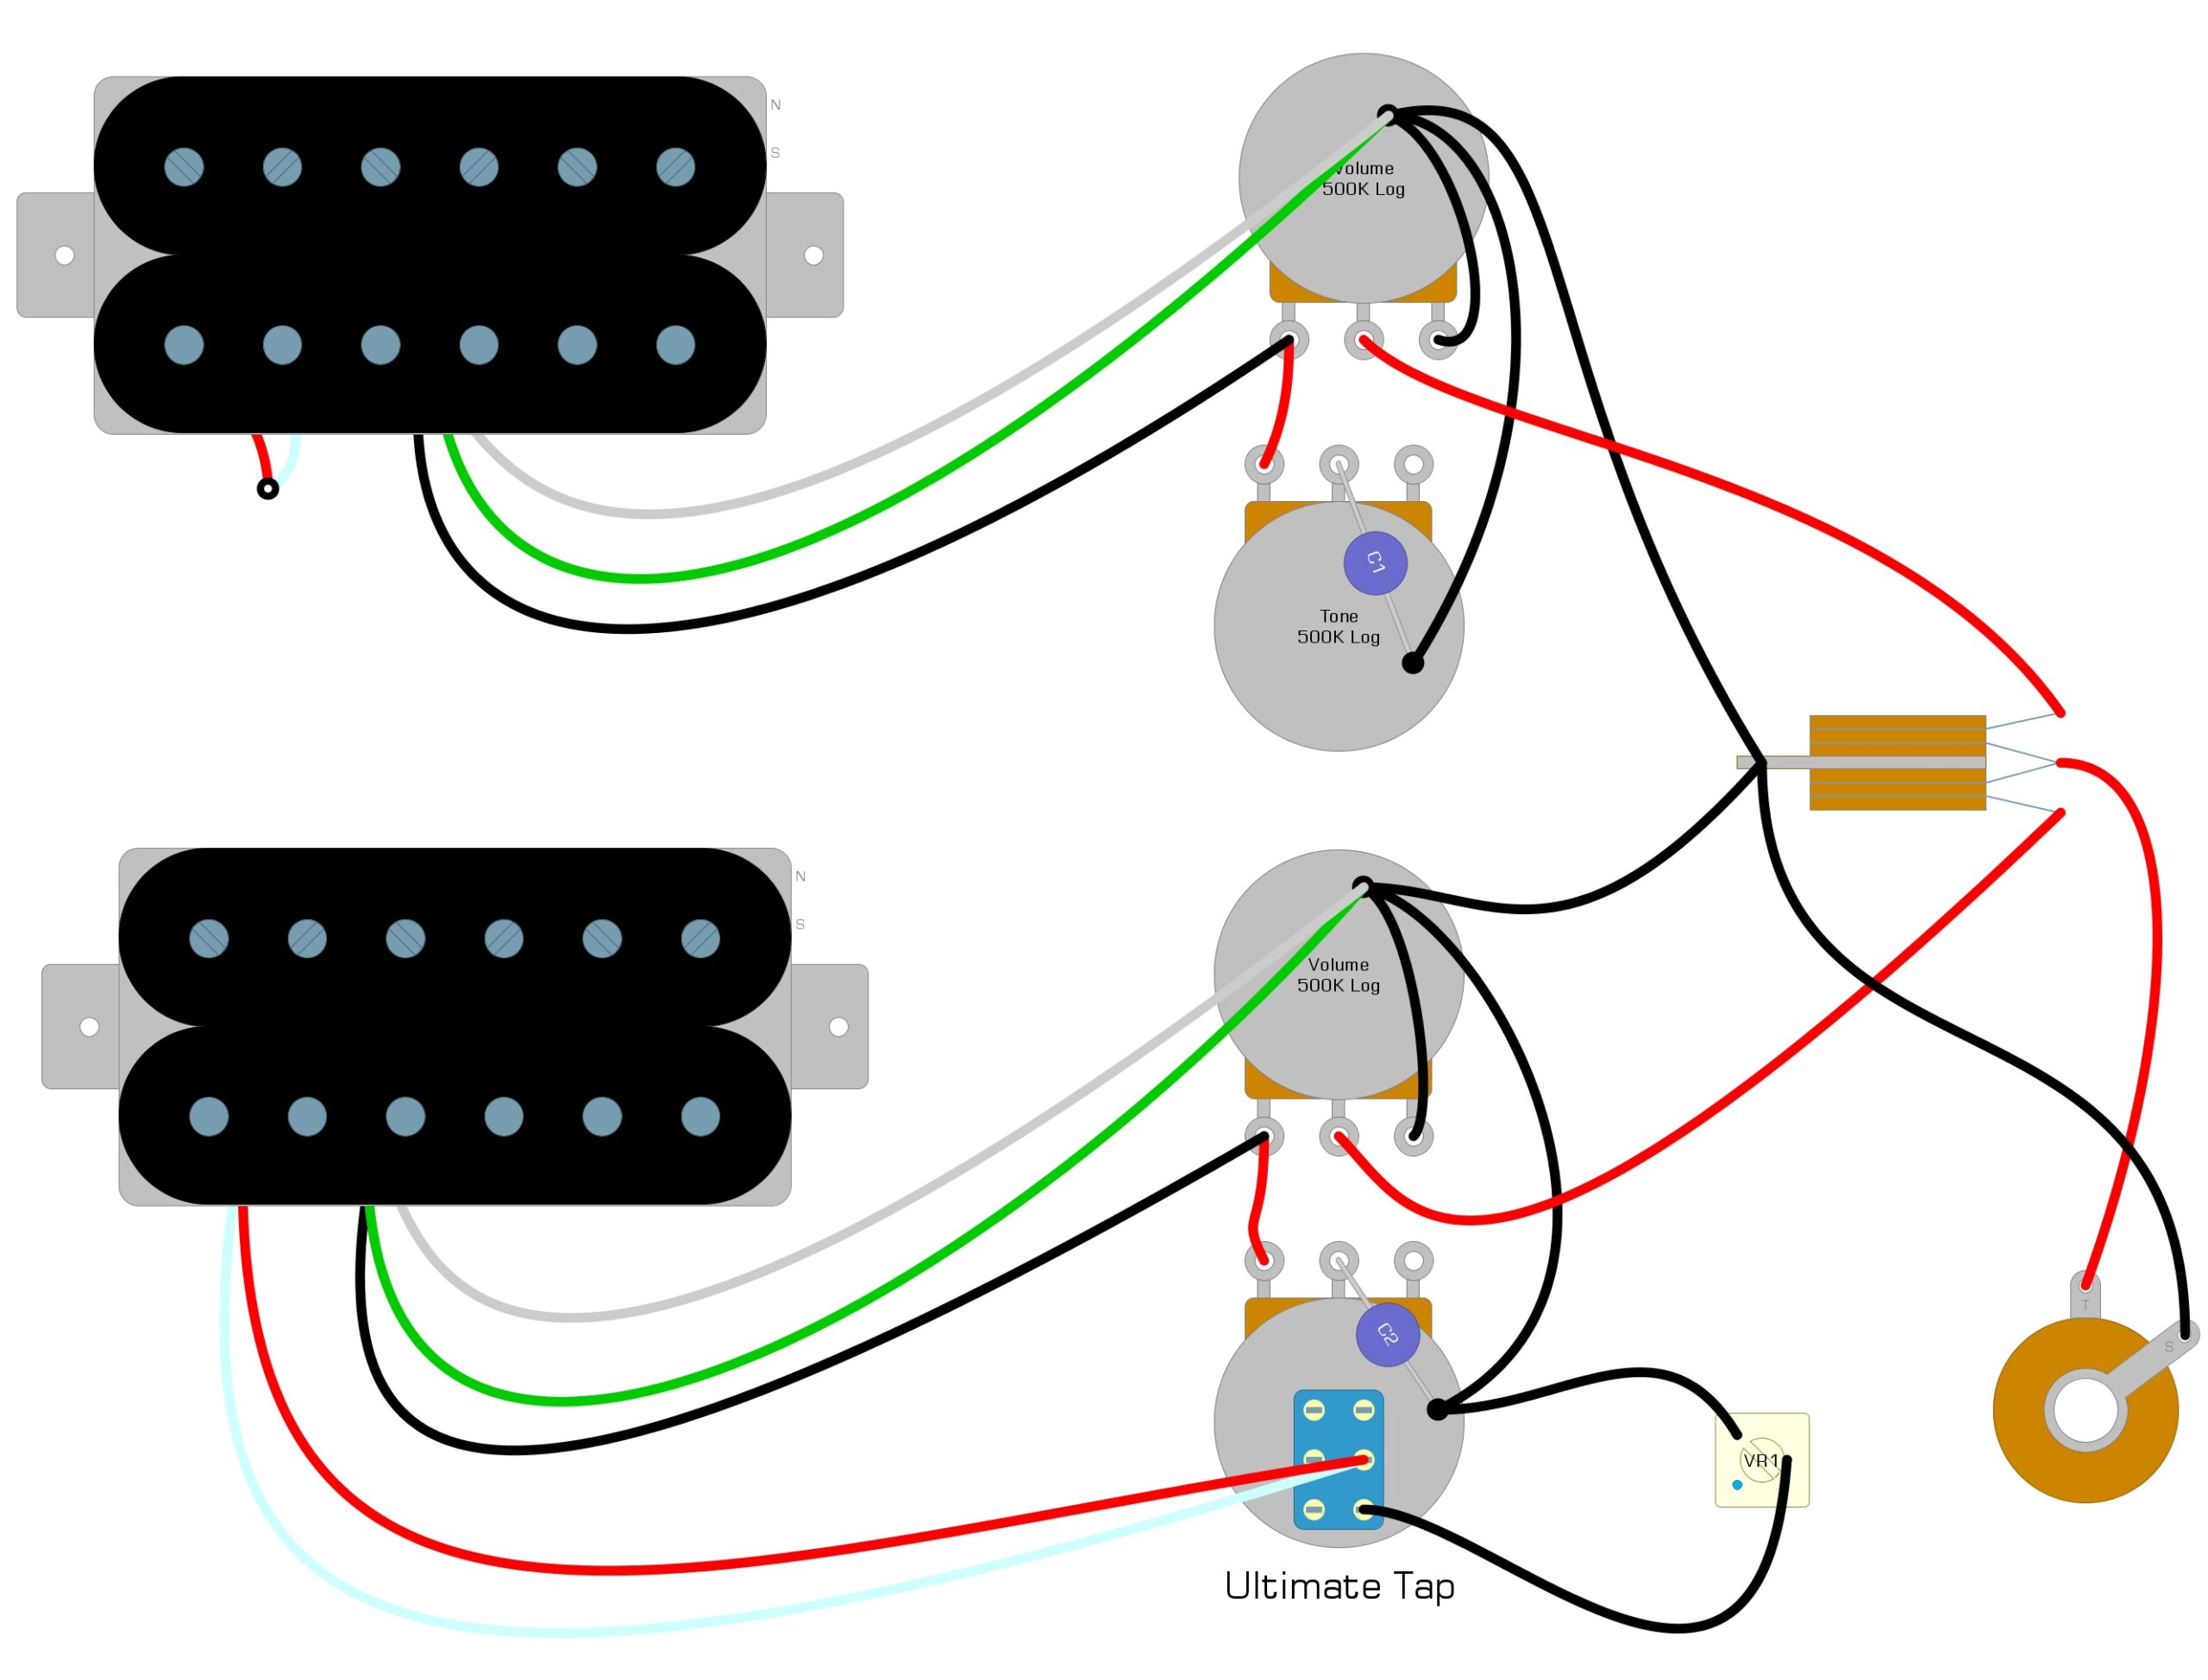
Installing a 10k trim pot is no more difficult than installing a resistor, and it gives you complete control over your coil-split sound.
With the trim pot turned to one side, there will be no resistance applied to the signal. It would be as if the second coil were off like a standard coils split mod.
As you turn the trim pot toward the other side, you add more and more resistance, up to 10k. As you add resistance, you will be turning the second coil on, little by little, changing the tone and volume. Therefore, you can use this mod to achieve the perfect balance between tone and volume.
Example 4 shows you what it might look like with the ultimate partial tap resistor in place.
Example 4
Summary
We hope you’ve enjoyed reading over our guide to the partial tap resistor, a relatively rare guitar modification. What started as a modification to allow coil-splitting of lower output humbuckers has turned into a modification that we feel should be part of the standard coil-split mod. Since manufacturers don’t design their humbuckers for splitting, we believe that most will benefit from some tweaking allowed by this mod.
If you have found this guide helpful, please feel free to share these partial tap resistor advanced techniques on Facebook and Twitter. For more articles on guitar electronics, visit humbuckersoup.com.

