By Ed Malaker
Posted 09/18/2020
This Wolfetone Installation Guide will show you how to install any Wolfetone pickup model into your guitar – from vintage P90s to the modern-day high-output humbucker. Wolfetone began making high-quality pickups in 1998, on a single Singer sewing machine. Today, it’s a large company that produces every type of pickup.
We’ll take a close look at these hand-wound pickups and discuss how to install them correctly. We’ll cover each type of pickup in the text, and provide wiring diagrams for most styles.
Before You Get Started
While we try to keep explanations as clear as possible, this article assumes that you already know how to change your pickups, have the tools to do so, and can read wiring diagrams. If you are a beginner, we recommend checking out one of our many pickup installation articles that provide step-by-step methods for installing specific brands of pickup. The Lindy Fralin Modern PAF Wiring Diagram would be a good one to begin with.
Vintage Stratocaster Wiring
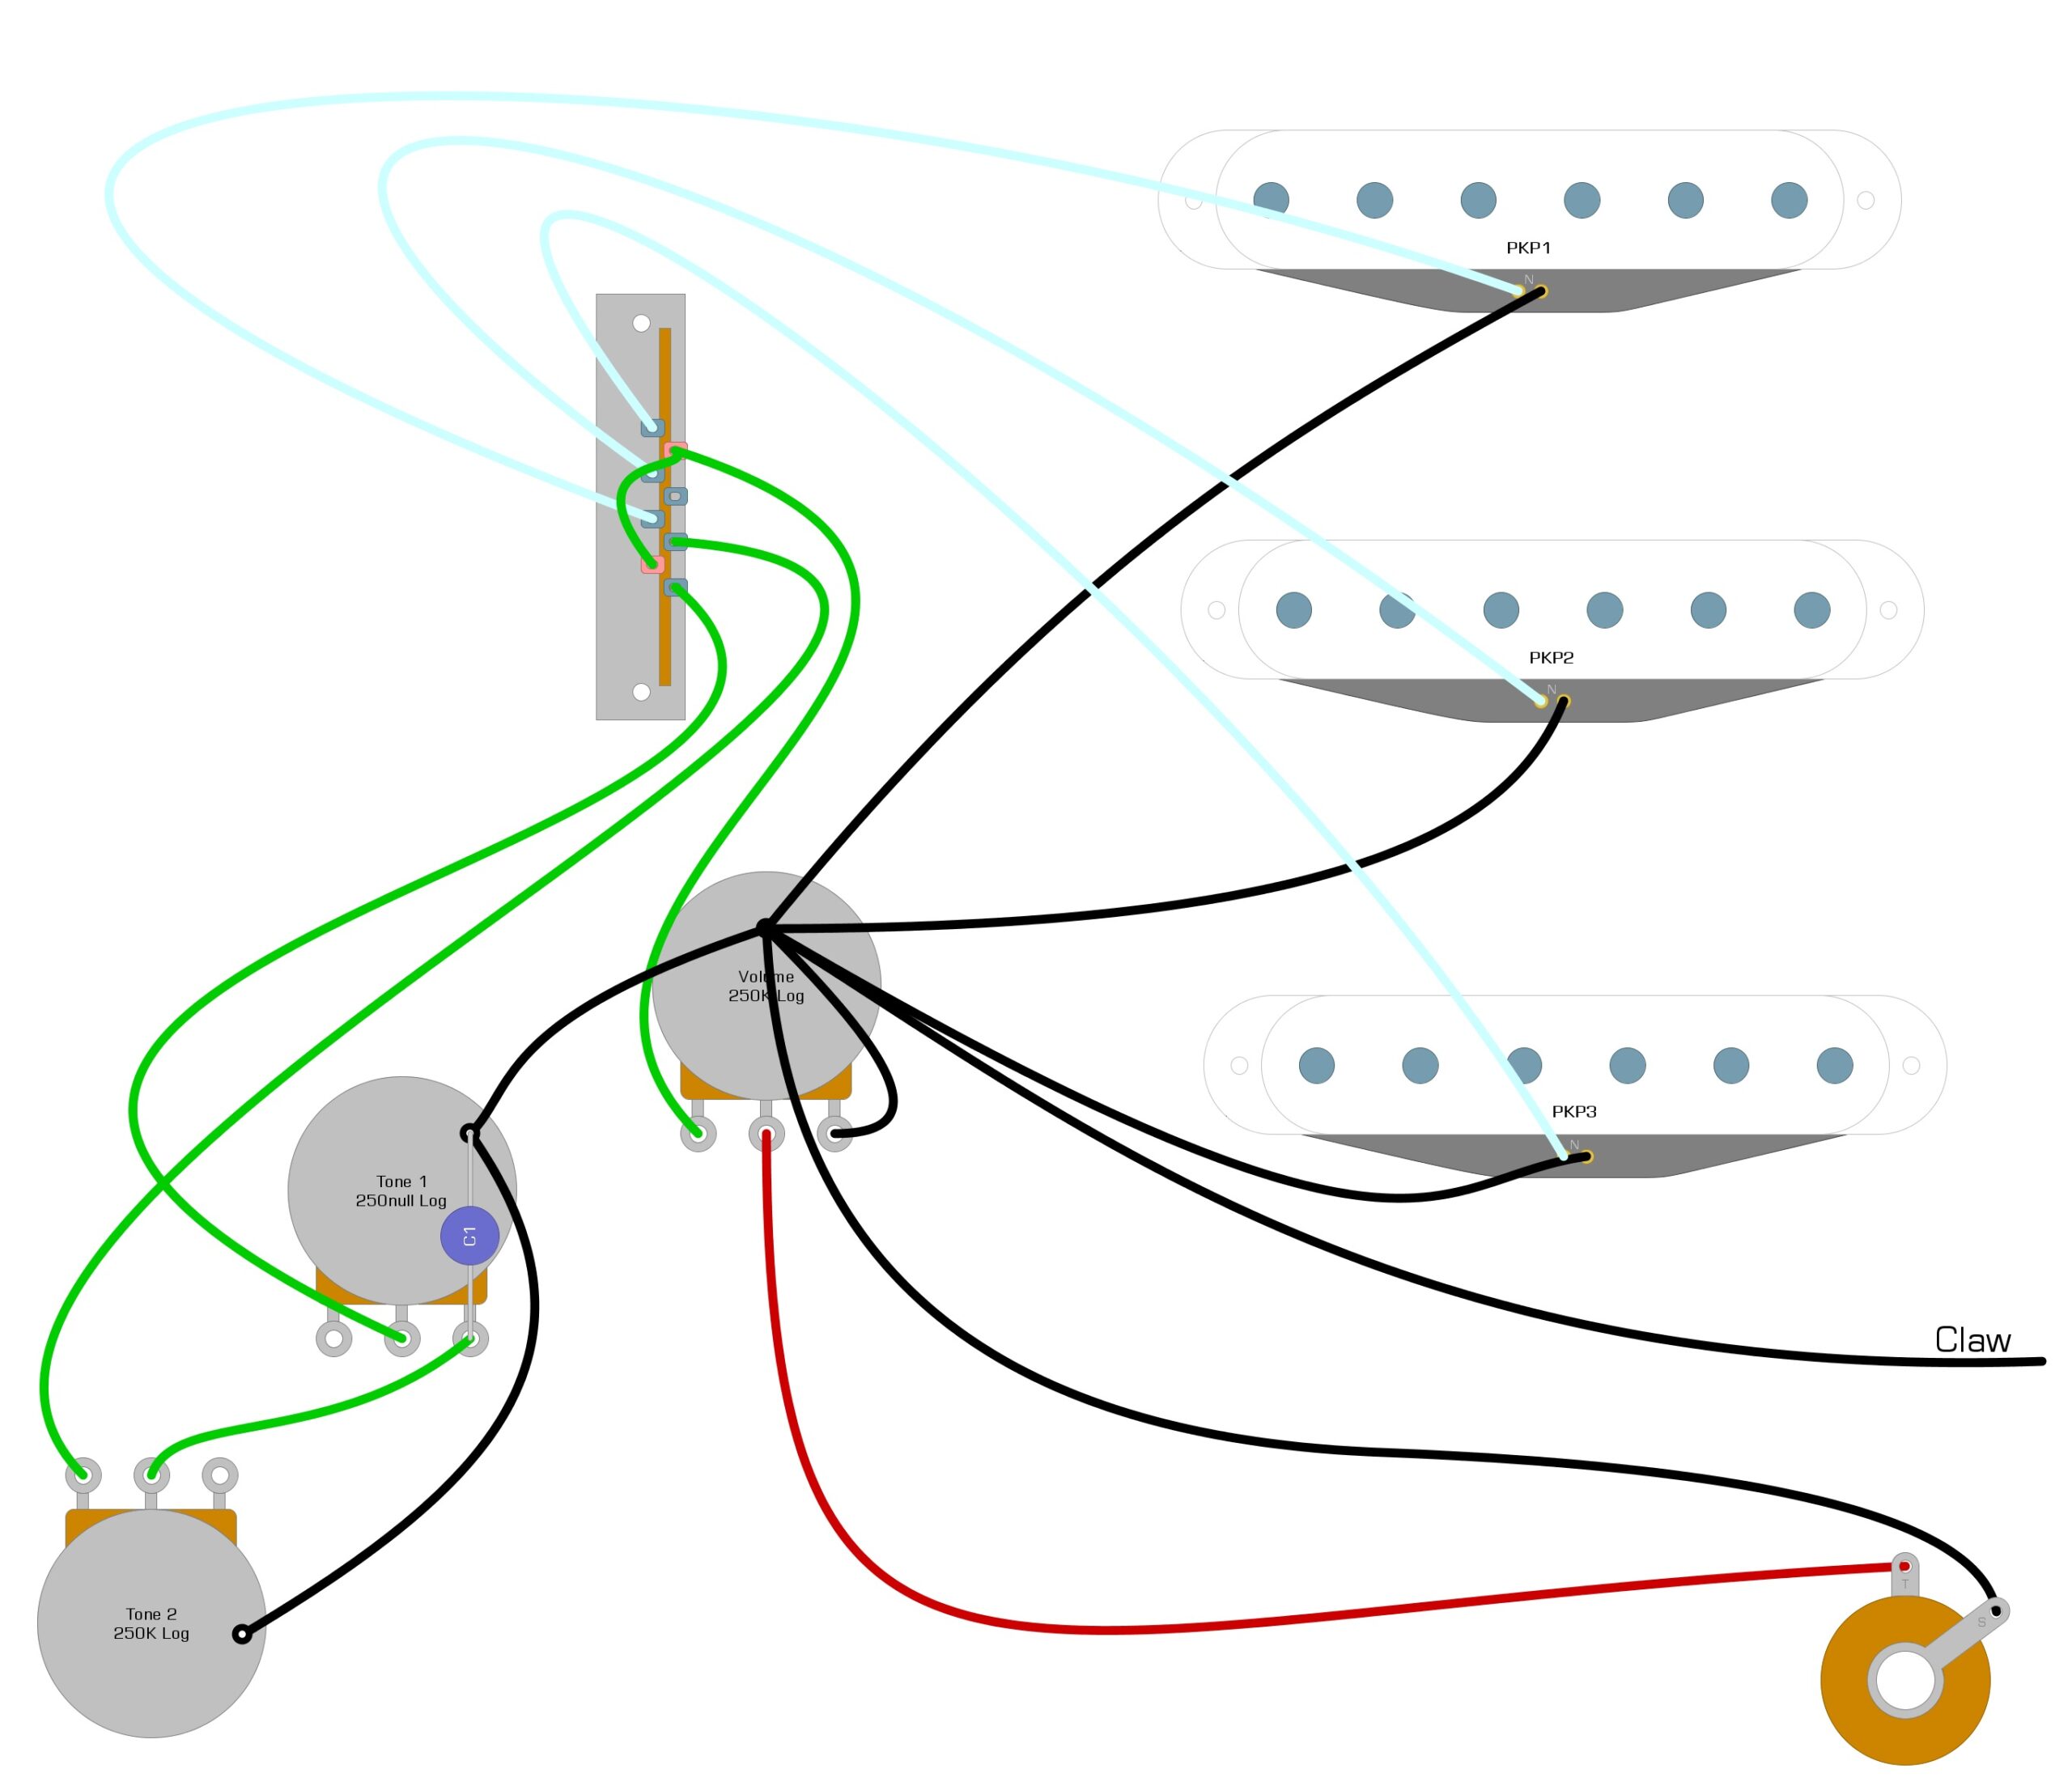
The first type of pickup we’re going to look at is the single-coil, commonly found in the Fender Stratocaster. Wolfetone makes several excellent single-coils, including the Flashback, Strat Cub, and the Rabid Bitch. These pickups generally have two wires, and use the white wire as Hot and the black wire as Ground.
In Example 1, we illustrate a very common way to wire single-coil pickups in your guitar.
Example 1
Vintage Telecaster Wiring
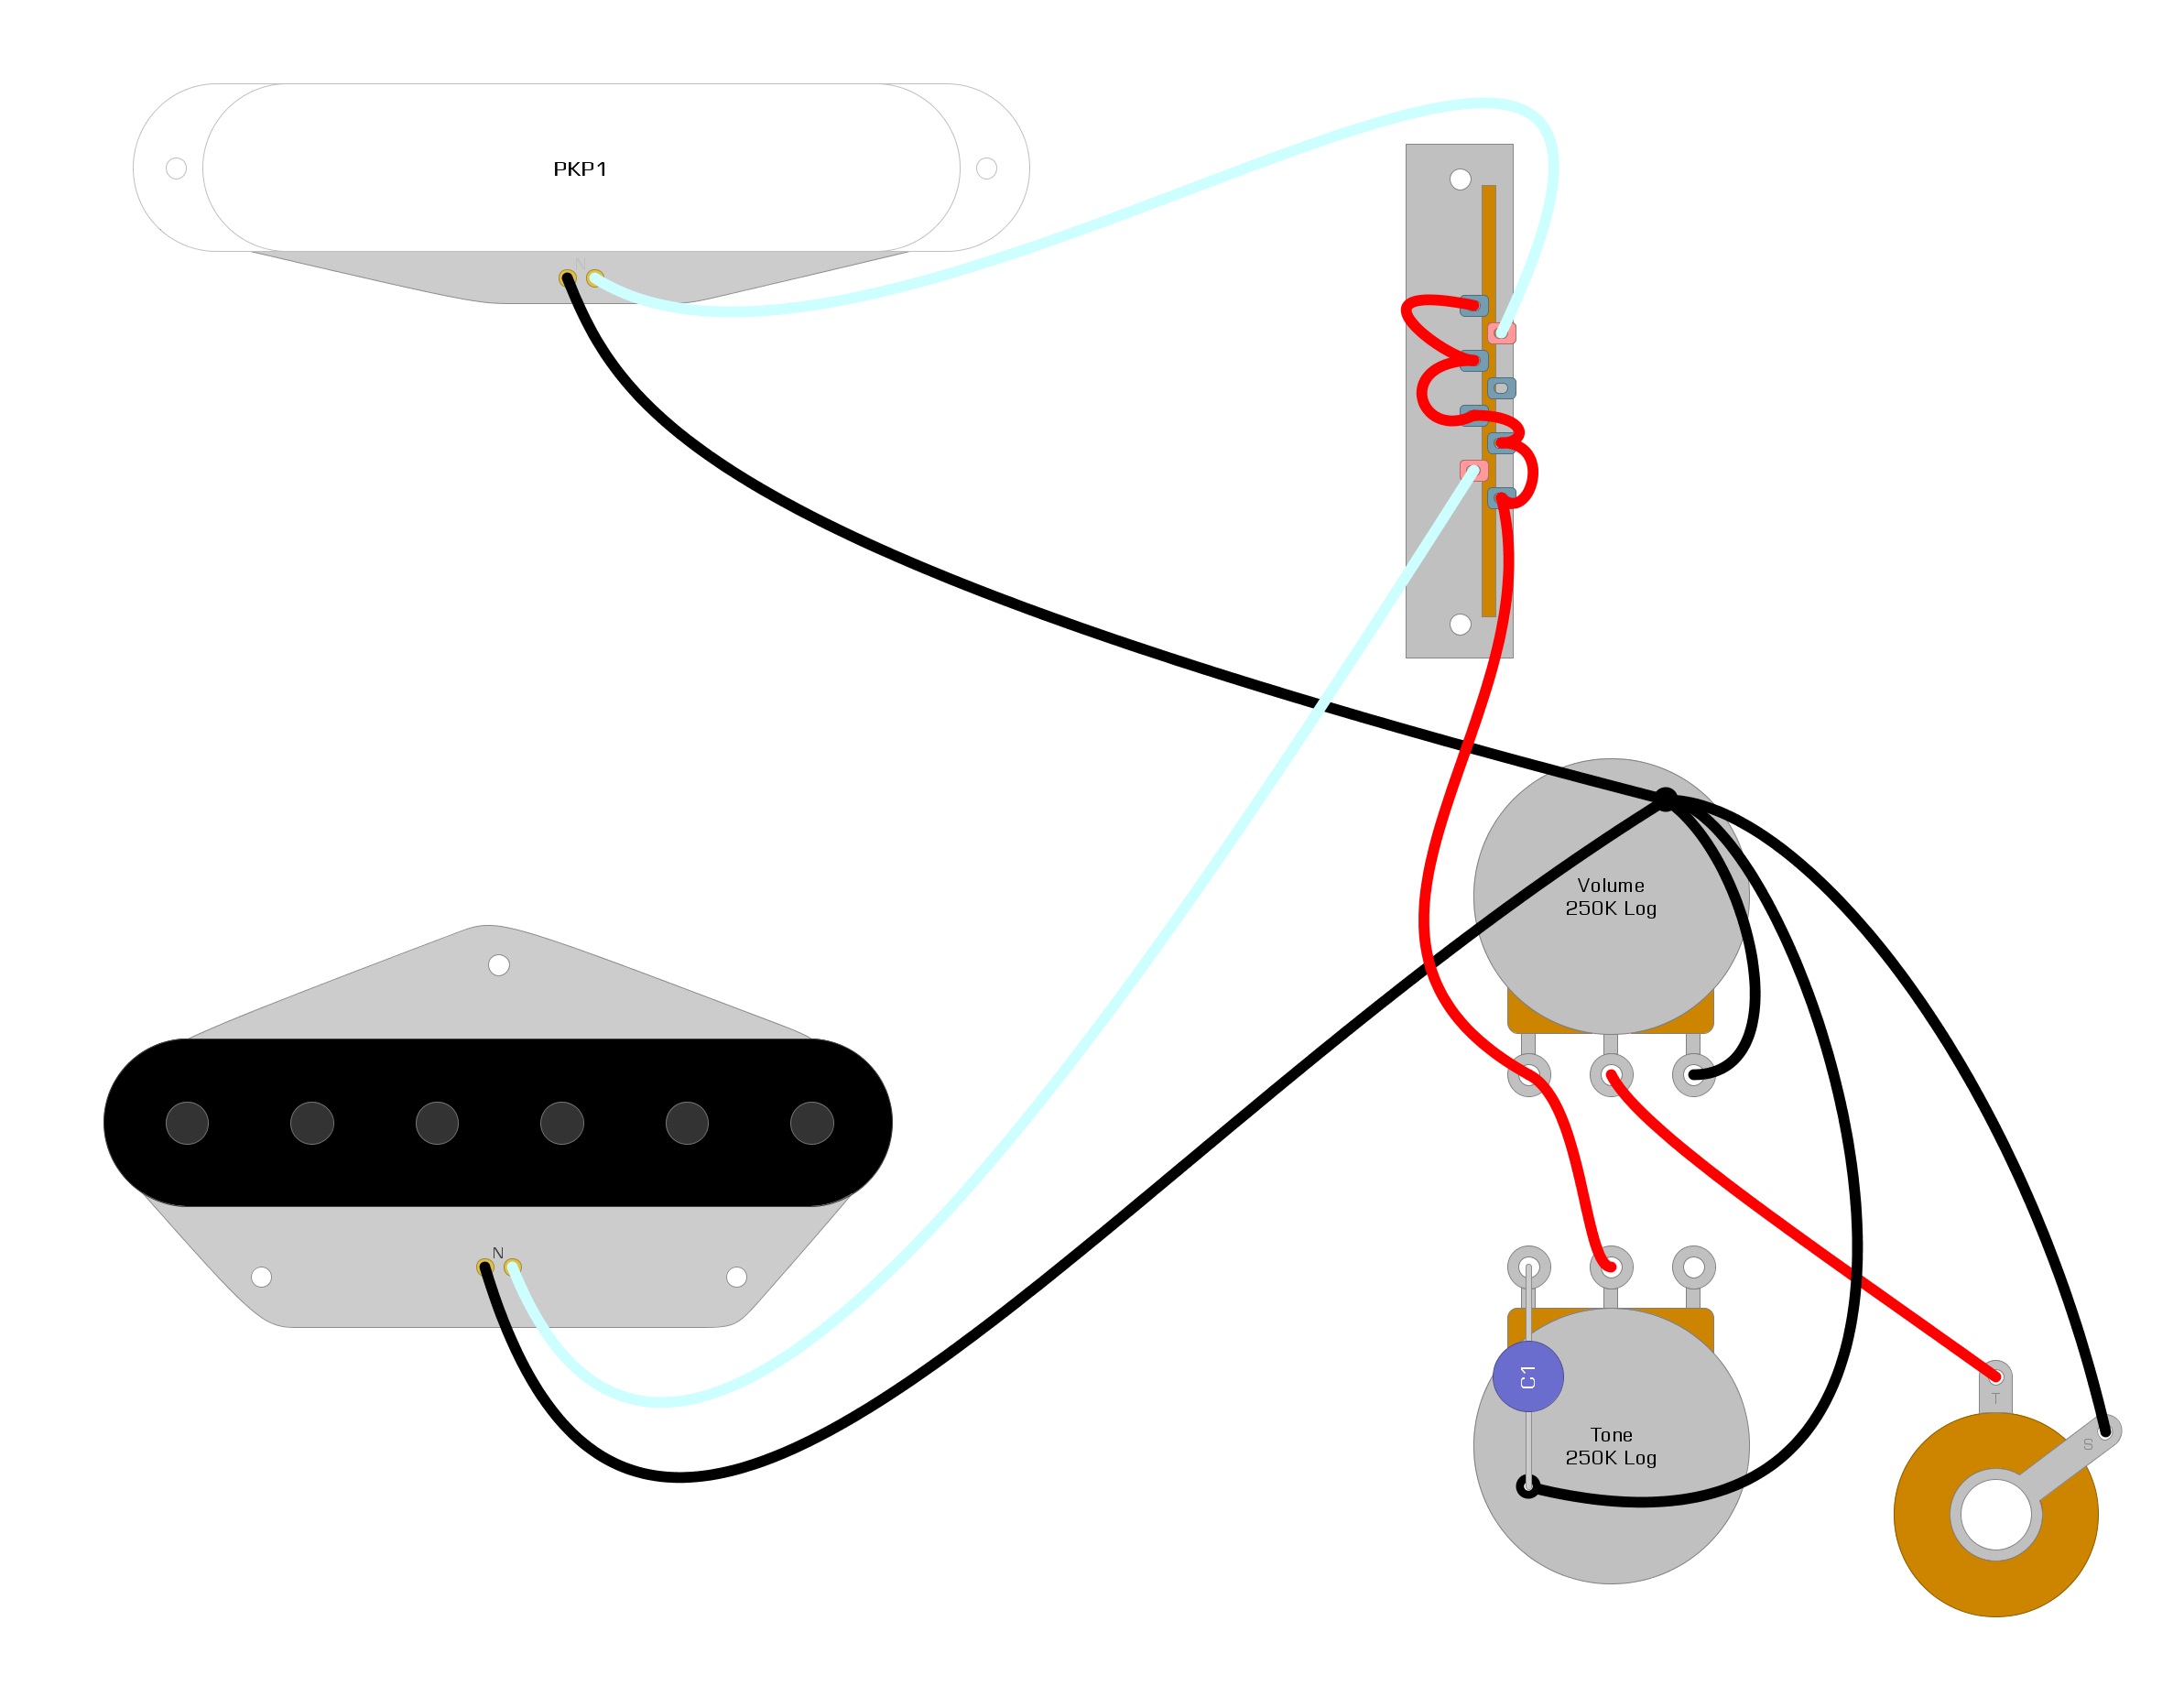
Fender Telecasters also use single-coil pickups. The difference is these pickups are often tuned slightly differently to get the famous Tele twang. More importantly, they use a different wiring scheme, as there are only two pickups in the configuration. Wolfetone makes several sets of Tele pickups, including the Tele Bitch and the Tele Cub. These pickups also use two wires and are sometimes coded yellow and black, or white and black. The black is always Ground, while the white or yellow will be Hot.
In Example 2, we illustrate a popular way to wire a Fender Telecaster.
Example 2
Vintage P90 Wiring
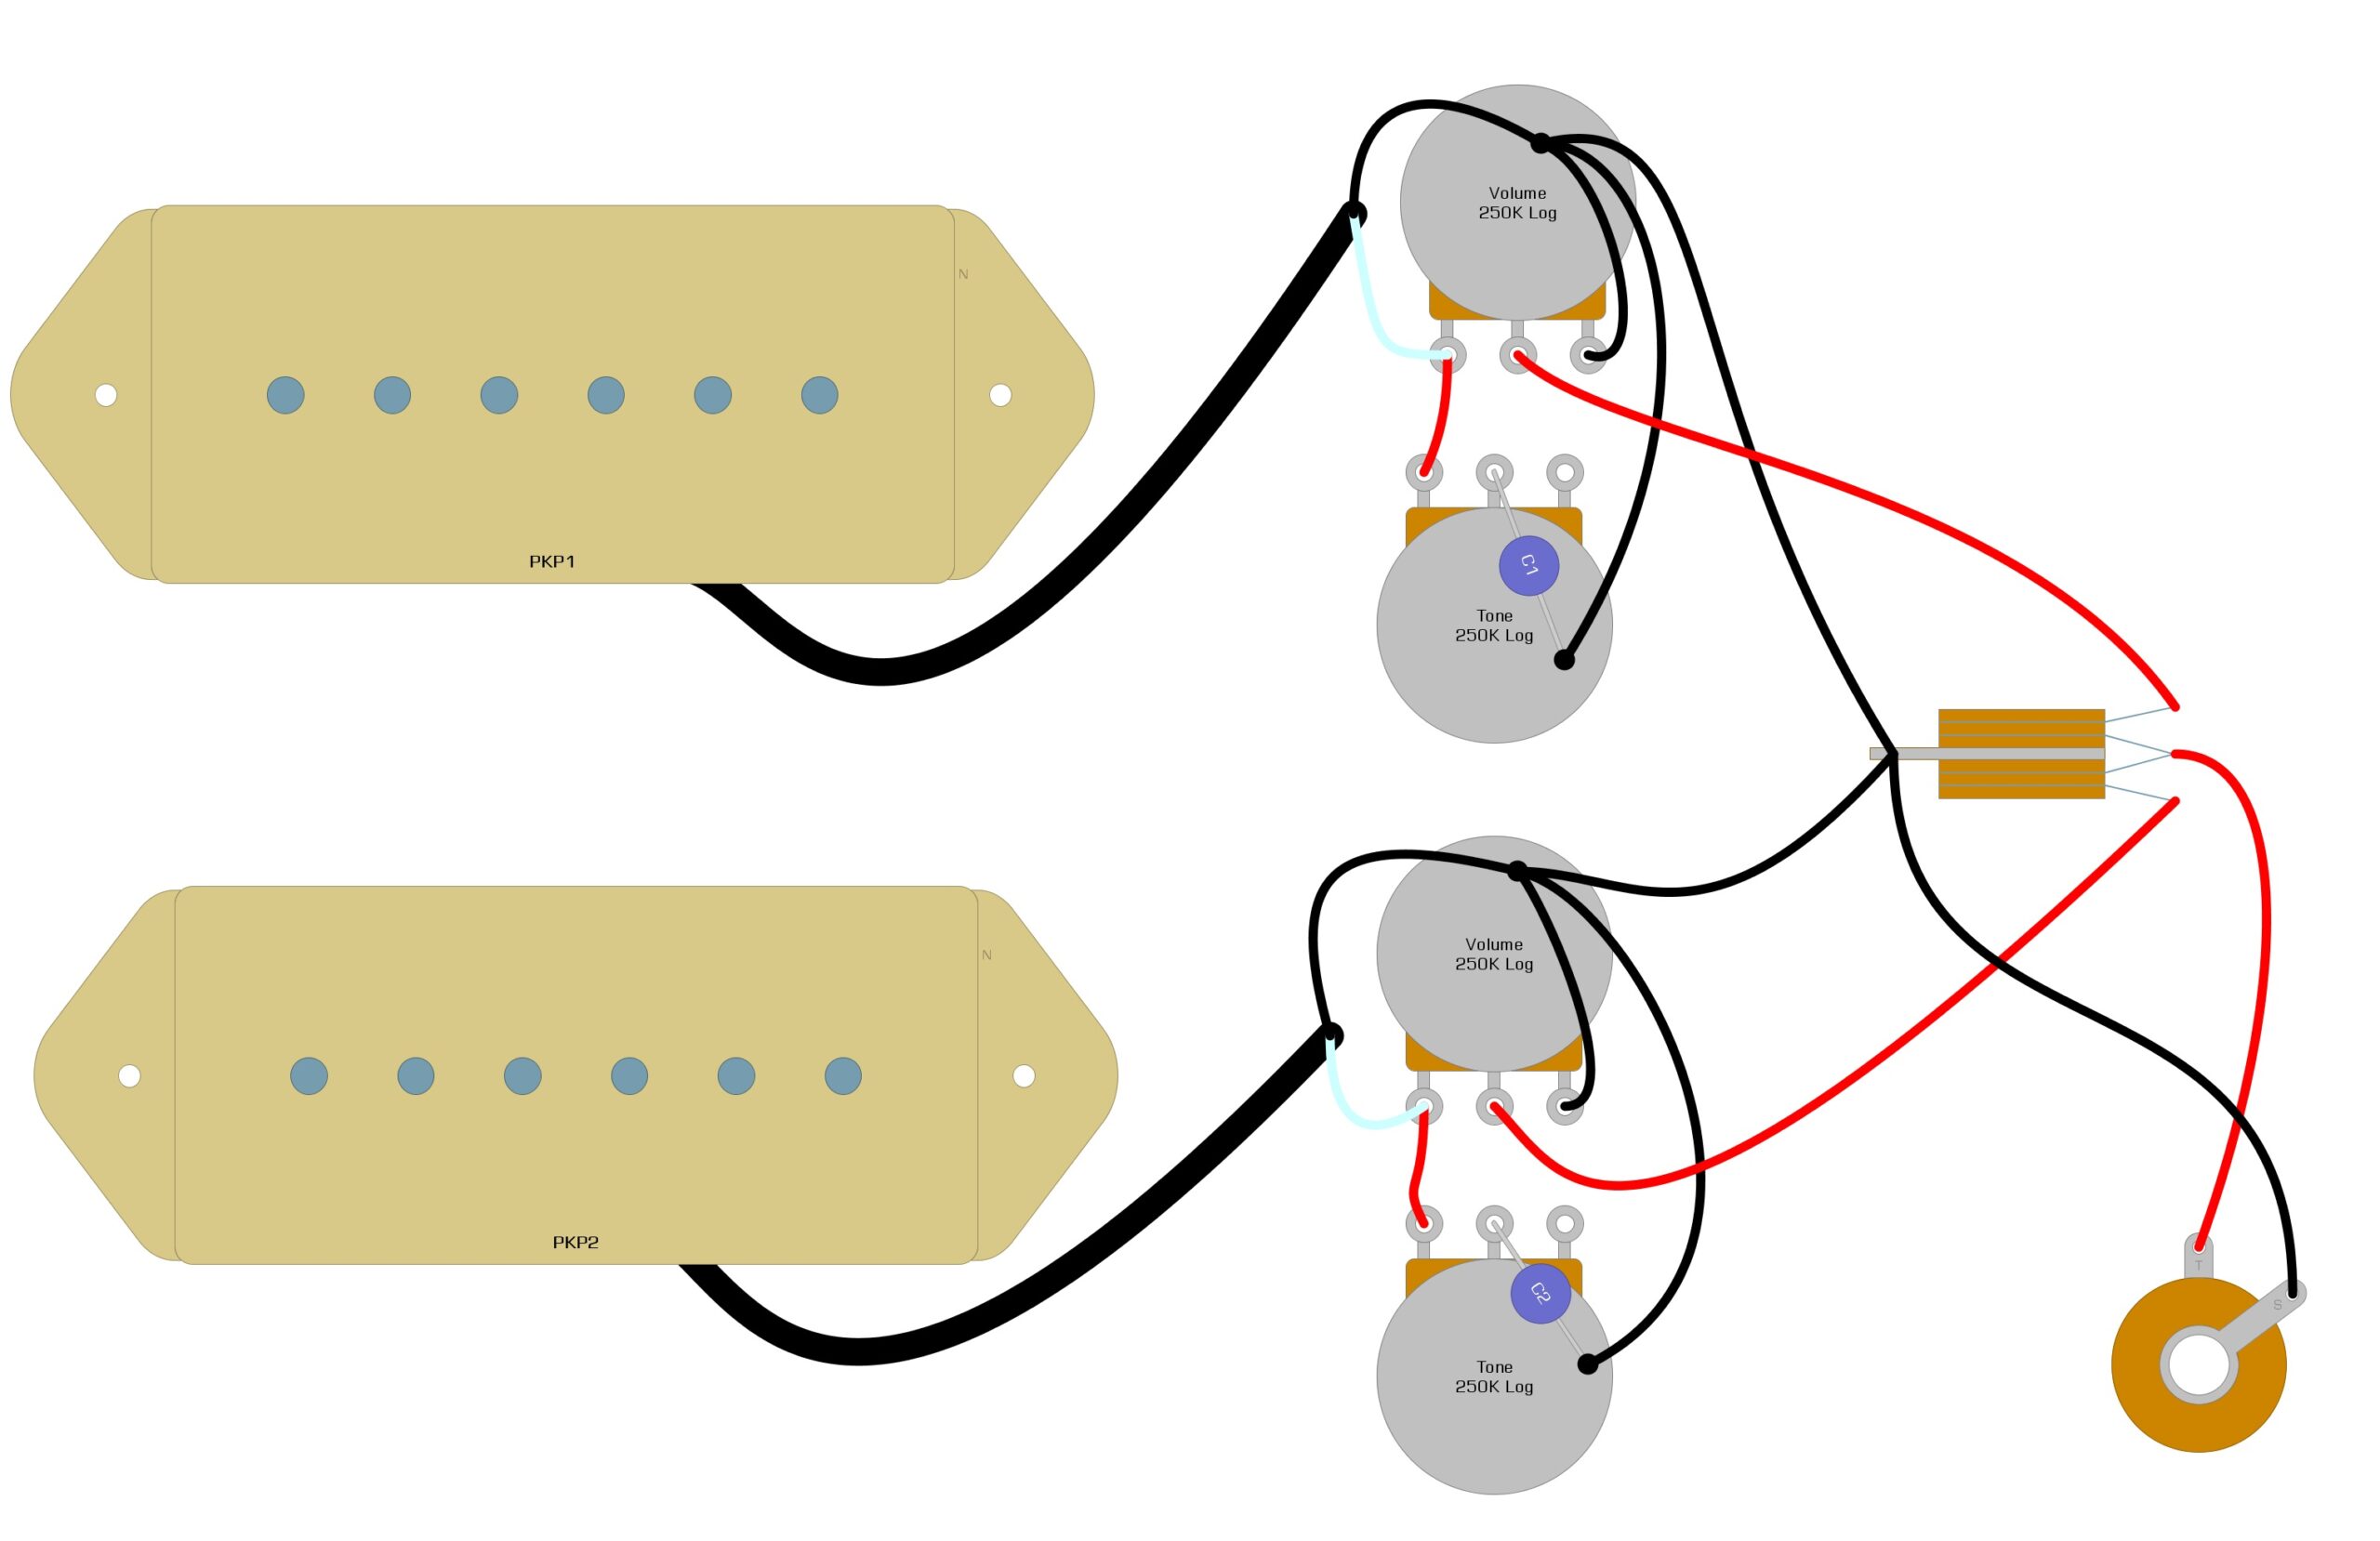
The vintage P90 is Gibson’s answer to the Fender single-coil. The P90 is also a single-coil pickup, though it looks more like a humbucker, and it technically has two wires, though one wire is a braided metal shield covering the other. When you are using a vintage pickup with a braided metal shield, the inner colored wire is the Hot, while the braided wire is the Ground. Wolfetone makes several P90 style pickups, including the Mean, Meaner, and Meanest.
In Example 3, we illustrate a popular way to wire the P90s in a Gibson Les Paul.
Example 3
Humbucker Wiring (Braided Wire)
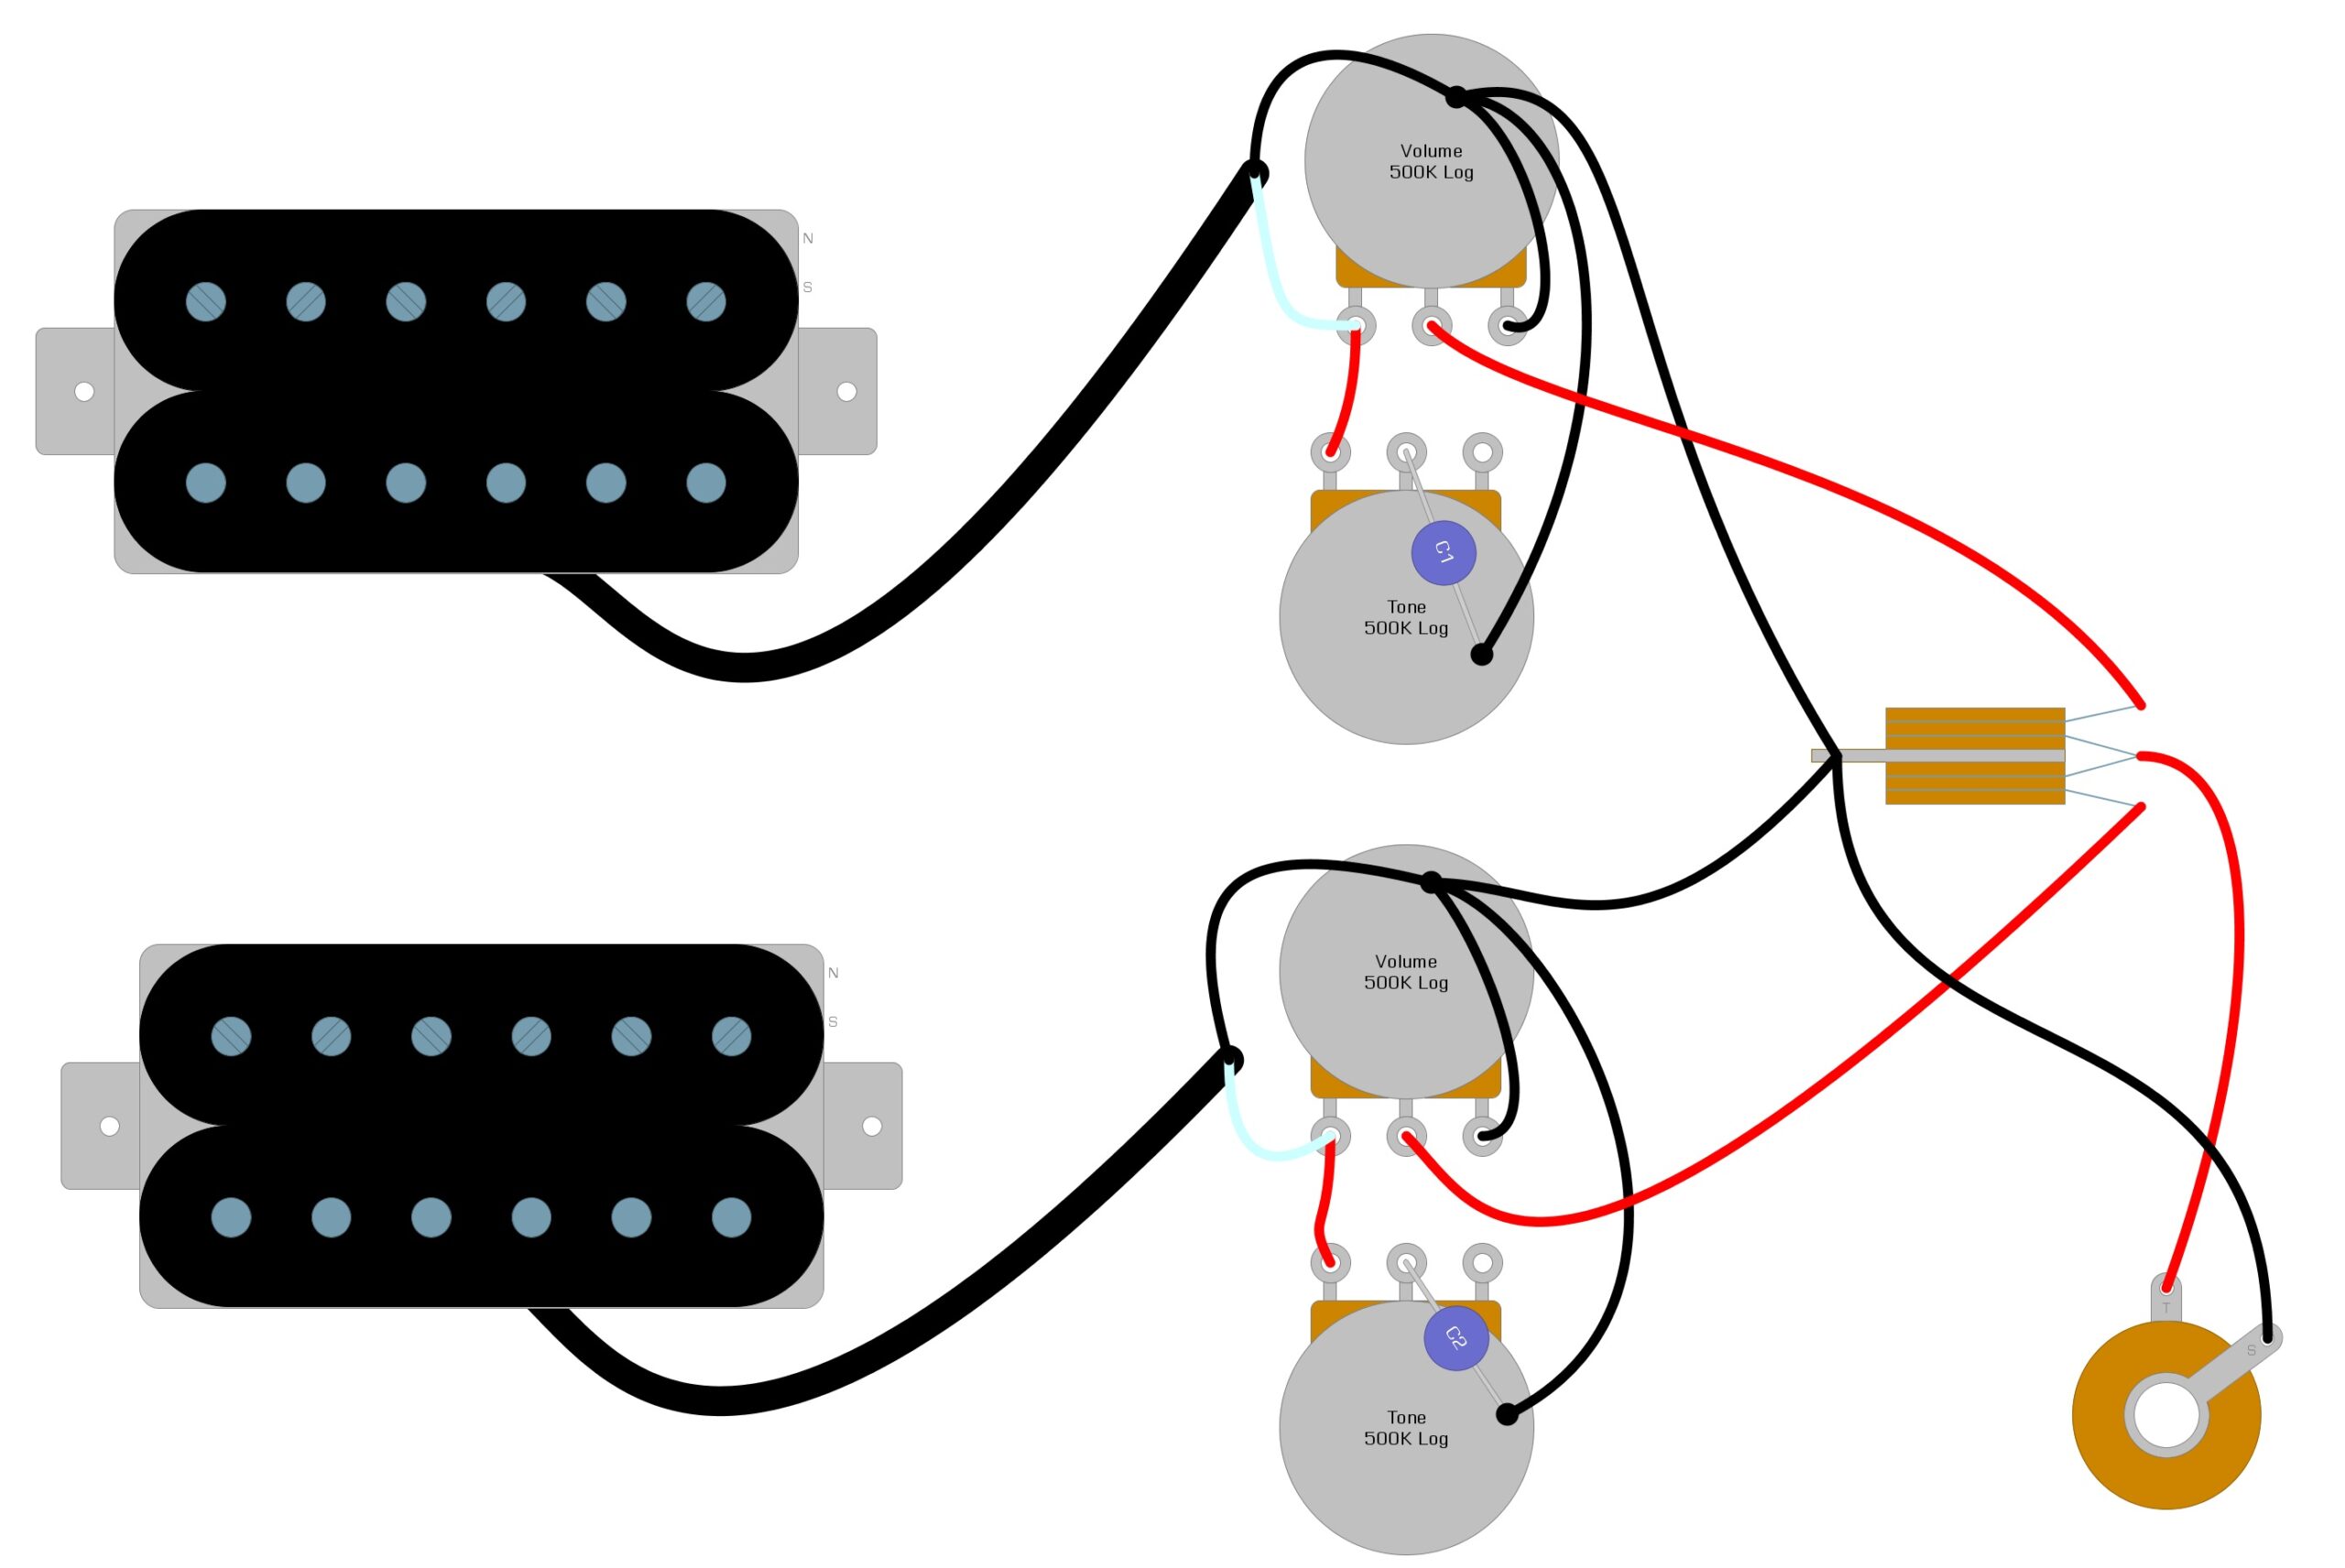
When humbuckers first arrived on the scene, they used the same style of wire as the P90s—a single, colored wire inside of a braided metal shield. The colored wire is the Hot, while the braided wire is the Ground. Wolfetone makes several models of humbucker pickups, and you can order most of them to have the braided wire configuration.
In Example 4, we illustrate a popular way to install humbuckers in a Gibson Les Paul style guitar.
Example 4
Humbucker Wiring (4-Wires)
Once manufacturers learned that you could wire humbucker coils in different ways to achieve multiple sounds, they began to sell four-wire humbuckers to allow guitarists to perform these modifications without damaging the pickup’s internals. Each coil has two wires that represent the beginning and end of the coil, hence the four wires. There is also a bare wire that acts as a shield for the pickup chassis. Normal humbuckers have one coil going into the next; this is called series wiring. To install it, you need to know what colors go to each coil, which is called the wiring code, and each manufacturer has a different one.
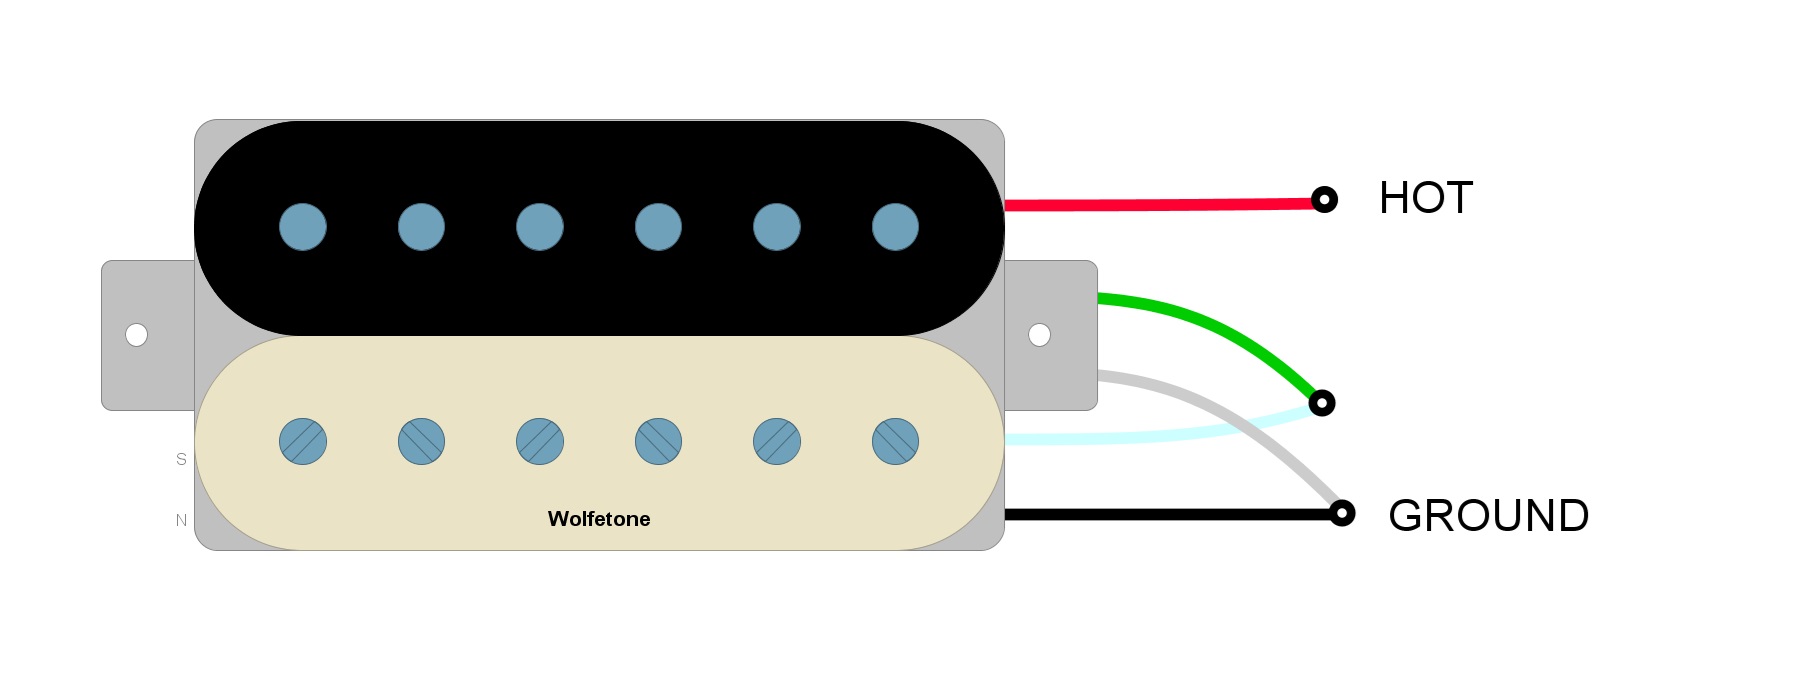
Wolfetone Wiring Code
- Red = Hot
- Green + white = soldered together and taped off
- Black + bare = soldered together and Ground
In Example 5, we illustrated the Wolfetone wiring code.
Example 5
Once you know the wiring code, you use the Hot and Ground to install it like you would any other two-wire pickup.
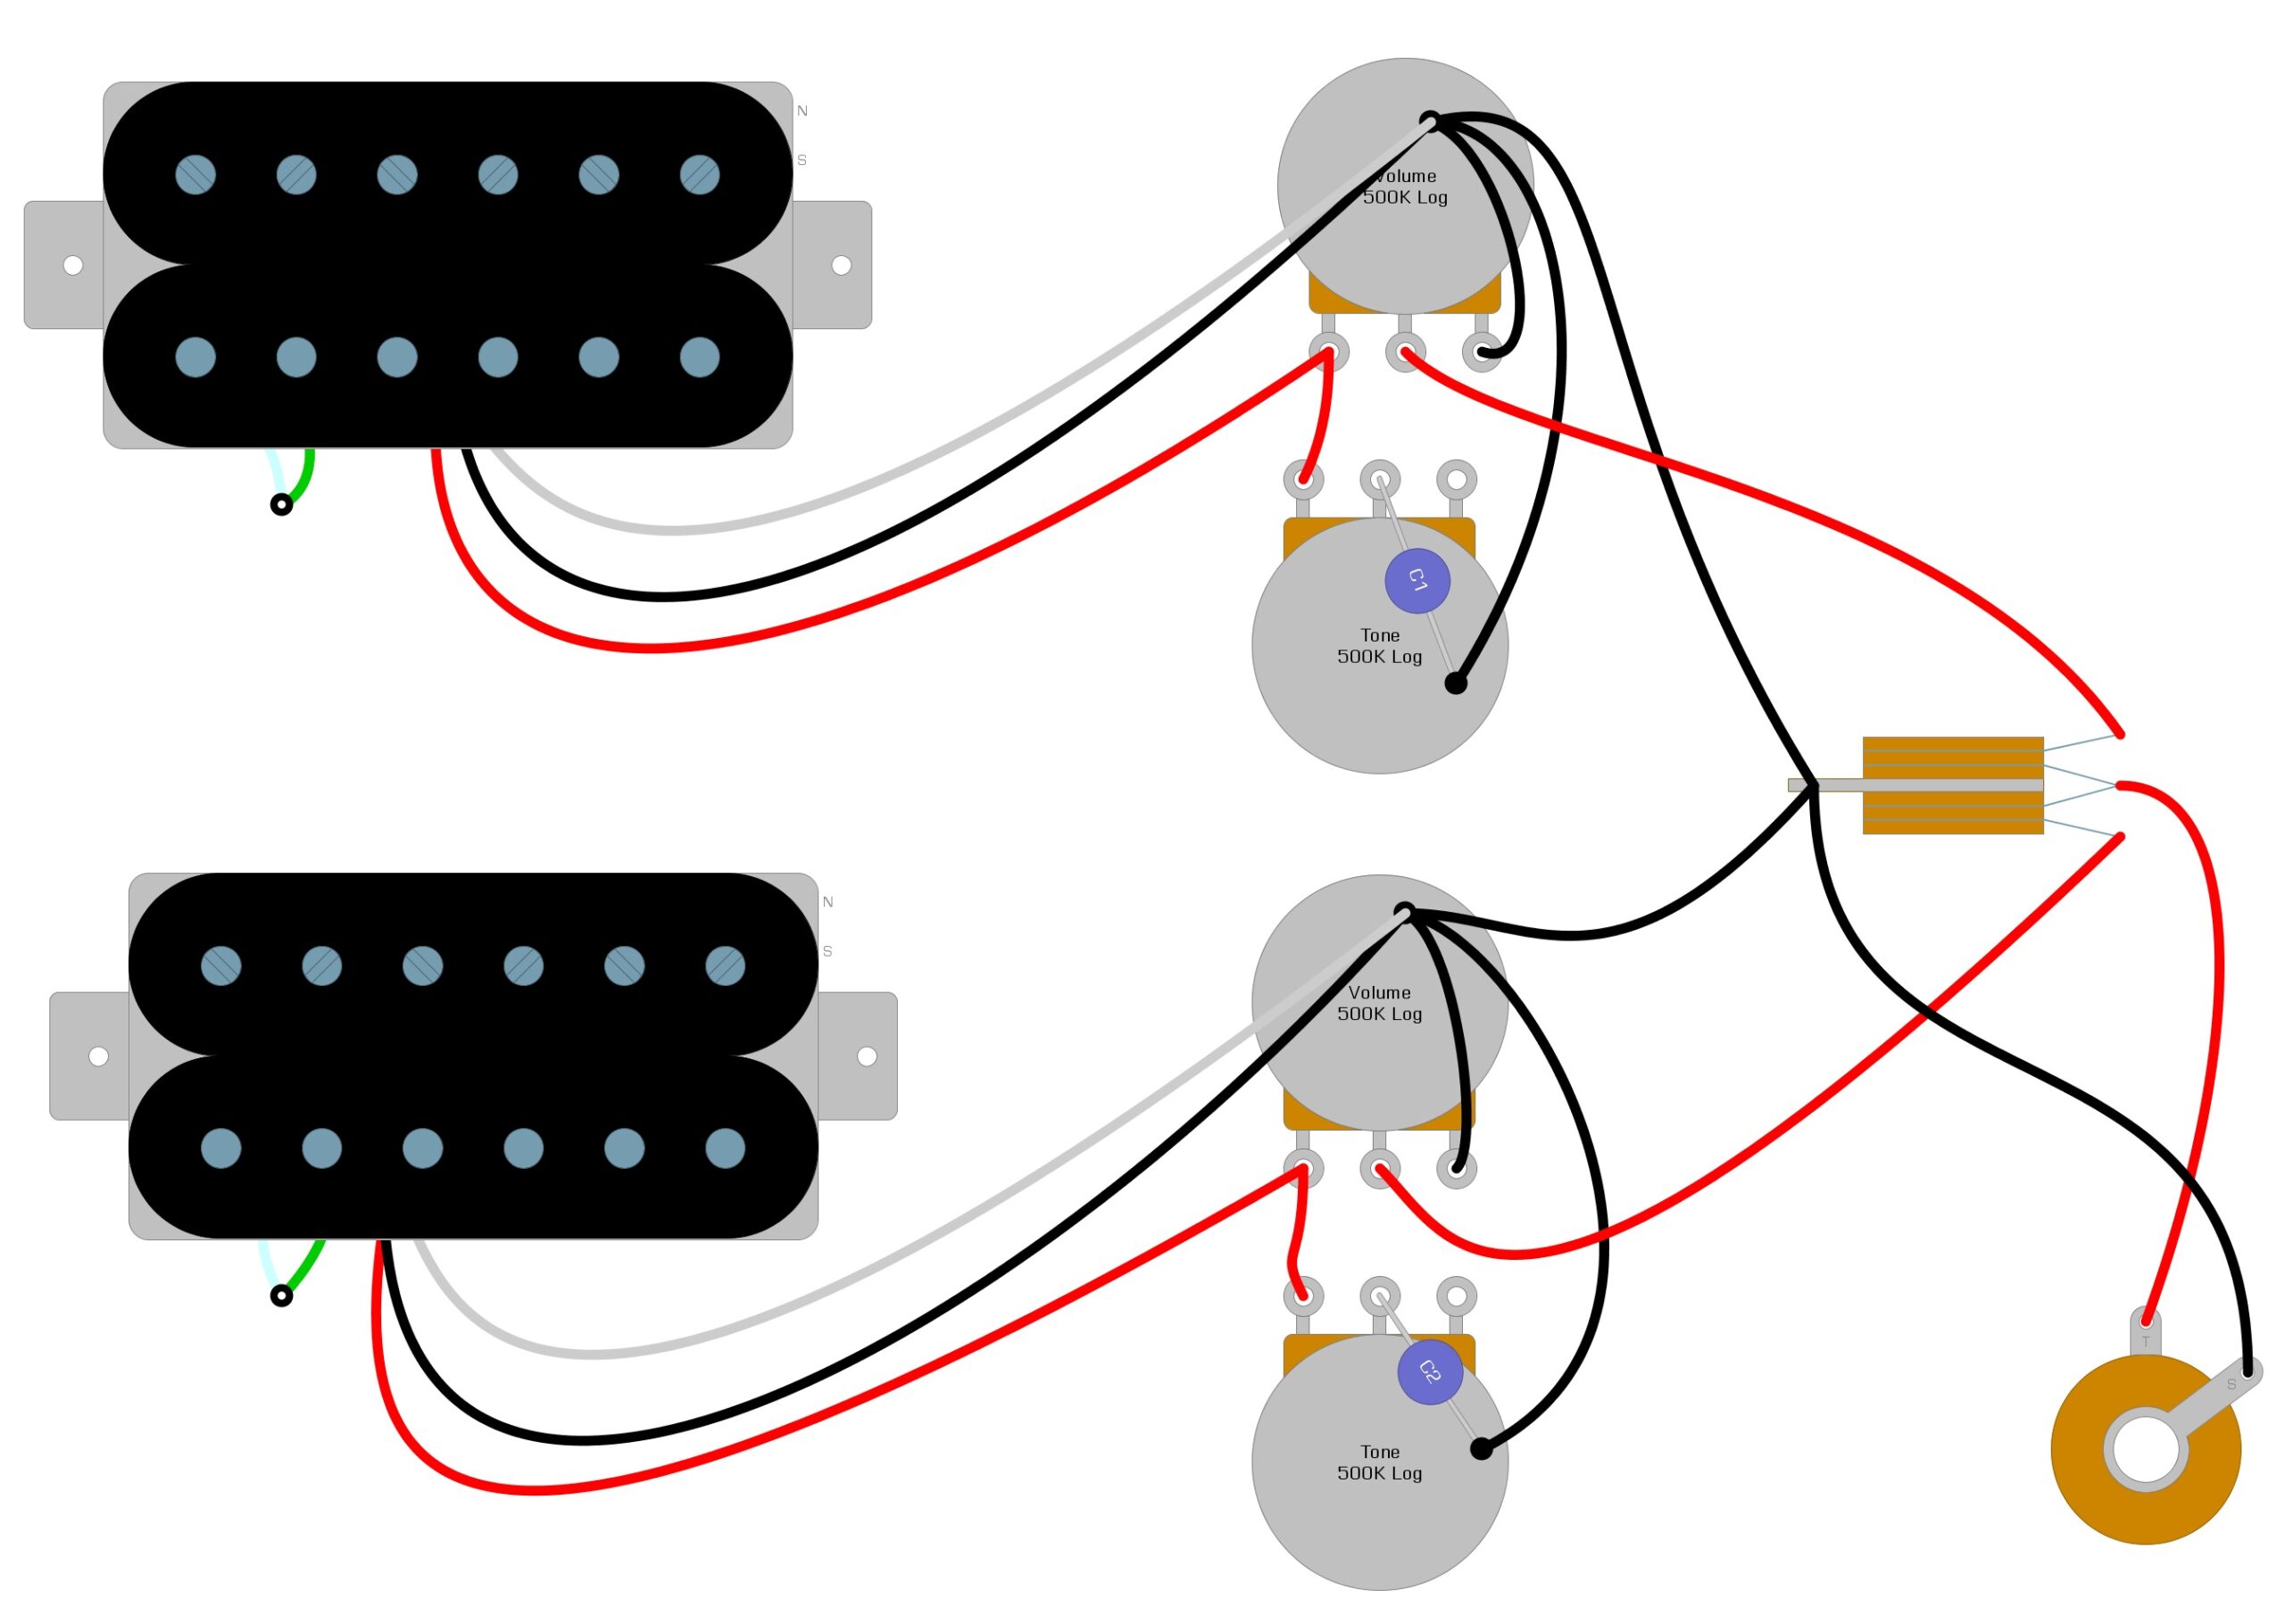
In Example 6, we’ve illustrated how to install the four-wire humbucker into a Gibson Les Paul. Notice how similar the wiring is to that of the P90.
Example 6
Humbucker Coil Splitting (4-Wires)
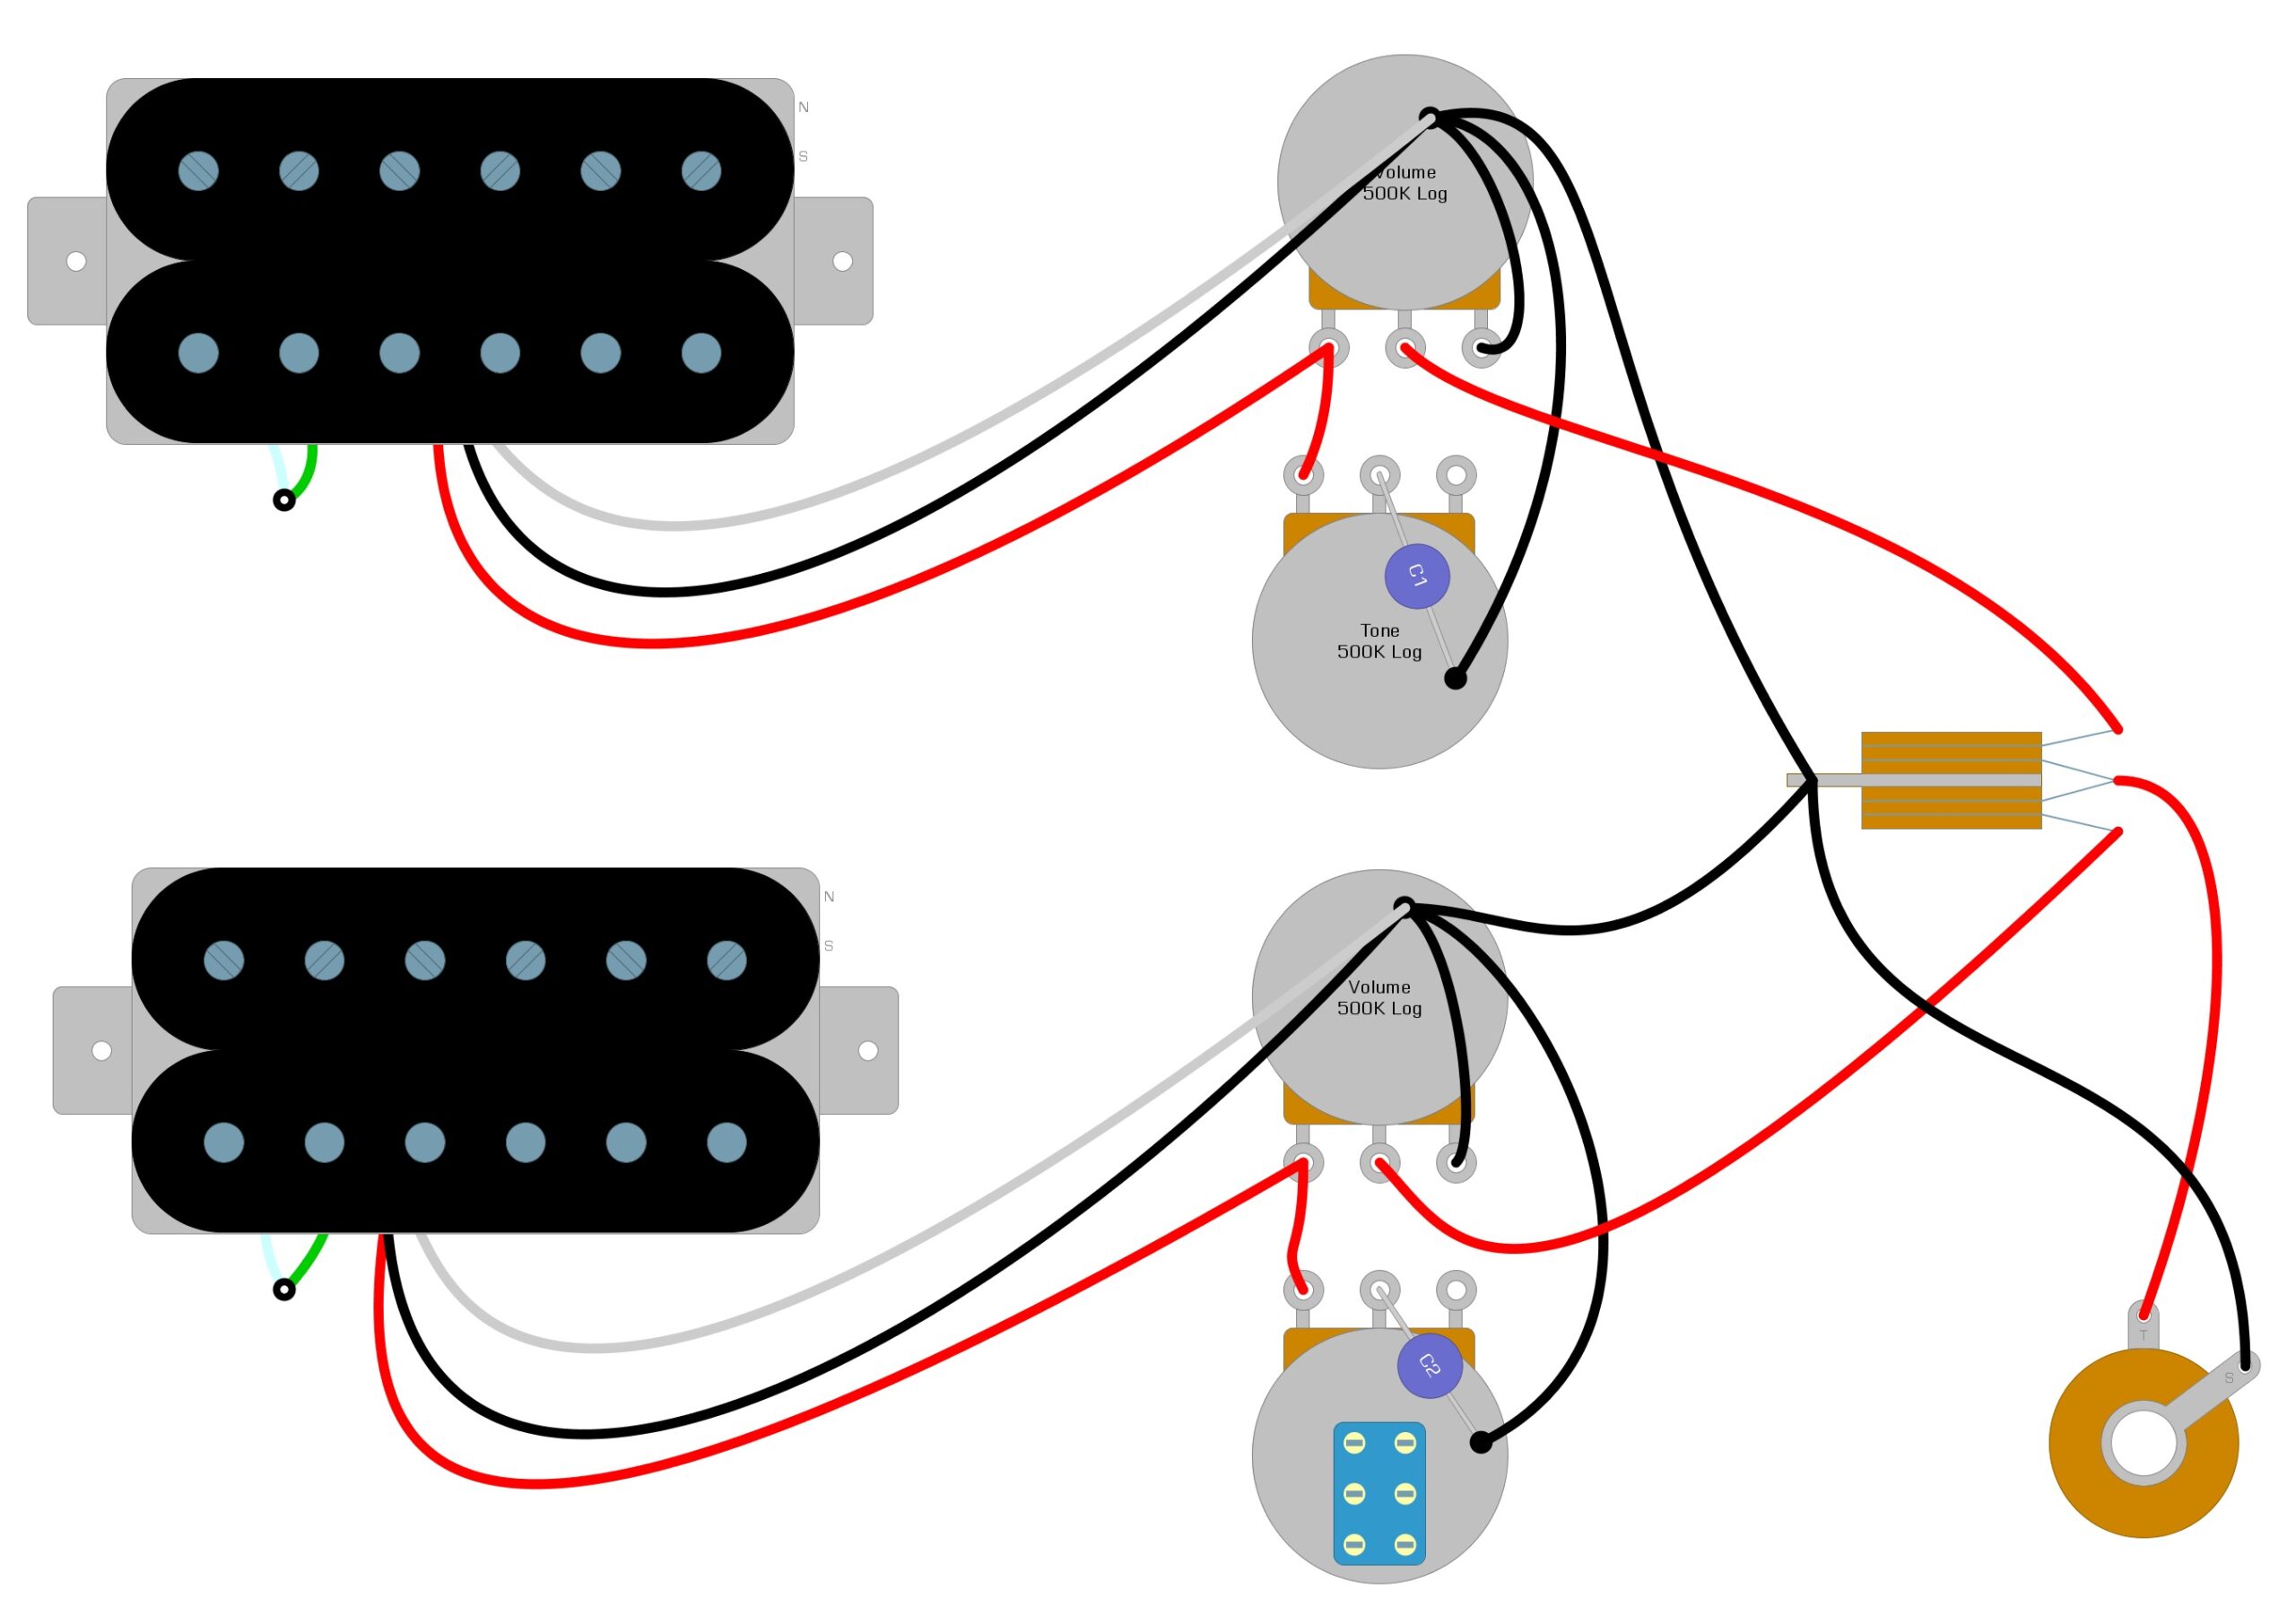
Even though the humbucker coil-splitting modification is not technically part of the Wolfetone Installation Guide, we thought it a good opportunity to show the power of the four-wire humbucker. This modification will require you to convert one of your tone controls to a push-pull pot, but you will solder your wires to it the same way as a standard pot. This gives your humbucker access to the sound of a single-coil.
In Example 7, we’ve illustrated what the guitar wiring might look like in a Les Paul after installing the push-pull pot.
Example 7
With the push-pull pot in place, we only need to connect the green and white wires we already have soldered together with the middle lug of the switch part of the push-pull pot. You will also need to add a ground wire from the bottom lug to the back of the tone control.
In Example 8, we illustrate these modifications.
Example 8
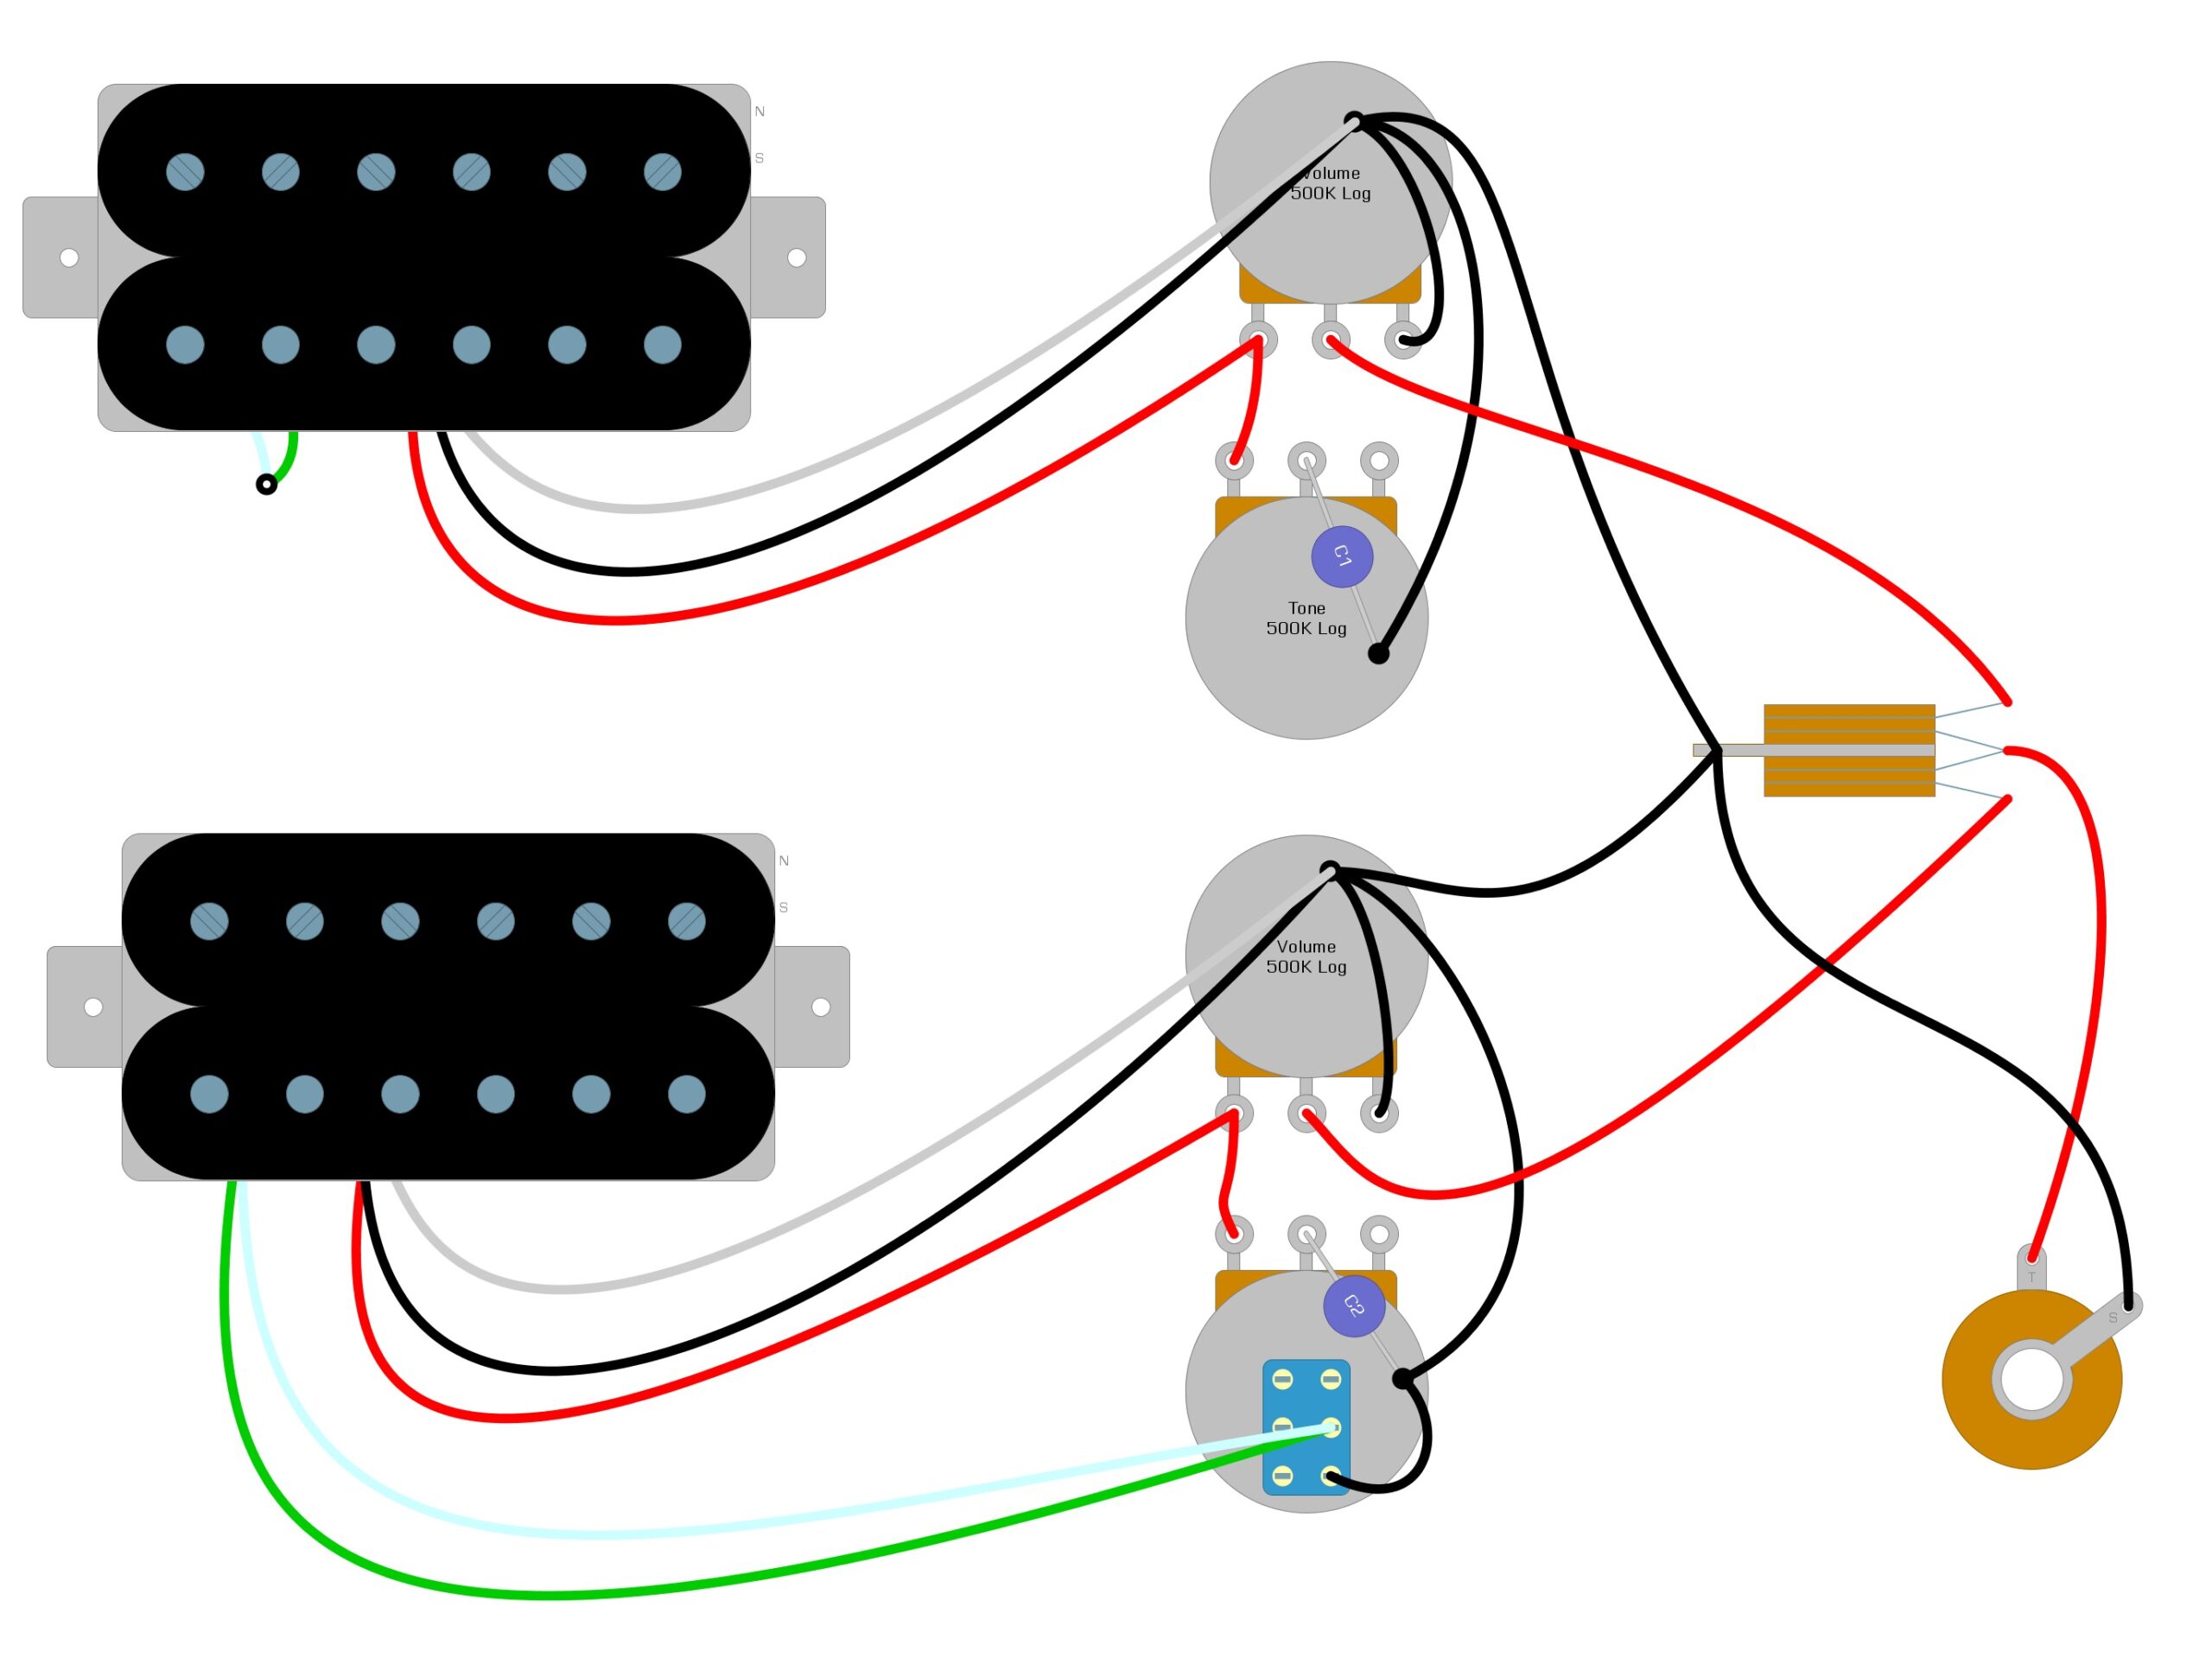
Pulling out the push-pull switch will engage the modification and split the pickup, and pushing it back in will disengage the modification, returning the pickup to normal.
Summary
When installing new pickups, it comes down to the Hot and the Ground. The Ground usually goes to the back of the volume pot, while the Hot will go to either the pickup selector switch or a lug on the volume pot. The most difficult pickup to install is the four-wire humbucker, because you need to know the wiring code, and they’re often different across brands. Fortunately, we know the code for Wolfetone pickups; otherwise we’d need to look it up or use a multimeter.
We hope you’ve enjoyed looking over these illustrations, and that they will help you get your pickups working. If you’ve found this guide helpful, please feel free to share this on Facebook and Twitter. For more articles on guitar electronics, visit humbuckersoup.com.


