By Ed Malaker
Posted 06/01/2018
Let’s take a look at how to wire a Les Paul three-way switch. While we’re at it, we’ll take a look at the rest of the circuit as well — the two humbuckers, the three-way switch, two Volume controls, two Tone controls, two capacitors, and the output jack.
 You might also like this HumbuckerSoup article: Stratocaster Five-Way Switch Wiring – Basic Guitar Electronics
Let’s Start with the Pickups
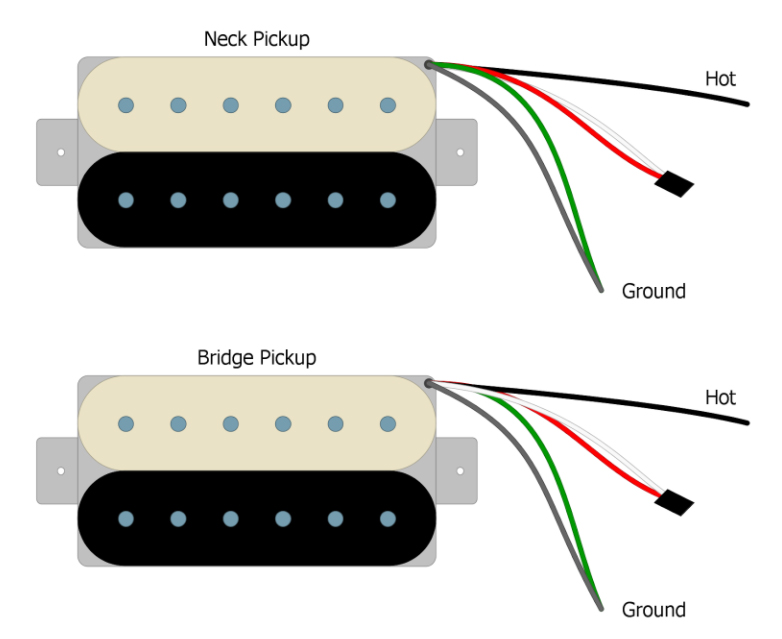
There are two humbucker pickups and we’ll wire both of them up the same way. Each pickup is going to have five wires: Bare, Green, White, Red, and Black. If you have different colors than the ones presented here, you might have to look up your specific pickups’ “Wiring Code.” The pickups have this many wires because the humbuckers are actually two single coil pickups and these wires give you access to each of the coils. This allows you to split the pickups or wire them in other unique ways. We’re just going to worry about the standard configuration in this guide.
Solder together the Red and the White wires and tape them off, then solder together the Green and the Bare wires. This is your ground wire. The Black wire is the Hot wire (Fig 1).
Figure 1
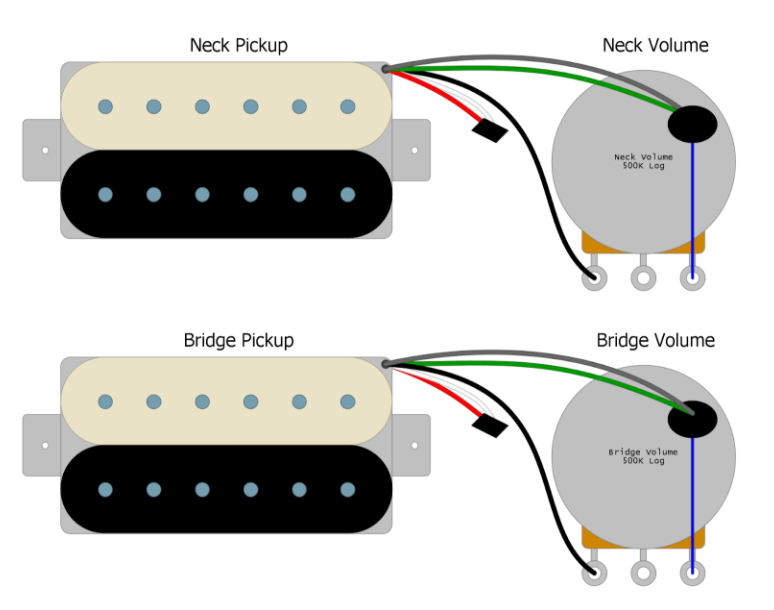
The Gibson Les Paul circuit gives each pickup its own Volume and Tone control, and now that we have the Hot and the Ground wire from each pickup we can wire them to the Volume control the same as we would a single coil pickup.
If you hold the Volume pot upside down with the tabs pointing down, we can number them 1, 2, and 3. Solder the Hot wire of the neck pickup to Tab 1 of the neck Volume control. Solder a wire from Tab 3 of the neck Volume control to the back of the neck Volume control. Solder the Ground wire from the neck pickup to the back of the neck Volume control. Do the same thing for the bridge pickup and the bridge Volume control (Fig 2).
Figure 2
 You might also like this HumbuckerSoup article: Telecaster Three-Way Switch Wiring
Wiring Up the Three-way Switch
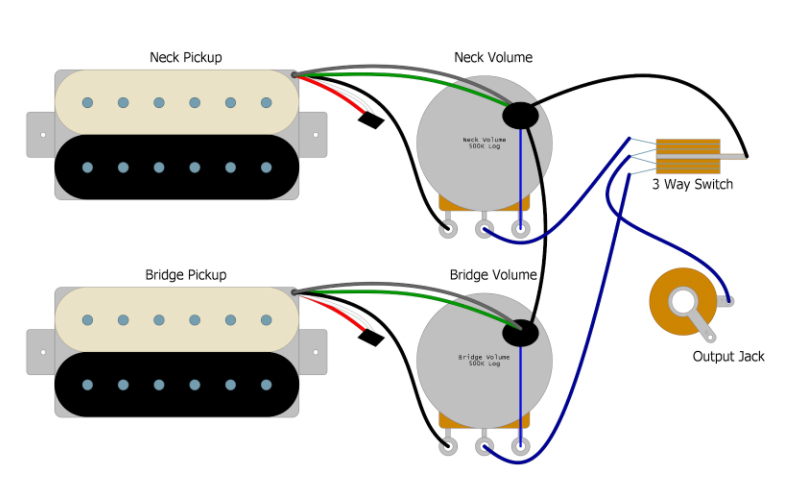
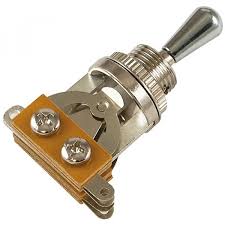
Look at the bottom of the Toggle switch and arrange it so there are three tabs on the left side and one tab on the right. We can number the tabs on the left from top to bottom: 1, 2, and 3. Solder a wire from Tab 2 of the neck Volume control to Tab 1 of the three-way switch, and solder a wire from Tab 2 of the bridge Volume control to Tab 3 of the three-way switch. Solder a wire from Tab 2 of the three-way switch to the tip tab of the Output Jack. We will leave the sleeve tab of the output jack alone for now. Solder a wire from the only tab on the right side of the three-way switch to the back of the neck Volume control (Fig 3).
Figure 3
Wiring the Tone controls
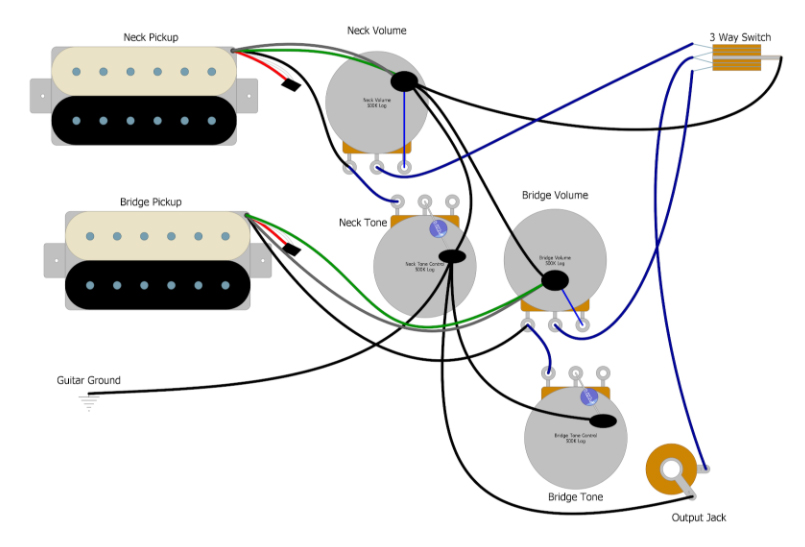
Solder a wire from Tab 1 of the neck Volume control to Tab 3 of the neck Tone control. Then, solder the capacitor from Tab 2 of the neck Tone control to the back of the neck Tone control.
Do the same for the bridge Volume and Tone controls. Solder a wire from the back of the bridge Tone control to the back of the neck Tone control. Solder a wire from the back of the neck Tone control to the back of the Volume Tone control.
Solder the main Ground wire from the bridge of the guitar to the back of the neck Tone control. Finally, solder a wire from the sleeve of the output jack to the back of the neck Tone control (Fig 4).
Figure 4
This last diagram might look pretty complex, but if you follow the above steps, you’ll find it to be a pretty easy process. If you’re using a Les Paul-style guitar that is not made by Gibson, changing the other components for higher quality ones can improve your tone quite a bit.
https://www.youtube.com/watch?v=F0D4a7Ea8uQ

