By Ed Malaker
Posted 09/14/2019
What’s better for your Fender, a 3 Way Switch or a 5 Way Switch? This is a topic that can be confusing to many people, so let’s start with some background information.
The 3 Way Switch
The 3 Way Switch is the switch initially used in Stratocasters when they were introduced in 1954. The Stratocaster featured three pickups, and the three-position switch allowed the player to select one at a time.
Guitarists quickly learned to wedge a piece of cardboard from a pack of matches or a cigarette pack into the switch between positions to turn on two pickups at once.
The 5 Way Switch
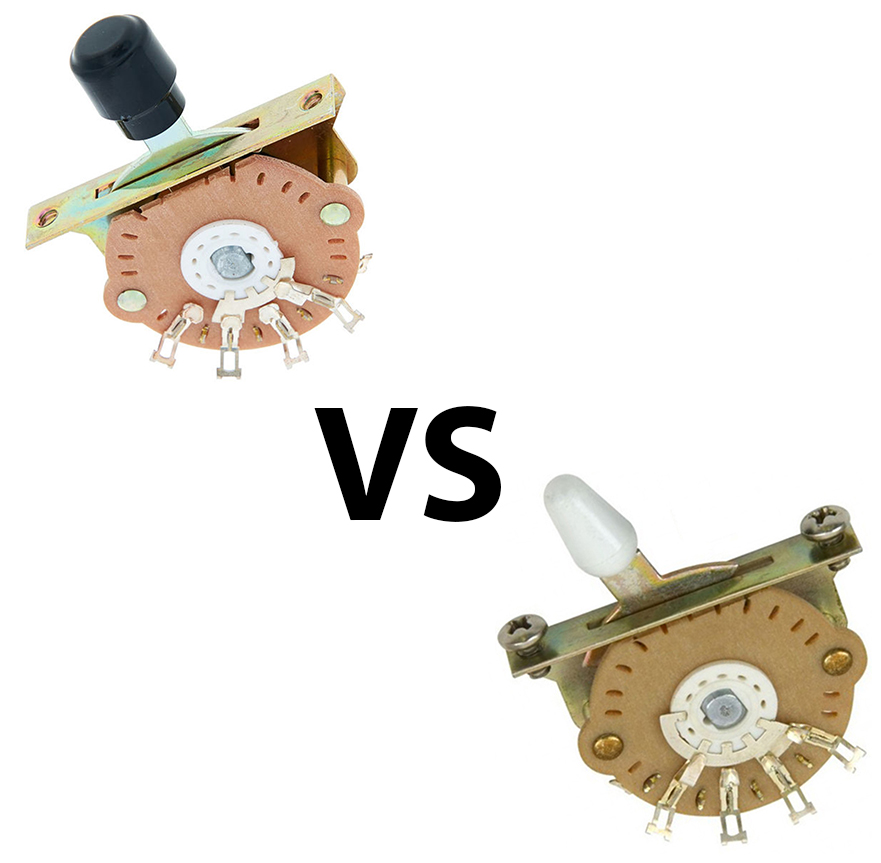
In 1977, Fender introduced the 5 Way Switch with detents in place at the second and fourth position and guitarists no longer needed cardboard wedges. Other than these detents, there is no difference between the two switches. Both switches look like Fig 1.
Fig 1
3 Way Switch vs 5 Way Switch — Internal Structure
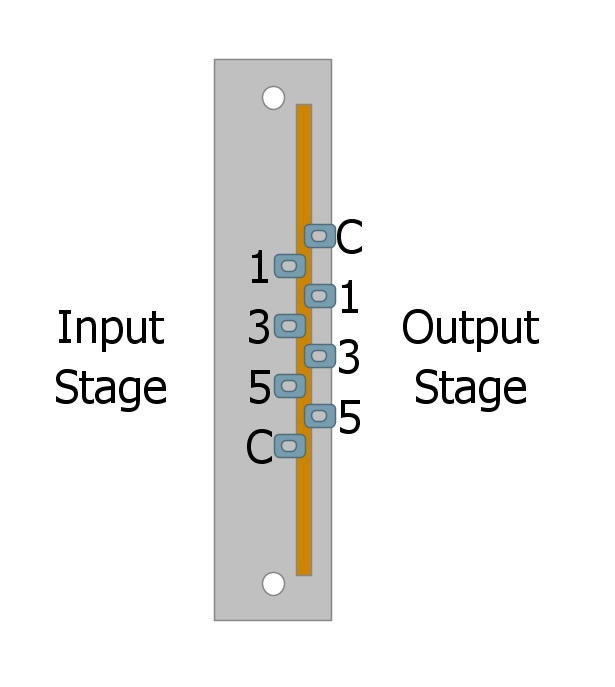
Modern switches have two sides, and each is called a stage. The left side is considered to be the input stage, while the right side is the output stage. Vintage switches only had one and looked very different, but functioned the same internally.
Each stage has four lugs, of which three are singles (1,3, and 5) and one is common (C). That means that the 1, 3, or 5 will connect to the common (C).
It might be easiest to compare the switch to a railroad. On the input side, the train will come from the one, three, or five, and leave through the common. On the output side, the train will begin from common and exit through the one, three, or five.
Fig 2
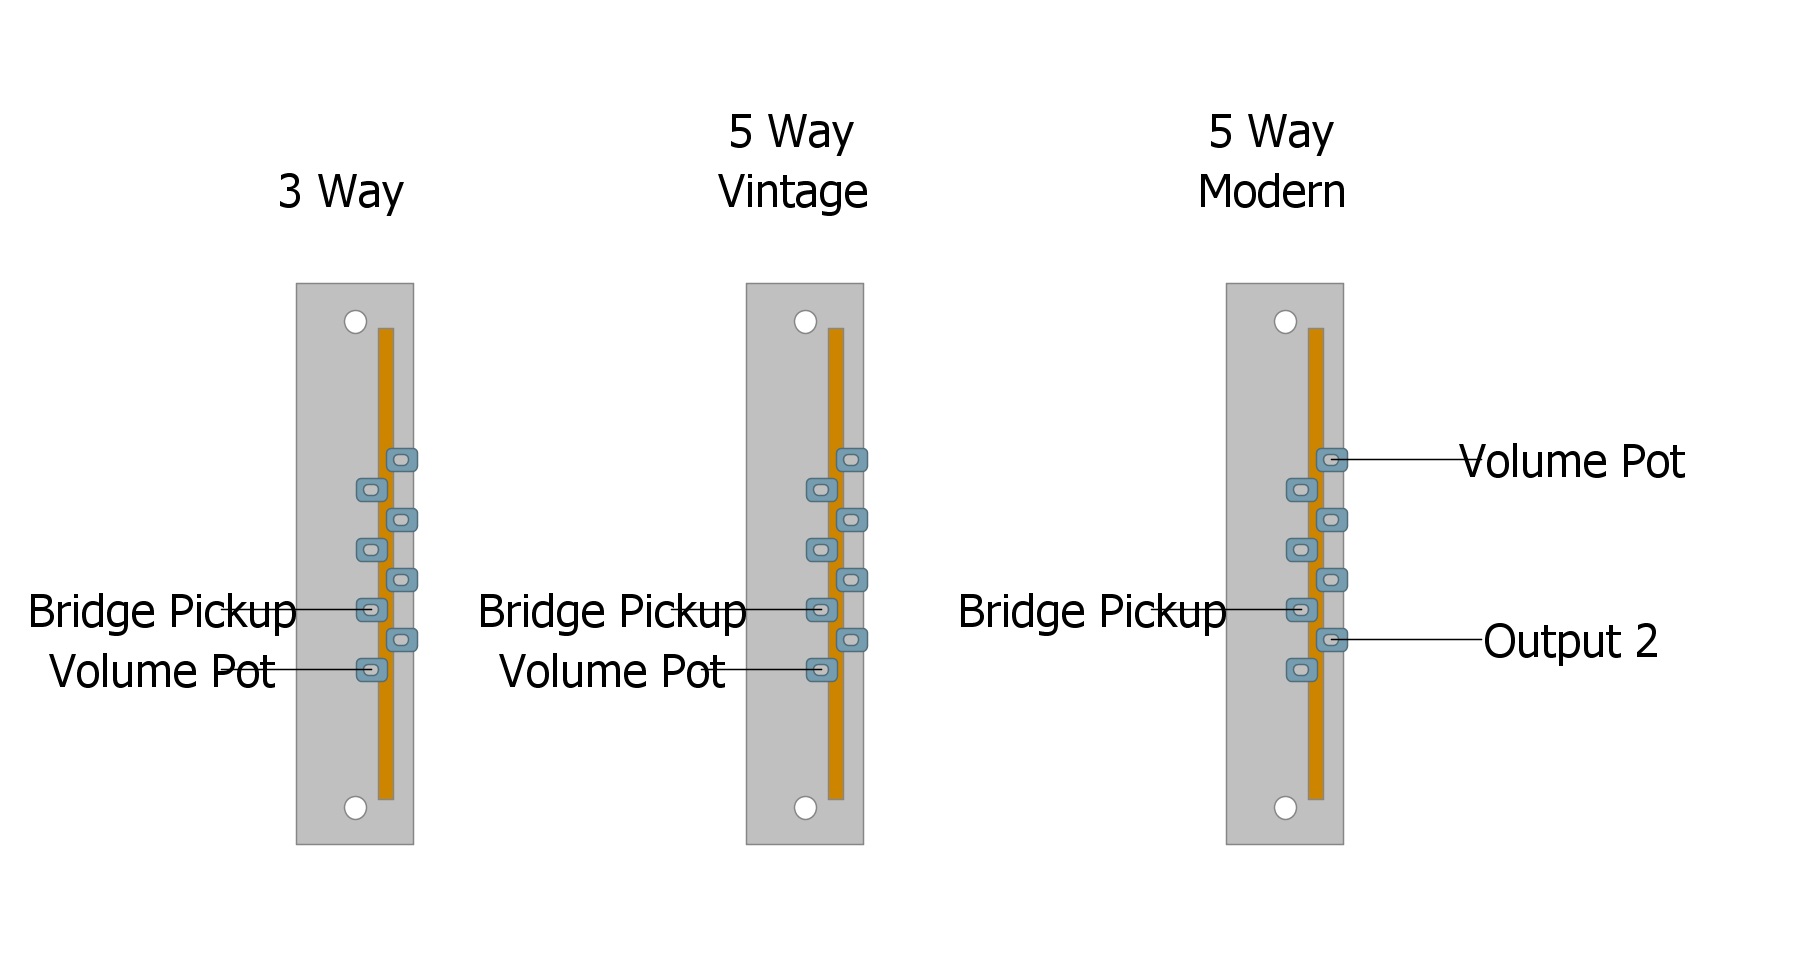
3 Way Switch vs 5 Way Switch — Input-Output Sides
Let’s look at the difference between the input side and the output.
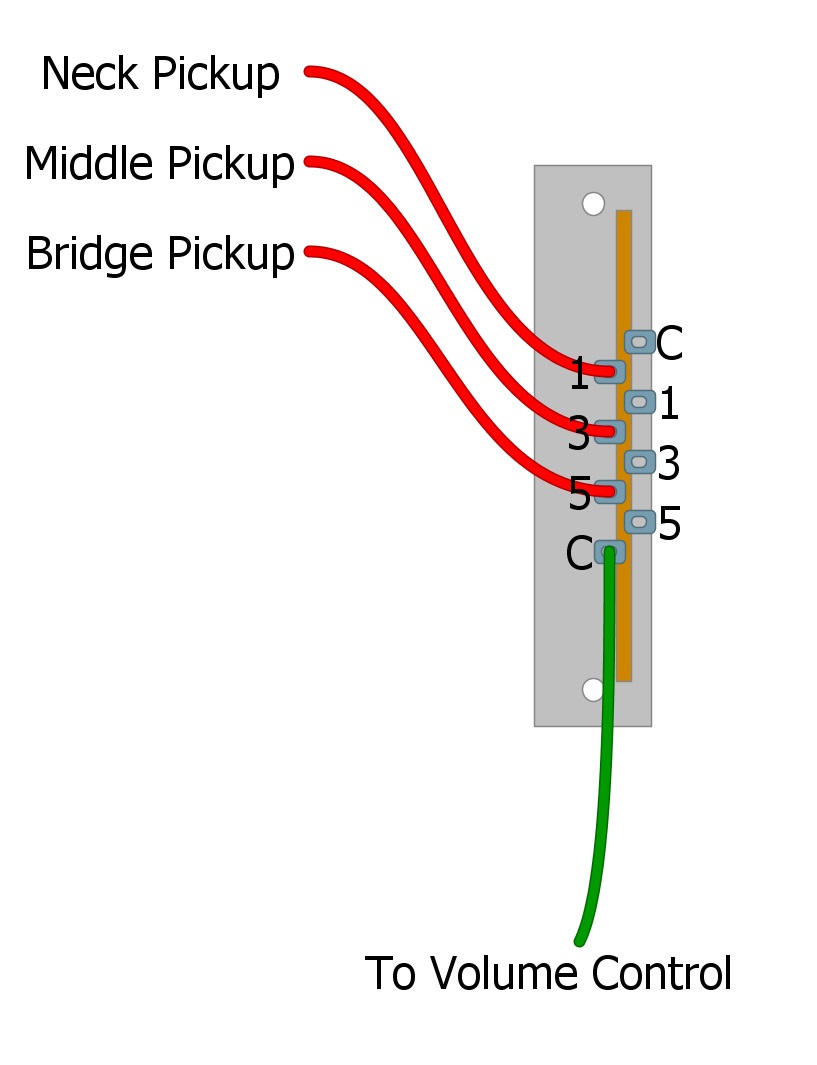
Vintage 3 Way Strat Wiring
We wire the Fender Stratocaster using the input side. The neck pickup goes to one, the middle to three, and the bridge to five of the input side. In vintage guitars, we would solder a wire from common to the volume control.
Fig 3
Modern 5 Way Strat Wiring
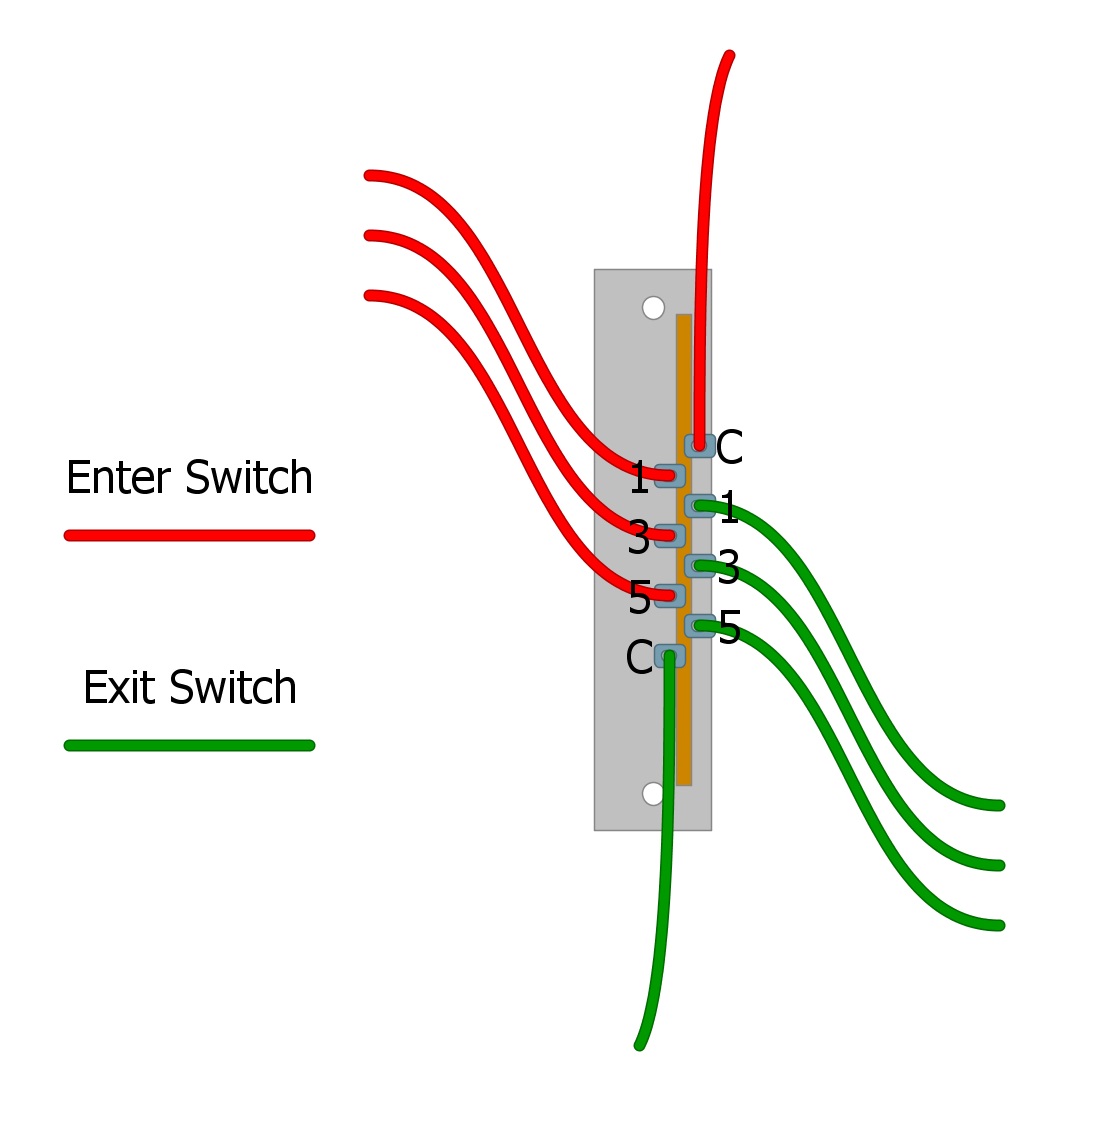
You can do vintage wiring using the modern 5 Way Switch, but you do not get to access the output stage if you do. Access the output stage by connecting the common on the input stage to the common on the output stage. Then solder a wire from the common on the output stage to the volume pot as seen in Fig 4.
Fig 4
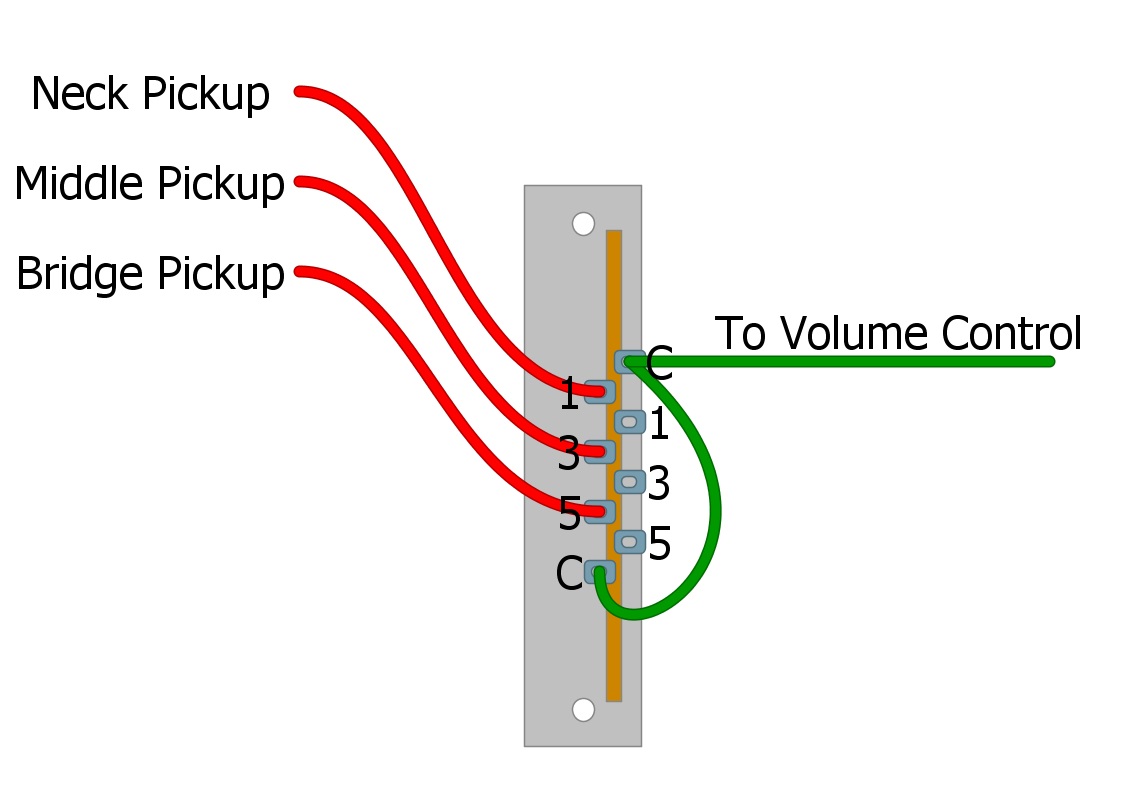
There is still one continuous wire that runs from the input common to the volume control, but now we have activated the output side. Let’s see what that means by looking at the different switch positions.
Positions for 3 Way, 5 Way Vintage Wired, and 5 Way Modern
Let’s take a look at which lugs are activated for each position on the switch.
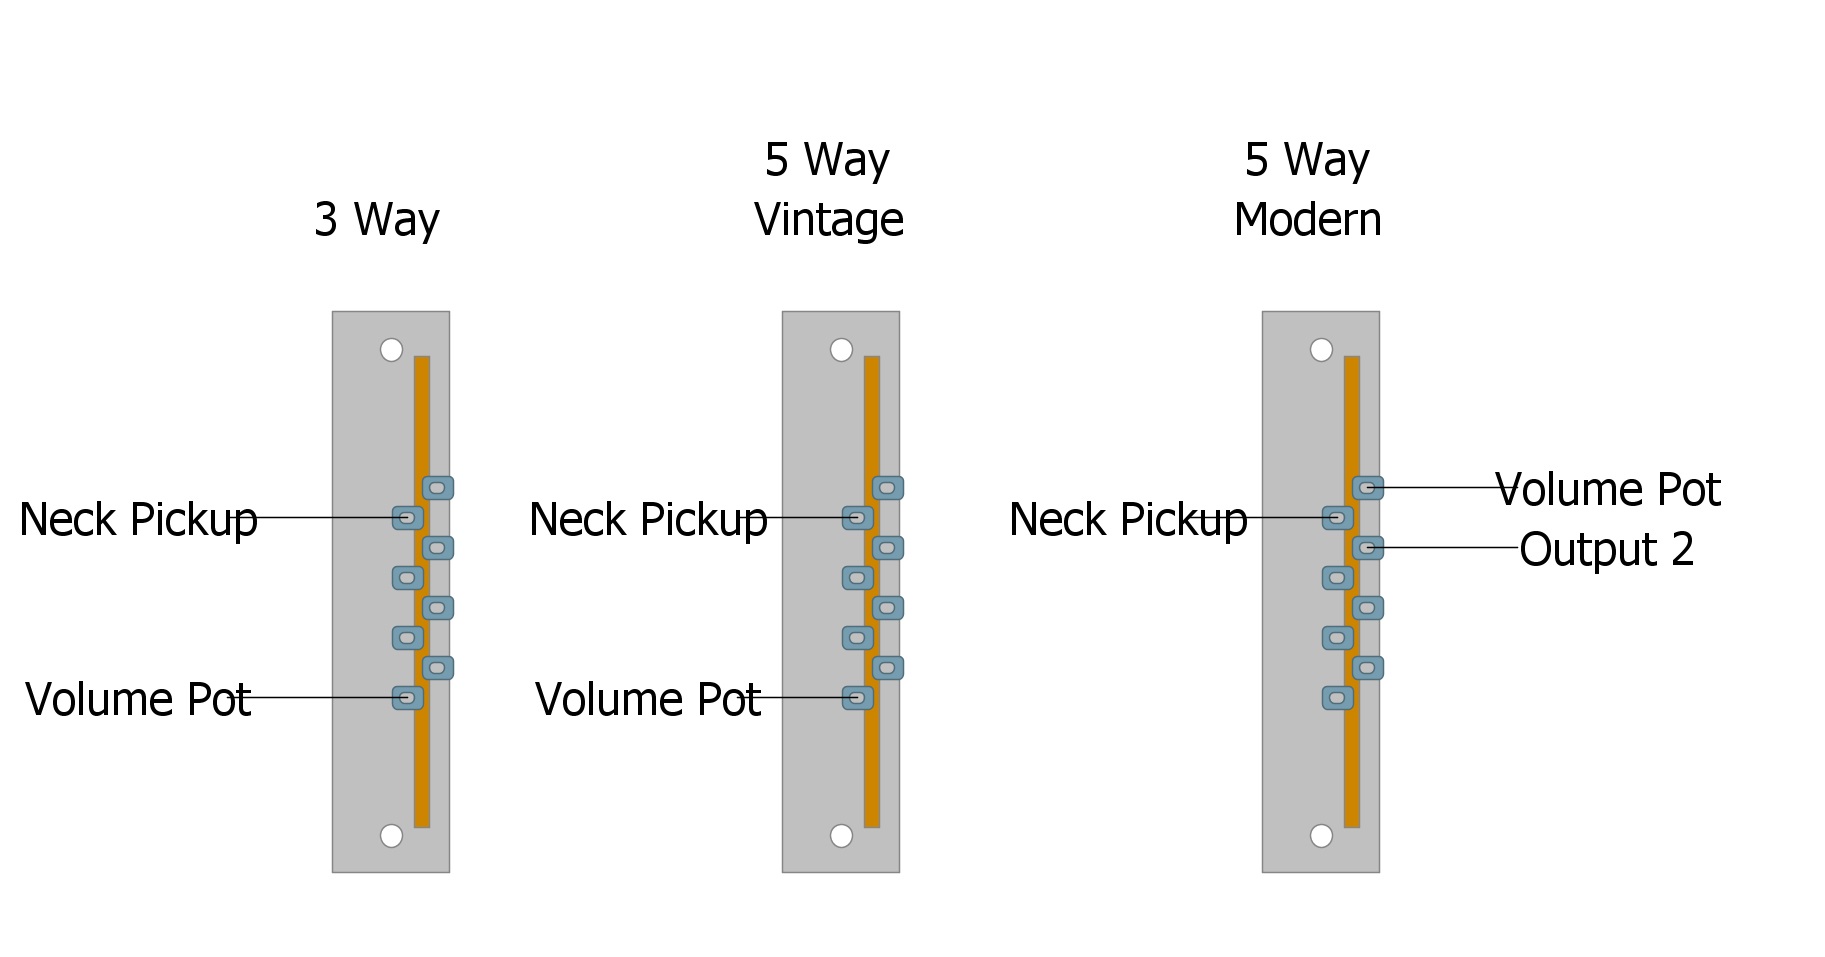
Position 1
We’ll call this the neck position, and it is selectable by all three types of switches. We can see in Fig 5 that we get one extra output on the modern 5 Way Switch at the One-lug of the output stage. The signal coming from the One-lug will be only the neck pickup.
Fig 5
Position 2
This is the neck and middle position, and it is not available on the 3 way switch without the cardboard trick. You can see by looking at Fig 6 that we get two extra outputs in this position with the modern 5 Way. In this position, the One-lug and the Three-lug output signal as well as the common. The sound coming from both lugs will be a combination of the neck and bridge pickup.
Fig 6

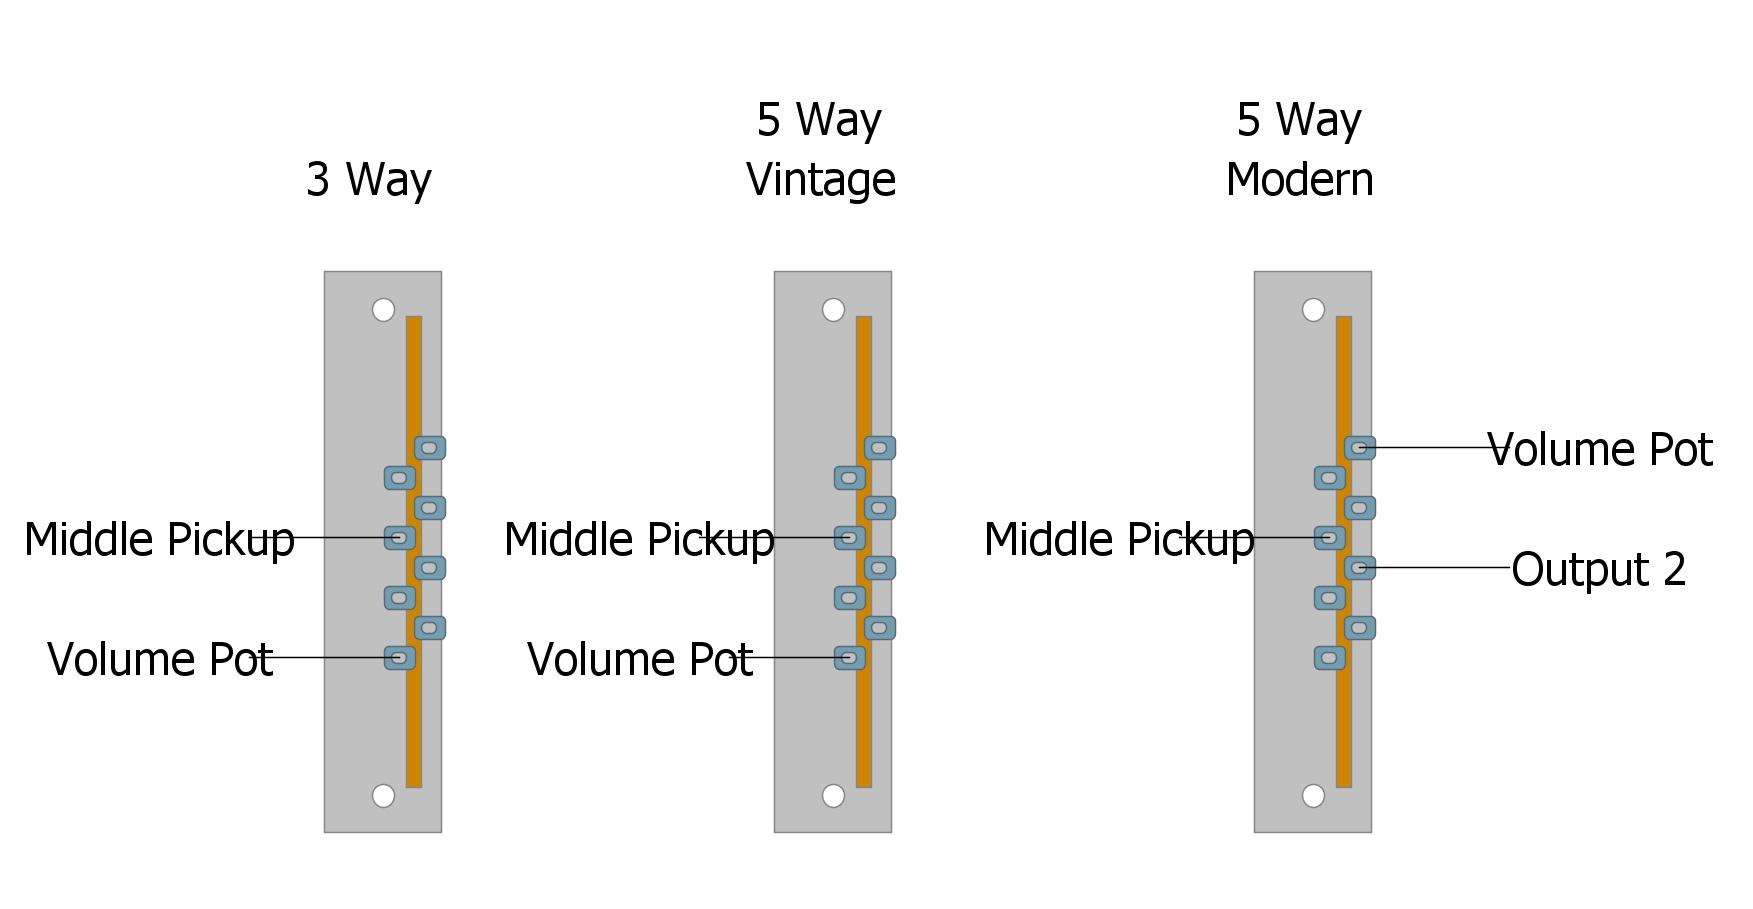
Position 3
The third position is the middle pickup by itself, and it is available with all three switches. You can see by looking at Fig 7 that we also get a single extra output at this position from the Three-lug on the output side of the 5 Way Switch. The One-lug is no longer active. The sound coming from this output is the middle pickup.
Fig 7
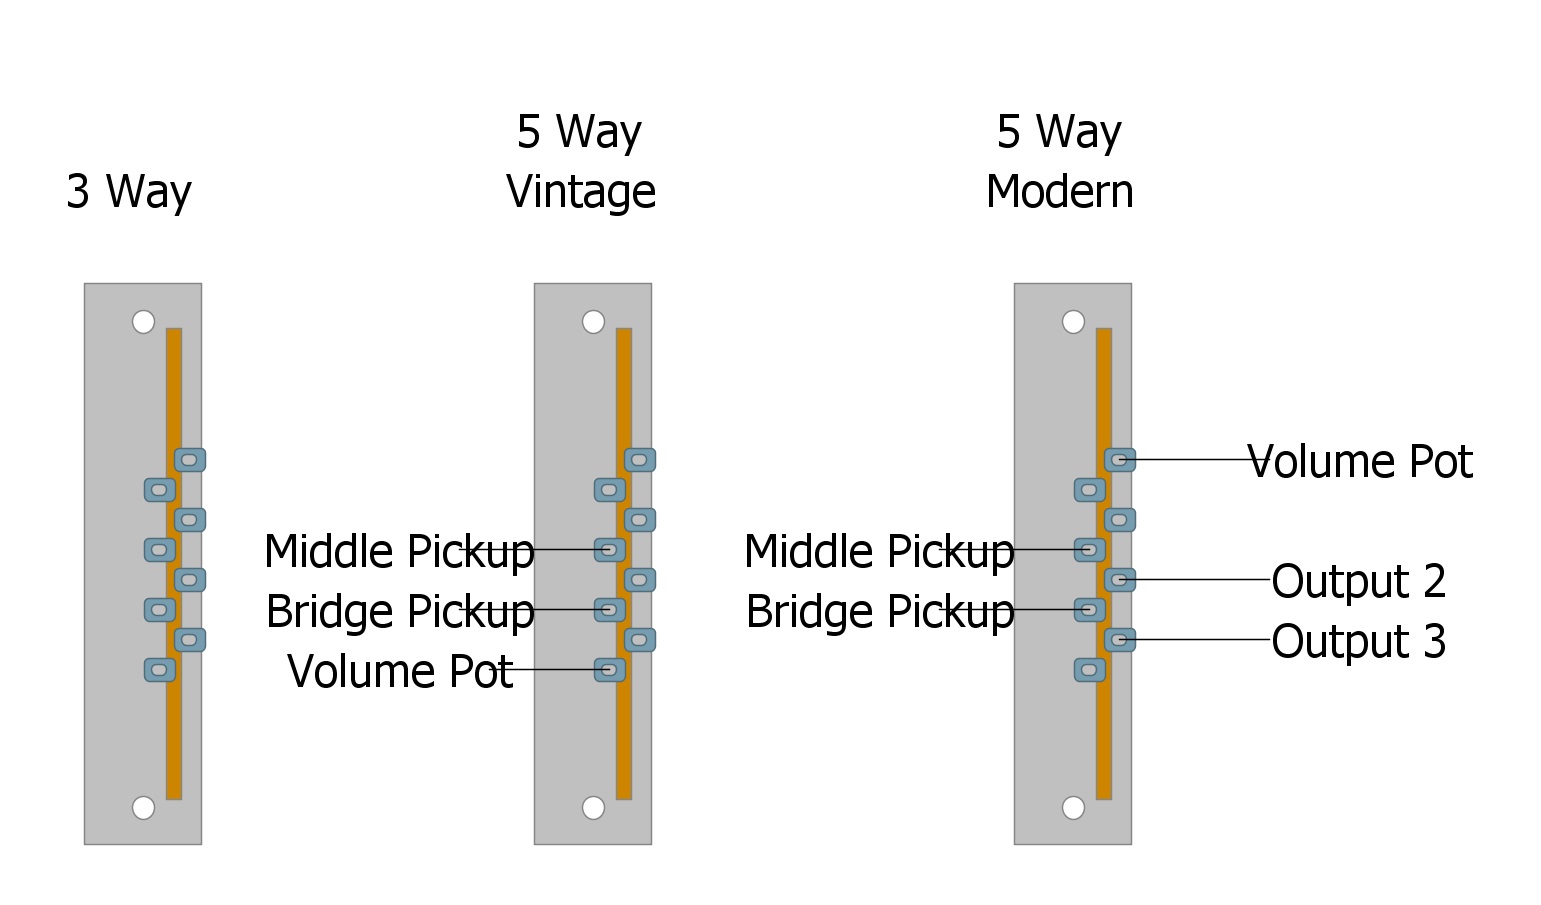
Position 4
The fourth position is the middle pickup combined with the bridge pickup, and as with the second position, it is not available with the 3 Way Switch. As we see in Fig 8, this position gives us two extra outputs if we use the modern 5 Way Switch. One output is from the Three-lug, and one is from the Five. The sound coming from both lugs will be a combination of the middle and bridge pickups.
Fig 8
Position 5
The fifth and final position is the bridge pickup. This selection is available with all three switches, and as we can see in Fig 9, we have one extra output coming from the Five-lug on modern switches.
Fig 9
Some Things to Keep in Mind
Modern 3 Way Switches also have the output stage, and they will have the same extra outputs that the modern 5 Way has on each available position.
The extra outputs only output a signal when those lugs are selected. The rest of the time they output no signal.
What Do We Do With These Extra Outputs?
We can use these extra outputs to help us complete several exciting modifications.
Fender has created the most popular way to use the extra outputs with its multiple tone controls on the Fender Stratocaster. The Fender Strat features one volume control and two tone controls. One tone control is for the neck pickup, and one is for the middle pickup. The bridge pickup has no tone control.
Let’s take a look at the Fender tone control circuit in Fig 10, and see how it works.
Fig 10
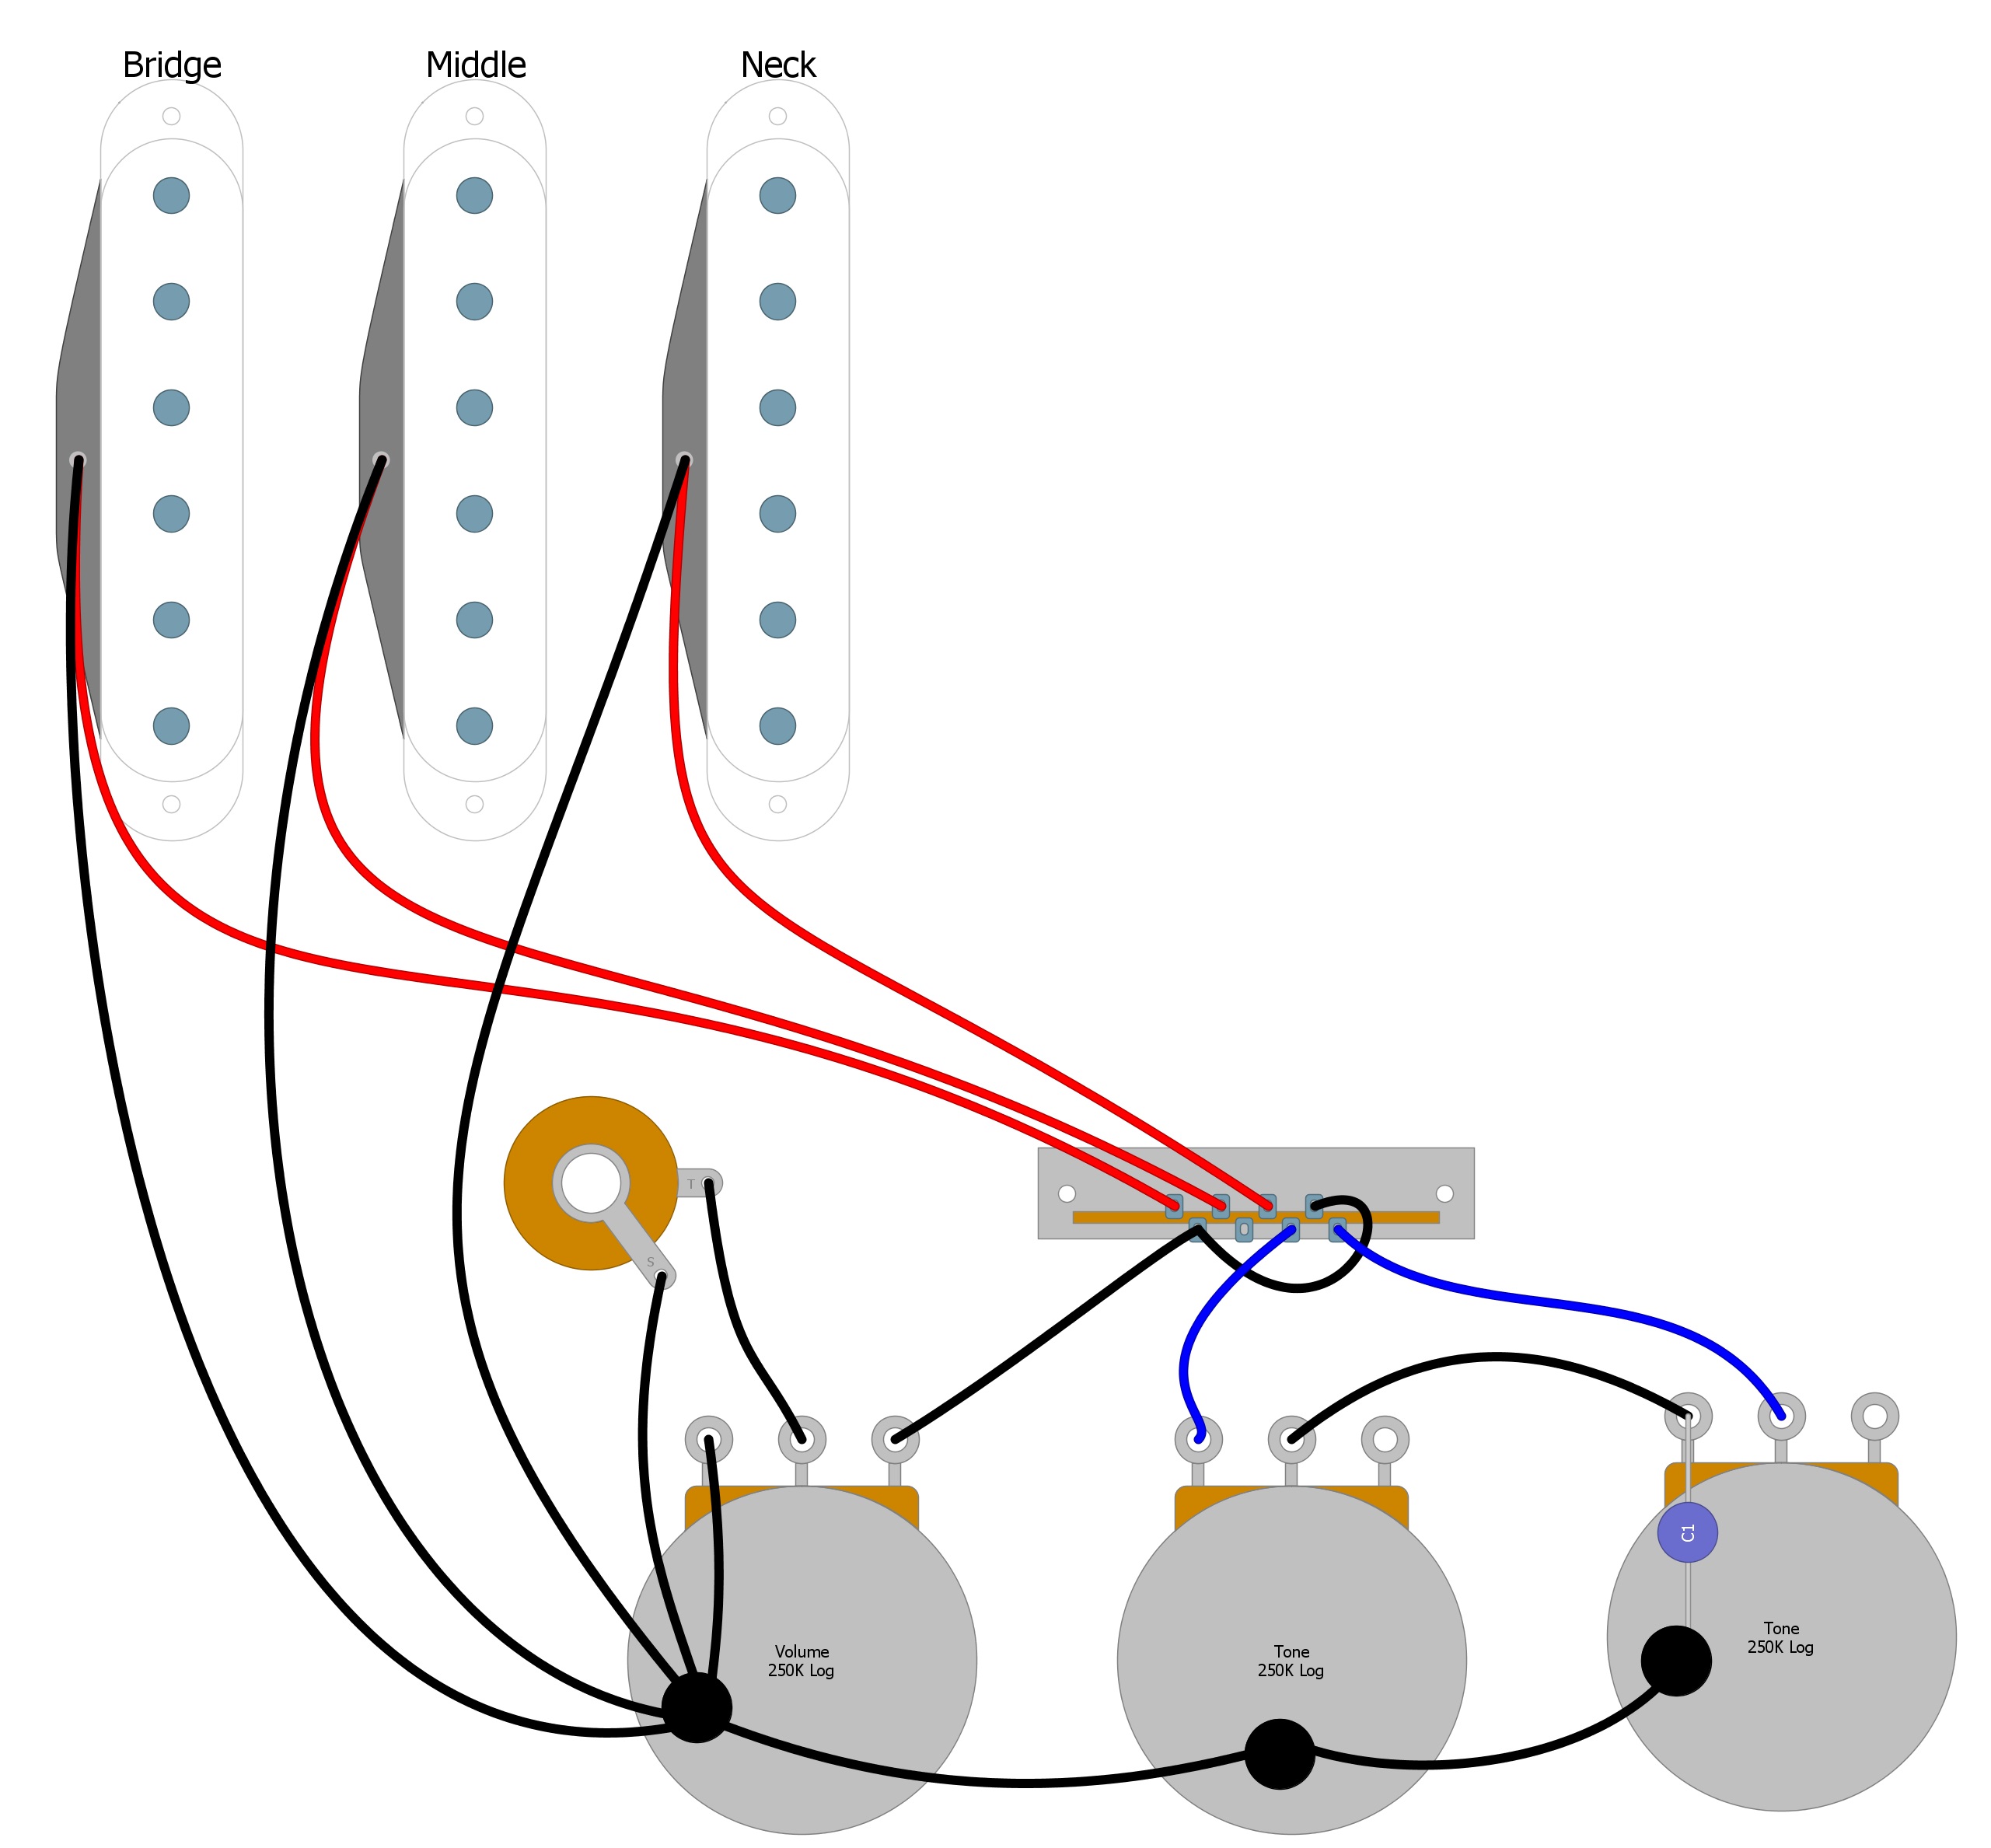
We can see by looking at Fig 10 that the first thing Fender does is flip the lugs for the neck and bridge pickups on the input side. Instead of the neck pickup going to the One-lug, it goes to the Five-lug. Instead of the bridge pickup going to the Five-lug, it goes to the One-lug. You can do this modification anytime you want to reverse how your switch works.
Fender takes it further though, and they use the output side to allow the neck and middle to have a separate tone control. Usually, a tone control would look like it does in Fig 11. With this circuit, any signal reaching the volume control also goes into the tone control. We can see in Fig 11 that a lug on the volume connects to a lug on the tone control.
Fig 11
If we go back to Fig 10, we can see that no lugs on the volume connect to any lugs on either tone control. Only the switch connects to lugs on the tone controls.
In the neck position, the Five-lug is active on the output side as we saw in Fig 9. We can see by looking at Fig 10 that this output is sent to tone control 1 and as you have probably guessed will allow you to change the tone of the neck pickup. Tone control 2 will not affect the sound.
In the neck and middle positions, the Three and Five lugs are active as we saw in Fig 8. We can see by looking at Fig 10 that the Three-lug goes to tone control 2 and the Five-lug is going to tone control 1. In this case, tone control 1 will affect the tone of the neck pickup while tone control two will change the sound of the middle pickup.
In the middle position, only the Three-lug is active on the output side, as we saw in Fig 7, and as we already know, the Three-lug is going to tone control 2. Tone control 2 will change the tone of the middle pickup, and tone control 1 will no longer have any effect on the sound.
In the middle and bridge positions, we know from Fig 6 that the One and Three lugs are active, but if we look at Fig 10, we can see we do not use the One-lug in this circuit. We are left with only tone control 2 to adjust the tone by changing the sound of the middle pickup.
In the bridge position, we can see in Fig 5 that only the One-lug is active, and if we look at Fig 10, we can see we do not use the One-lug. Therefore neither tone control will affect the tone of the bridge pickup.
Why Is There No Tone Control for the Bridge Pickup?
It’s hard to say exactly why there is no tone control for the bridge, especially when there is an extra output to power one, but it probably has something to do with these two reasons.
- The first reason is space. To add another tone control, you would need to add another potentiometer and drill another hole. You would then have four knobs, and three of them would be tone controls that only worked at certain times.
- The next reason might be to save high-end frequencies on the bridge pickup. It’s often desirable to get as much bite as possible from the bridge pickup to cut through the mix when playing rhythm. Any tone control circuit will immediately strip any pickup of some of its high end by nature of its design. By removing the tone control, you get a pure, single-coil pickup tone, unchanged by any components that retain its high frequencies.
A Simple Modification for Bridge Tone Control
For various reasons, you may want to have a tone control for the bridge pickup. You might feel that the stock pickup is too bright sounding, or some foot pedals might sound better if you could control the tone, or maybe you bought third party pickups that are too bright sounding.
There is a simple mod that you can do in one of two ways, to give you tone control for the bridge.
First Way
The first approach is often seen around the internet; it will work great, and it’s effortless to complete.
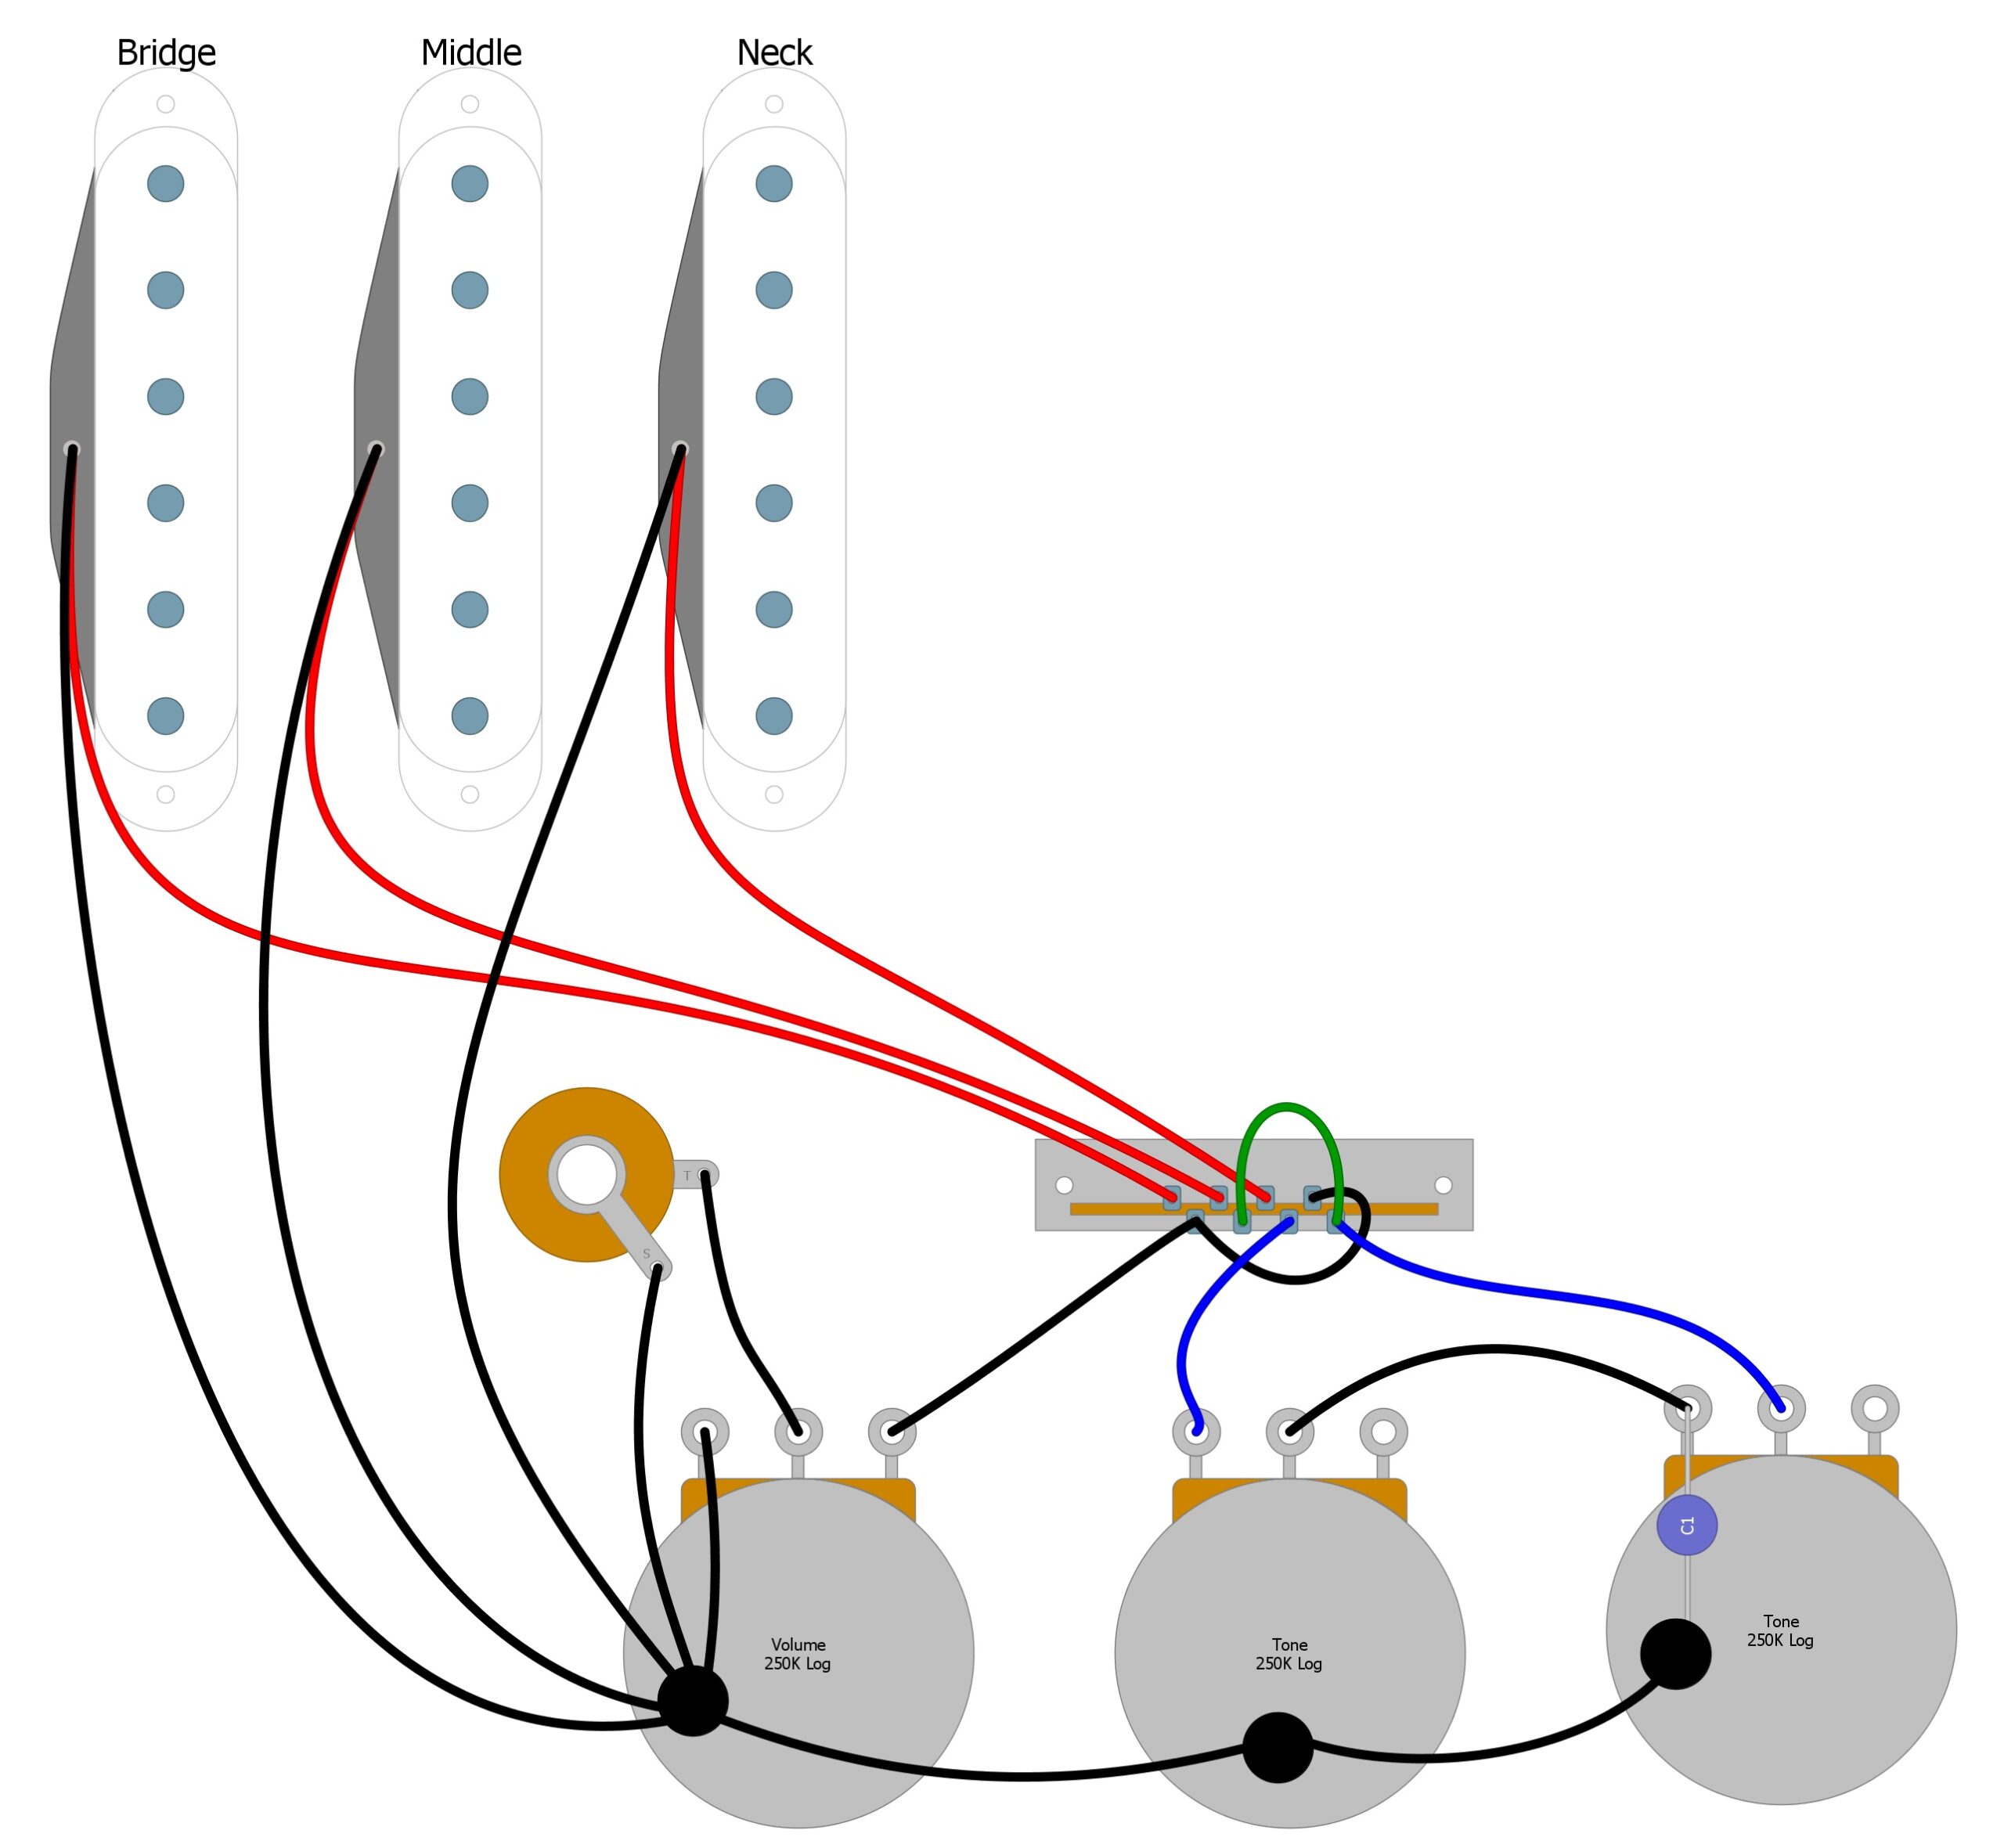
Add a wire (green in this example) that goes from the Three-lug to the One-lug on the output side of the switch. It should look like Fig 12. You could also run the wire from the One-lug right to tone control 2. It makes no difference.
Fig 12
This mod will activate tone control 2 for the bridge pickup. You can then use tone control 2 to adjust the tone for both the middle and bridge pickups.
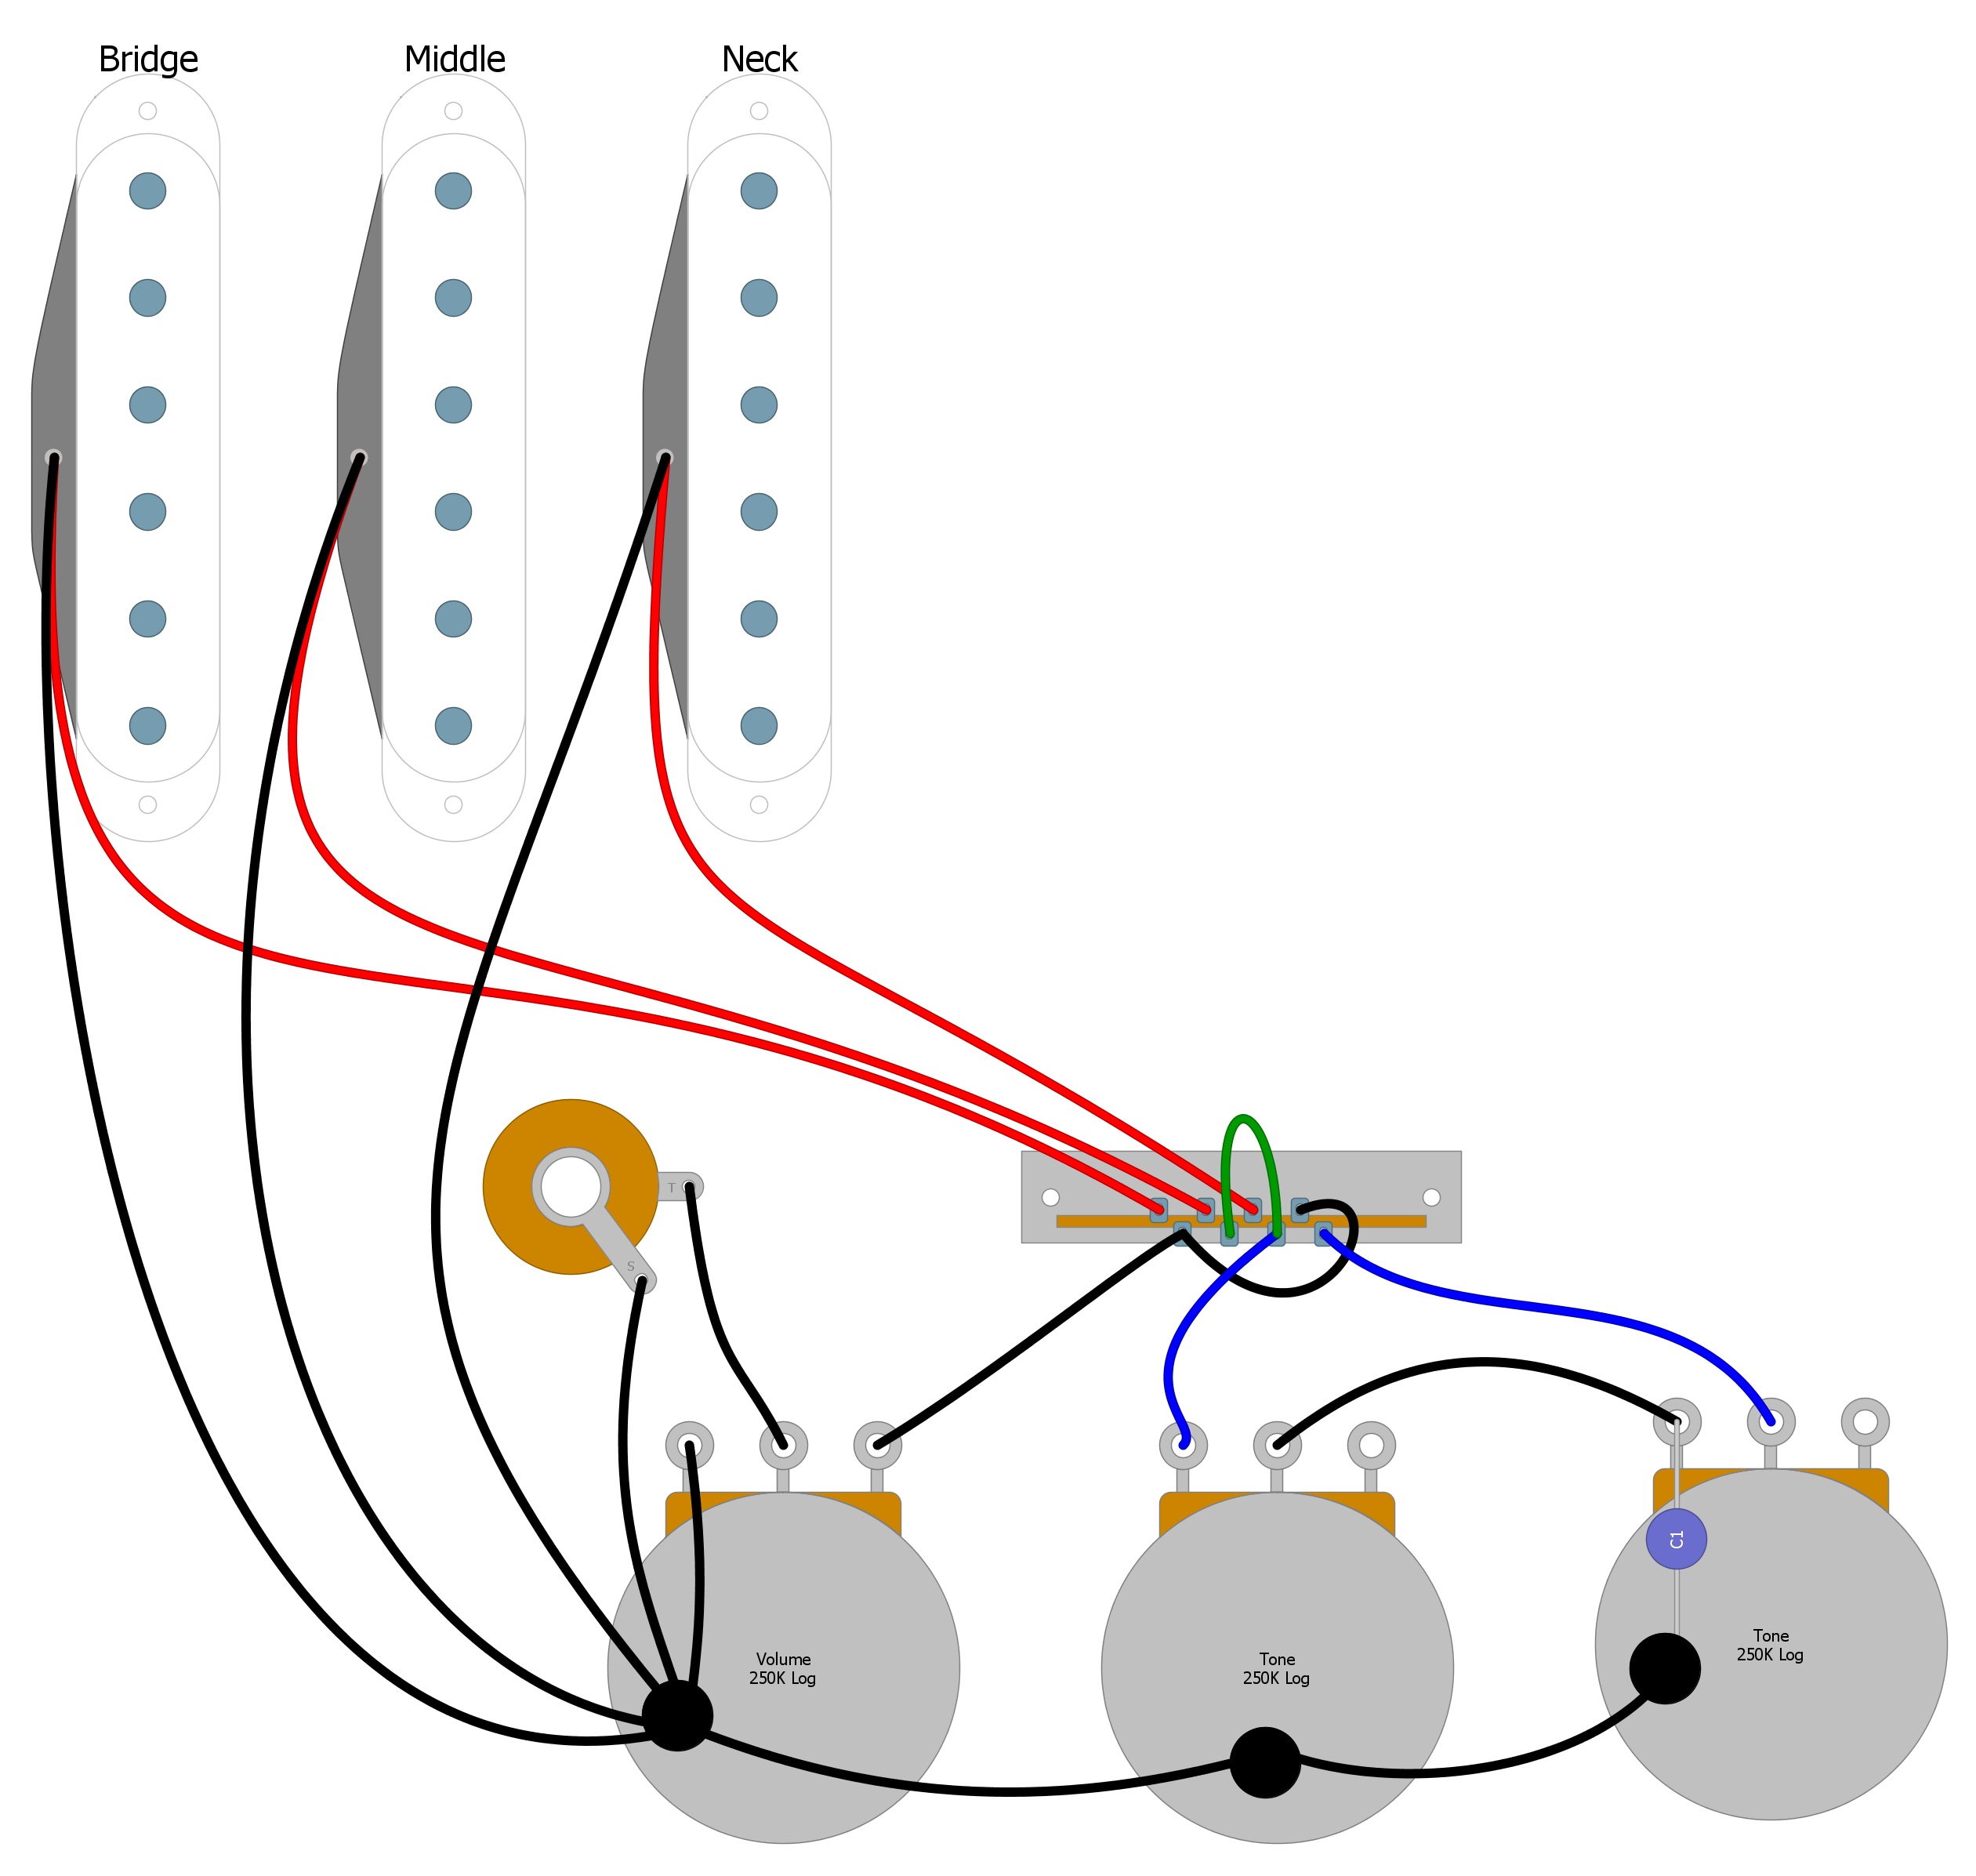
Second Way
The second way is the Humbucker Soup way, because I haven’t seen it anywhere else.
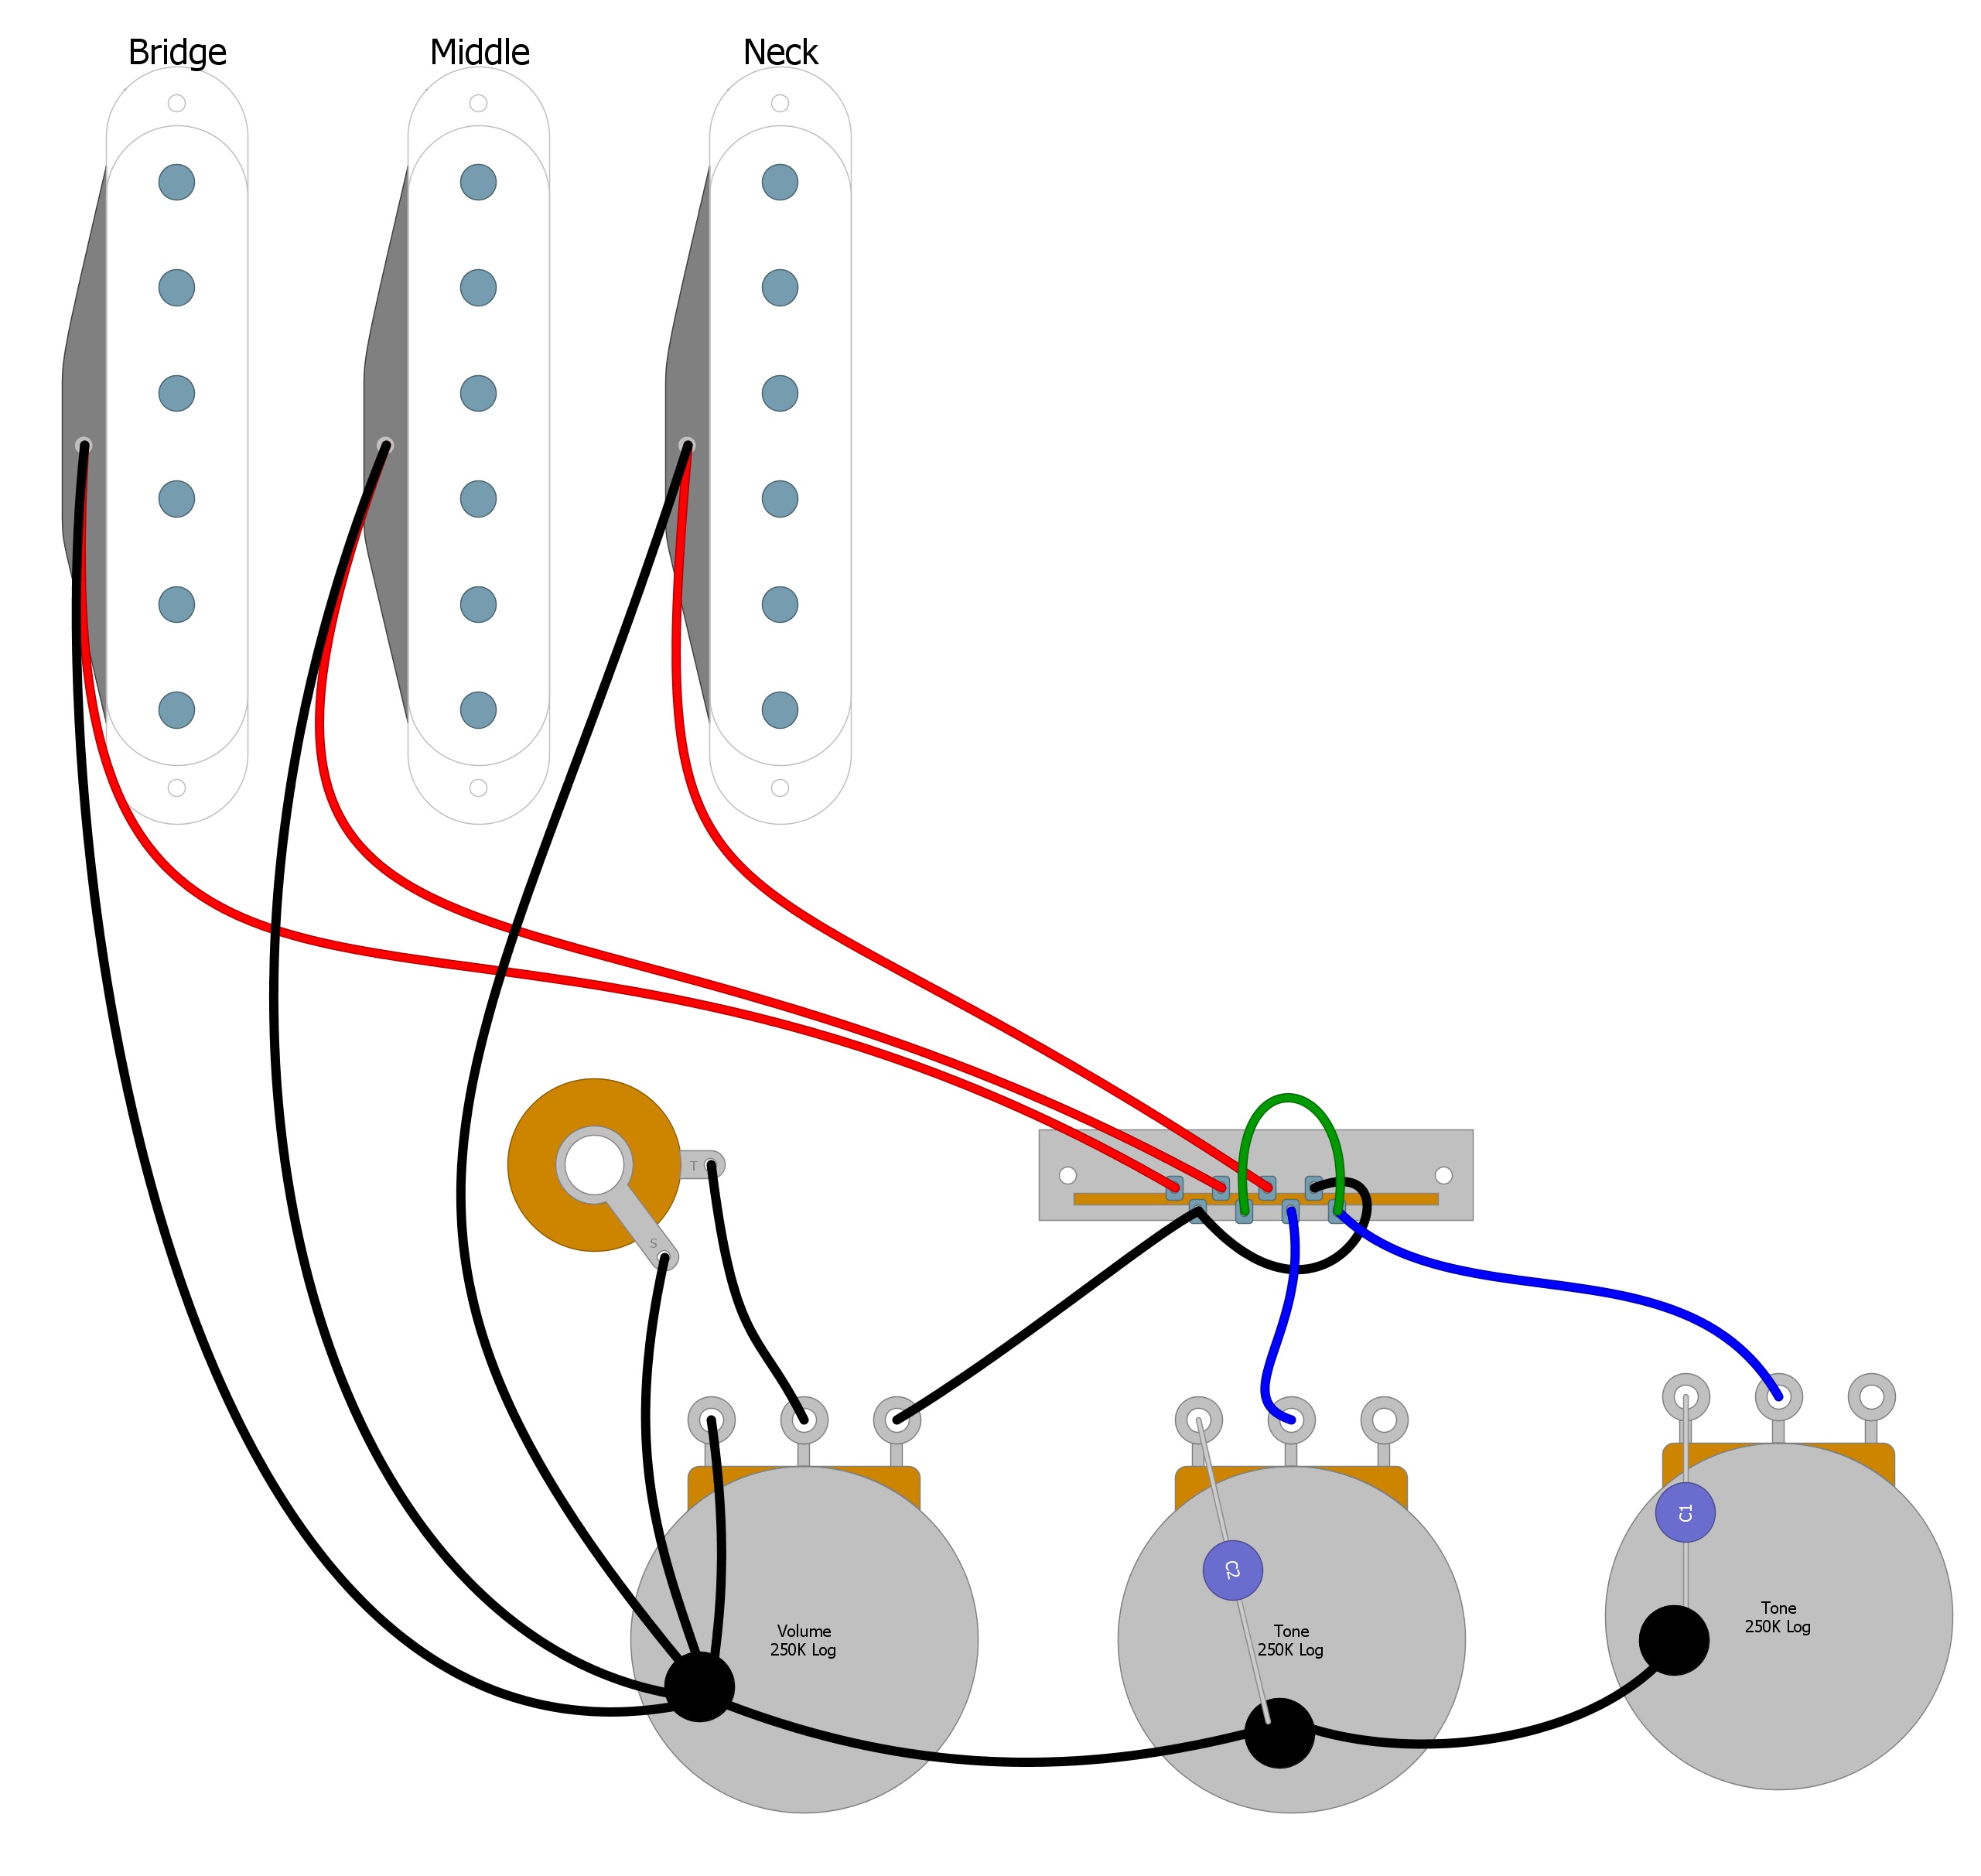
This mod is almost identical to the last mod, but this time we add the wire from the Five-lug to the One-lug, or from the One-lug to tone control 1. It doesn’t matter. Fig 13 shows this modification (green in this example).
Fig 13
I feel that this is the better way to do this mod because the bridge pickup uses tone control 1. This mod allows the tone of the middle and bridge pickups to be adjusted independently in the fourth position, instead of sharing tone control 2. You achieve more versatility for the same amount of work.
Of course, if you wanted to, you could drill into your guitar or pickguard and add another tone control.
Other Possible Mods
There aren’t a lot of other mods as famous as the Fender circuit, but there is still plenty that you can do.
One idea you can use is a modification of the Fender circuit that allows you to use two different capacitors instead of just one. You might find that your neck pickup is much warmer than your bridge pickup and a different capacitor value is more suited to it. Maybe using a .02uf capacitor on the middle pickup and a .01uf on the neck will give you more usable tones. To do this mod change the circuit to look like it does in Fig 14.
Fig 14
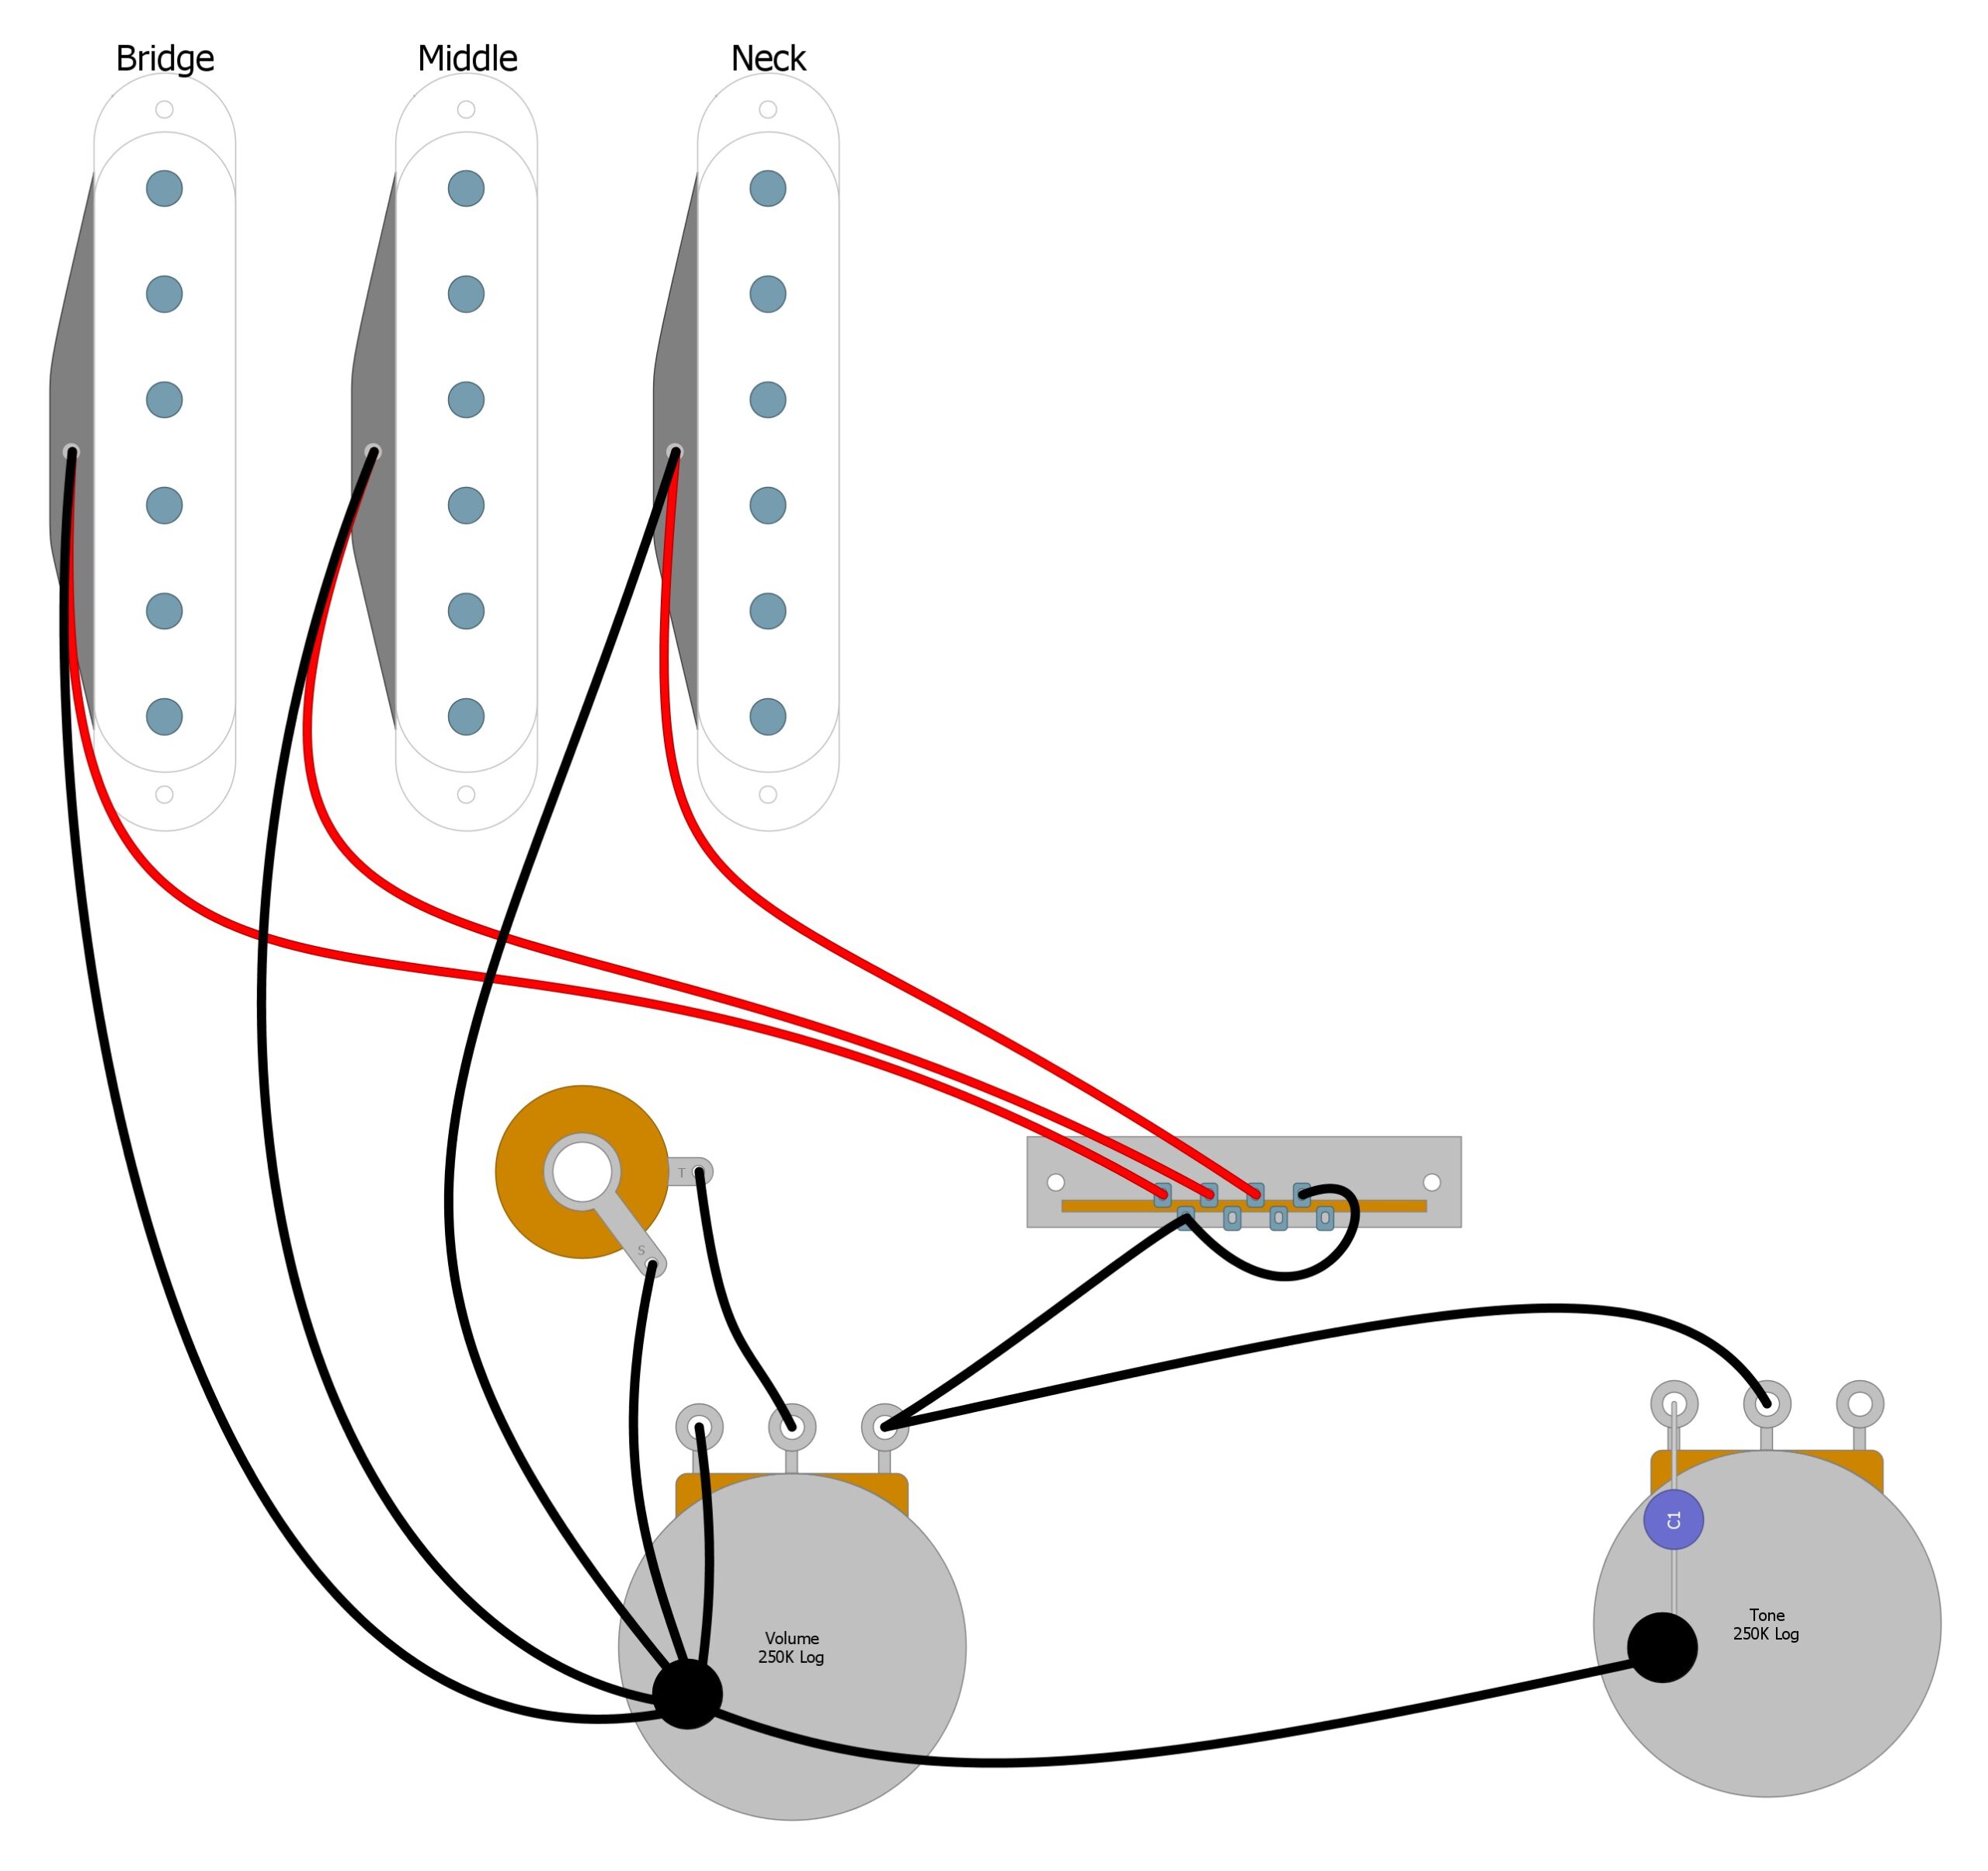
Another mod you might find useful is using a stereo output jack to send more than one output signal from the guitar. If you wire your guitar like it is in Fig 15, the guitar will work as it usually does with a standard guitar chord, but if you use a stereo Y-cable, a second amp will turn on when the pickup selector is in the neck position. This mod could be helpful in giving you an extra volume boost during a solo in a live show, or in sending only the neck pickup to a pedalboard or effects rack.
Fig 15
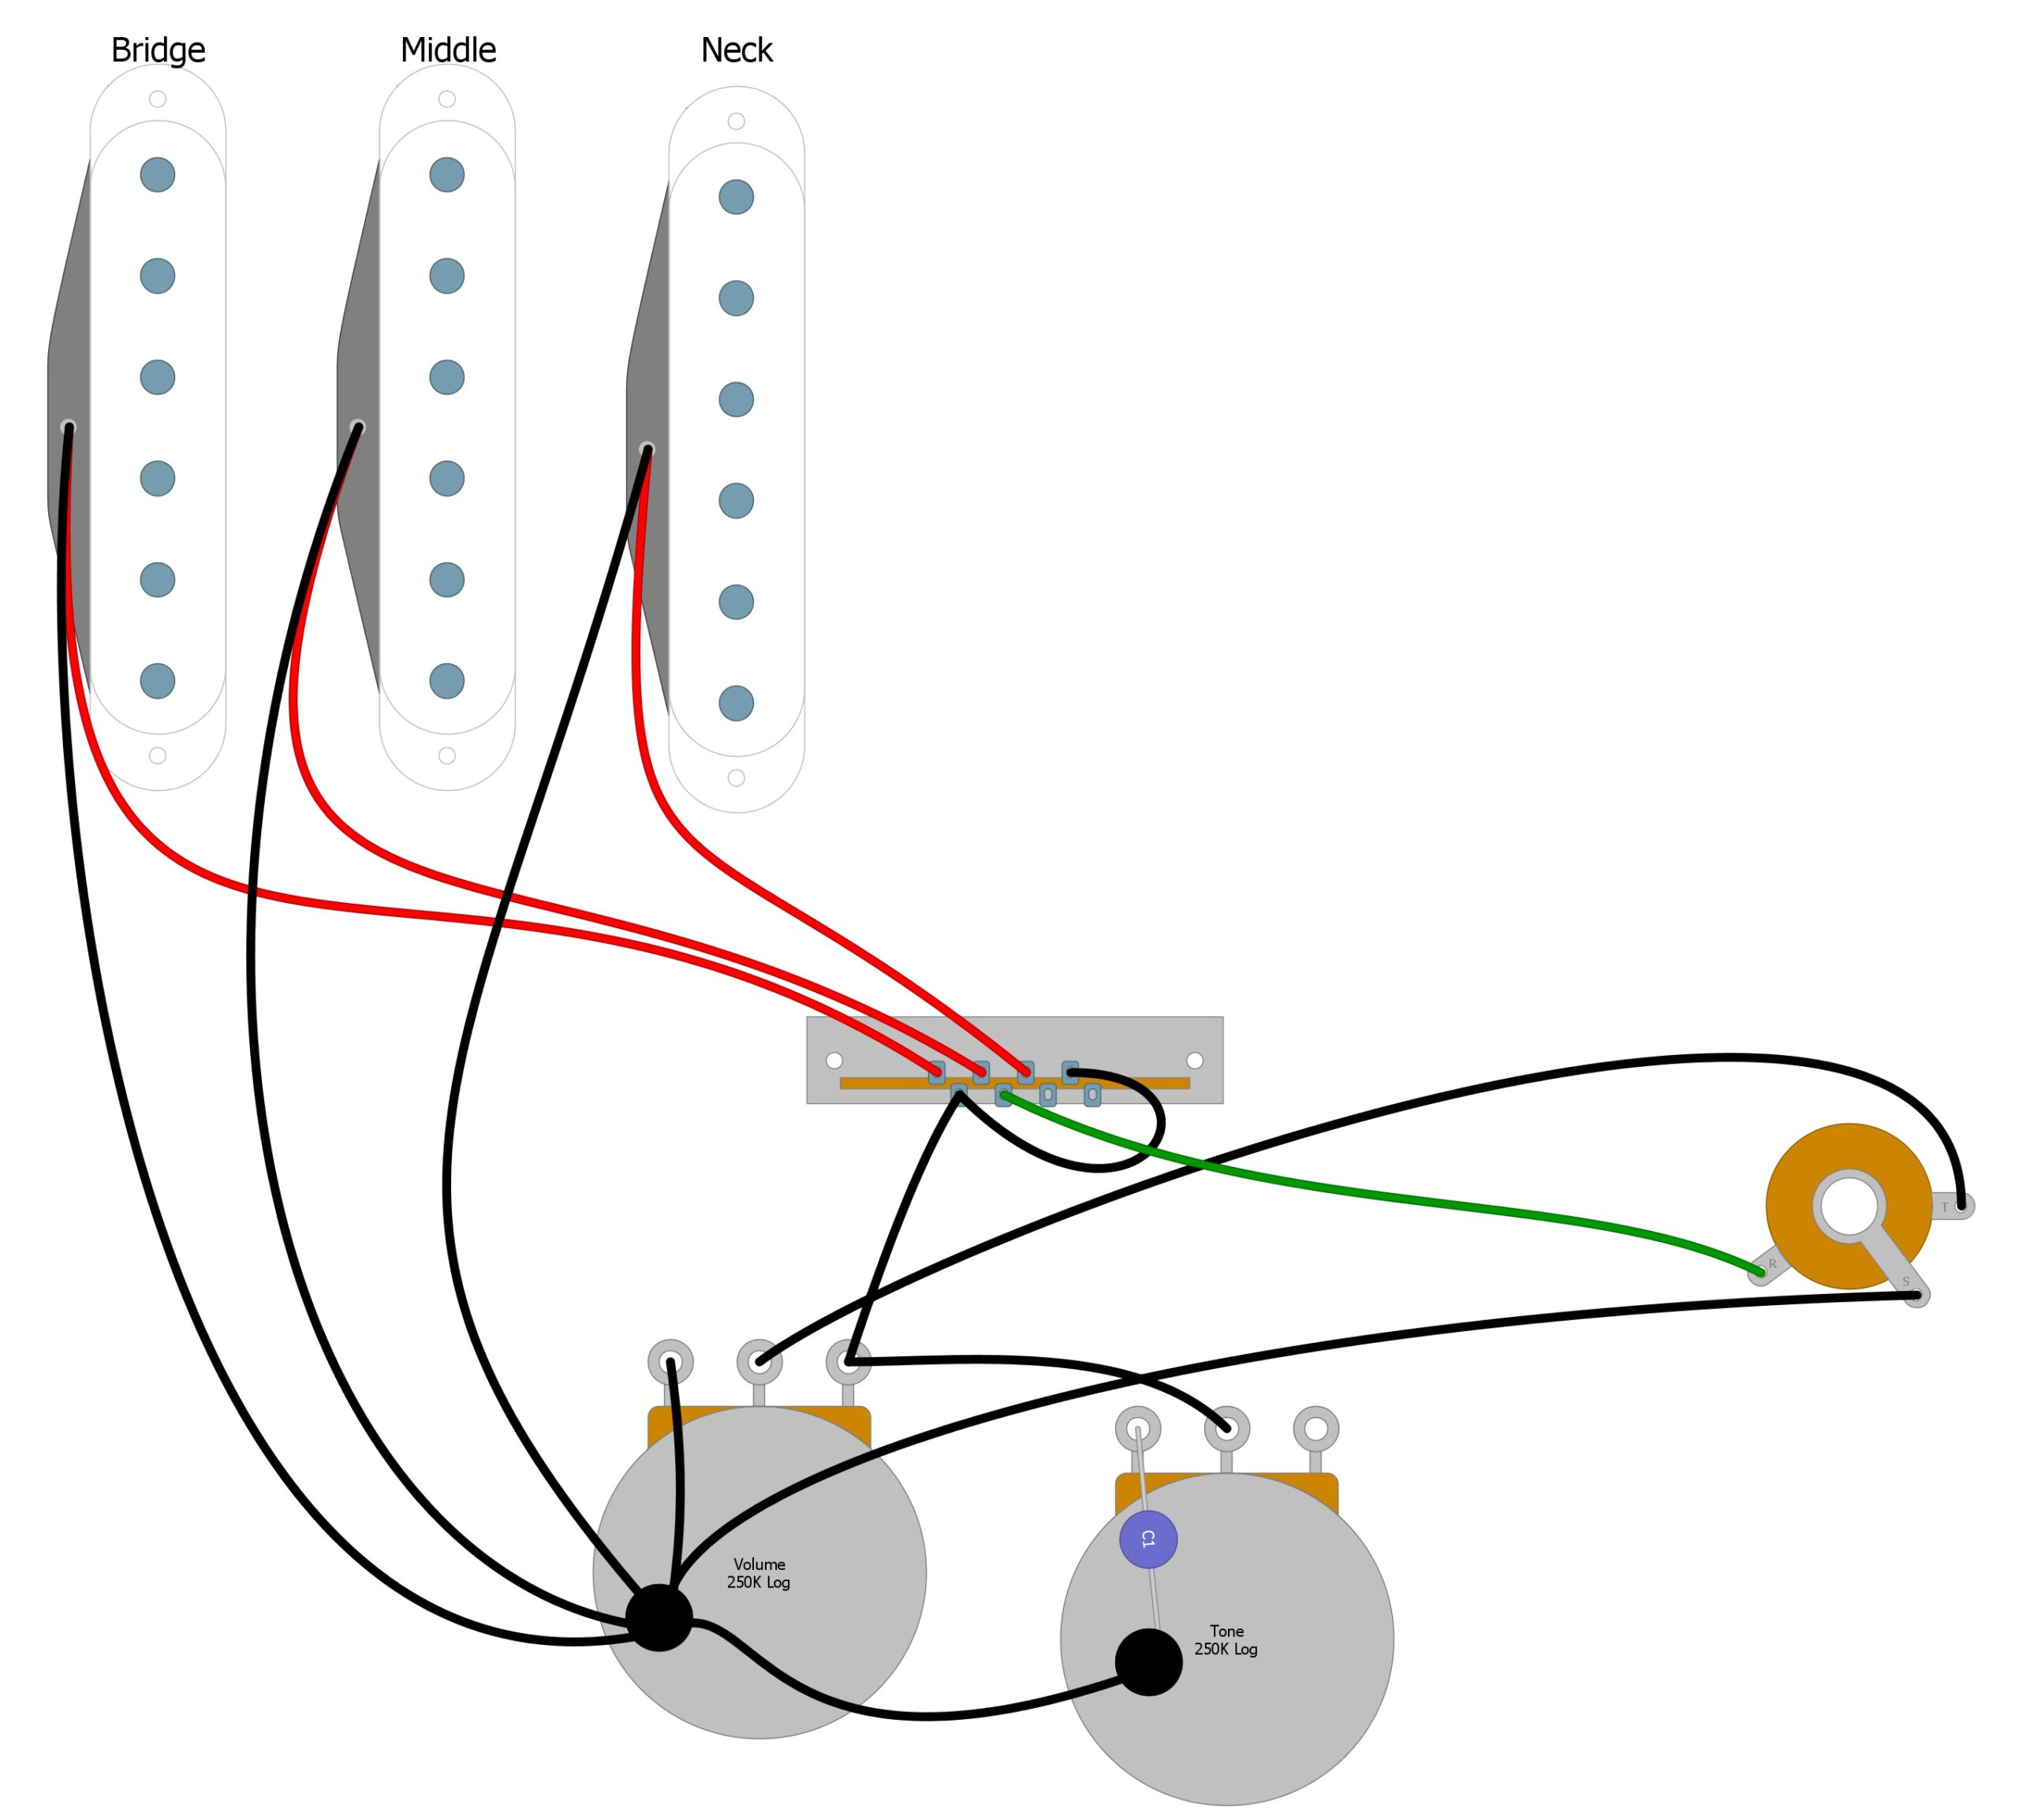
To make it the bridge or middle pickup instead, connect the green wire to the corresponding output side lug.
There are plenty more modifications you can do, limited only by your imagination and perhaps your guitar’s hardware. For instance, these Fender mods won’t do you much good if your guitar only has one tone control, but hopefully, they will give you some ideas for your projects.
3 Way or 5 Way Switch?
In terms of choosing between the 3 Way Switch and the 5 Way Switch, we don’t see much need to debate it since they’re both essentially the same. Technically, the 5 Way is more versatile, so if we needed a definitive answer, I’d go with the 5 Way Switch. The real question is, do you need the switch to stop at the two and four positions?
If you’ve enjoyed this post and learned some things that help you understand your guitar better and improve your tone, please feel free to share this 3 Way Switch vs 5 Way Switch article on Twitter and Facebook.
And be sure to take a look around humbuckersoup.com for other ways to wire your guitar, and open up your tonal possibilities.


