By Ed Malaker
Posted 05/11/2018
For many people, the Tone control itself is just a potentiometer (Volume knob) with a capacitor attached to it. When the Tone control is turned all the way up, the Tone is at its brightest, and as the knob is turned down (off), the Tone darkens (i.e., high frequencies get rolled off). What might not be generally known is that the other components, especially any other Volume and Tone controls, will also affect the tone, so their values must be considered.
Also, your tone is YOUR tone, so unless you’re trying to restore a collector guitar to its original specs, it’s better to not just blindly follow a manual and call it a day. Instead, use your ears and this guide to get the best tone from your guitar. With that said, let’s begin with the components of Tone control wiring:
 You might also like this HumbuckerSoup article: Stratocaster Five-Way Switch Wiring – Basic Guitar Electronics
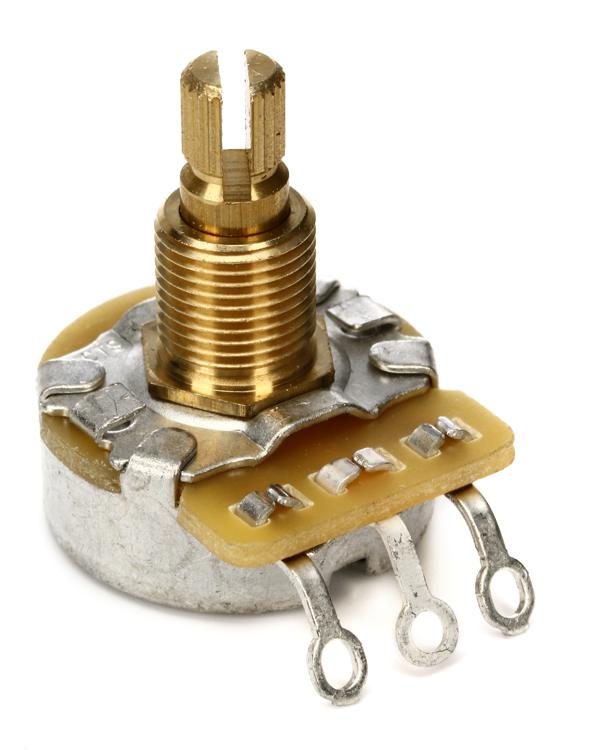
The Potentiometers
The first and most important of the components of Tone control wiring are the potentiometers, or “pots” — on not just the Tone control, but also on the Volume knob and any other knob on the guitar. When choosing a potentiometer, there are three things to consider: Quality, Value, and Taper.
Quality
Many entry-level guitar manufacturers cut down on costs by using low-quality pots. They work, but it won’t be very long before they wear out and begin to introduce noise into your signal. Another problem with low-quality pots is that they are manufactured with loose tolerances, which means that a 500k pot might actually work as a 415k pot, or a 544k pot. Higher quality pots are manufactured to much tighter tolerances, and the internal components, such as the wiper and lubricants, last much longer.
Value
The most common pots in use are the 250k pots and the 500k pots. The general rule is to use 250k pots for single coil pickups and 500k pots for humbucking pickups. This is based on the theory that single coil pickups are brighter than humbuckers, because the two coils in humbuckers have a tendency to phase out some of the high frequencies. This is a good rule of thumb, but it should only be your starting point.
Many times, the pickups won’t conform to this rule and you’ll want to make adjustments. It will always be better to listen to your pickups and decide for yourself what the proper value is. You are not limited to those two values either, and there are many other usable values, including a 1-mega ohm, and a no load pot. The smaller the value of the pot, the more the high-end frequencies will leak to Ground, even when the Tone or Volume control is turned all the way up. The higher the value of the pot, the less the high frequencies will leak to Ground, and the brighter the tone will sound coming from your amp.
Taper
The Taper of the potentiometer is very simple. There are only two kinds of pots: Linear Taper and Logarithmic/Audio Taper; in this case, we want Logarithmic/Audio Taper. It seems like a no-brainer, but Linear Taper pots are actually far more common. Be sure to double-check before purchasing.
 You might also like this HumbuckerSoup article: Telecaster Three-Way Switch Wiring
The Capacitor
The other component we need to take a look at is the capacitor, and here there are three things to consider: Quality, Value, and Voltage.
Quality
When considering the Quality of the capacitor it’s important to remember that you do not hear the sound that passes through it. The reason for choosing a better quality is, once again, for tighter tolerances and less failure.
Value
The Value is another thing that you will have to decide on, with some help from these guidelines. The Value ranges from .01u to .1u. The lower the value of a capacitor, the brighter the affected tone will be. The two most popular values are .022u and .044u, which were originally started by Fender and Gibson. While the .022u value is pretty much the standard today, these values may be a bit too high and could result in a tone that’s too warm. You might be pleasantly surprised if you try a smaller value cap such as a .015u.
Voltage
The Voltage needs to be at least about .5 volts; anything over that only results in a larger capacitor and has no effect on the tone. The material that it’s made out of has no effect on the tone.
How Tone Control Wiring Works
Now that we have the parts out of the way, let’s take a look at how Tone control wiring works. This will be the simplest design, with 1 Pickup, 1 Volume, and 1 Tone control.
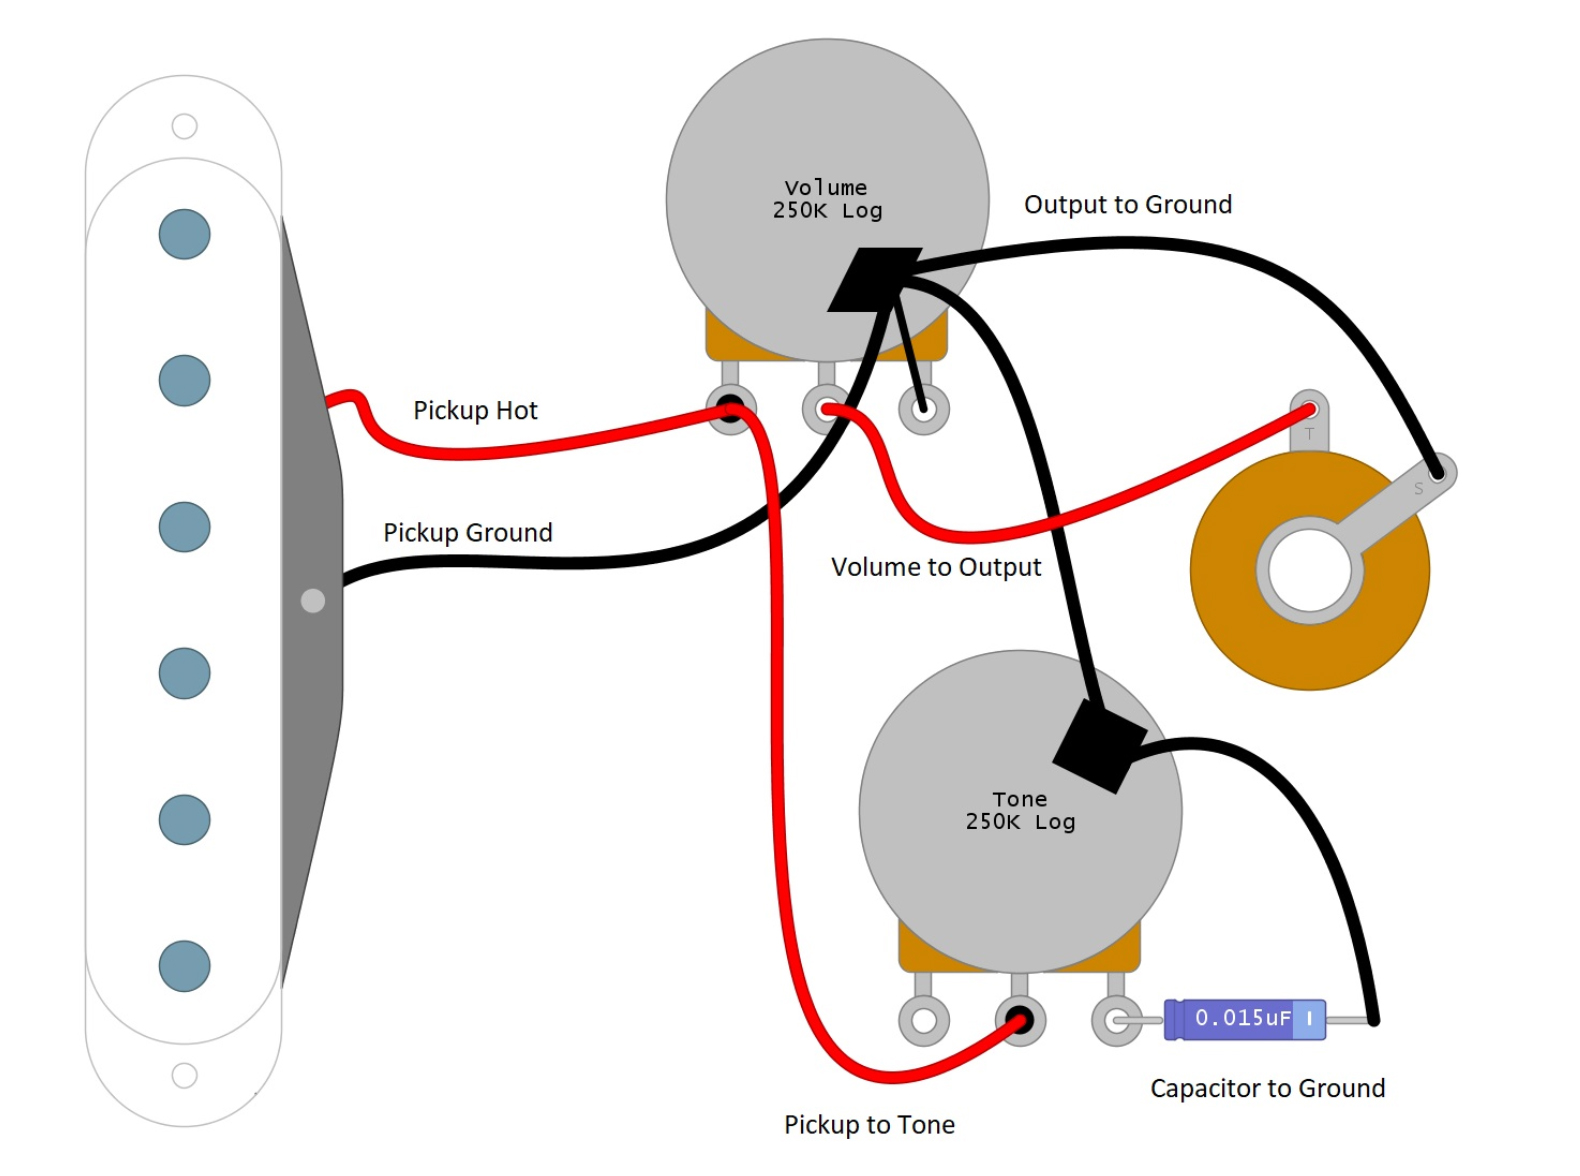
First, we need the Hot wire and Ground wire from our pickup. Solder the Ground wire to the back of the Volume pot. Now, solder the large Ground wire from the bridge of the guitar to the back of the Volume pot.
If you’re looking at the bottom of the pot with the tabs pointing down, number the Tabs 1, 2, and 3 from left to right. Solder the pickup’s Hot wire to Tab 1 and solder a wire from Tab 3 to the back of the Volume pot. Solder a wire from Tab 2 to the Tip Tab of the Output Jack, then solder a wire from the Sleeve Tab of the Output Jack to the back of the Volume pot. This is the basic Volume control wiring.
Add the Tone control by soldering a wire from Tab 1 of the Volume control to Tab 2 of the Tone control. Solder the capacitor from Tab 3 of the Tone control to the back of the Tone control pot, being mindful of the polarity of the capacitor. The Negative side goes to the back of the pot. Add a wire from the back of the Tone control to the back of the Volume control and you are finished!
NOTE: Many of the diagrams I see on the internet have the 2nd and 3rd Tabs of the Tone control reversed. Both ways give the same results; this is just the way that I do it.
Conclusion
We hope you’ve found this guide on wiring your own Tone control helpful. If you enjoyed this article, please feel free to share it on Facebook and Twitter. Also, take a look around humbuckersoup.com for more articles on guitar electronics.
 You might also like this HumbuckerSoup article: Les Paul Three-Way Switch Wiring – Basic Guitar Electronics
Written by: Ed Malaker