By Ed Malaker
Posted 01/01/2021
Here’s a Van Zant pickup installation guide that shows you how to install any type that they create, from vintage P90s to modern humbuckers. We explain the details in the text and provide you with an illustration for each kind of pickup.
What Are Van Zandt Pickups?
Van Zandt started as a brand in the 1980s by W. L. Van Zandt, who had already been repairing guitars since the 60s. He died in 1997, but his family continues his legacy of hand-built pickups. There’s at least one model of each type of pickup, and we’ll take a look at them now.
Before We Begin
Before we get started, we’d like to point out that this is not a step-by-step guide for installing these pickups. It’s a reference that you can use to quickly install many different types of pickups once you have enough experience to follow the illustrations. It assumes that you already have the tools required and know how to use them.
If you feel you need more guidance, we would like to recommend one of the many wiring articles we have here at Humbucker Soup that takes a much more detailed approach and is better suited to beginners. Installing pickups is not difficult, but it can be challenging if you don’t know how to read the illustrations.
Vintage Stratocaster Wiring
We’ll begin with the Fender Stratocaster style single-coil pickup because it’s likely the most popular in use today, for no other reason than there are three of them in many guitars. Single coil pickups have two wires that you will use to install them. The single-coil pickup is essentially a coil of wire around a magnet, and one wire leads to the beginning of the coil and the other, the end.
Van Zandt builds several single-coil pickups, including the Blues Strat, the Rock Strat, and the True Vintage Strat pickups. These pickups use a white wire as the Hot and a black wire as the Ground.
We demonstrate a common way to install single-coil pickups into a strat in Example 1. Notice that the Hot wire always goes to the switch while the Ground goes to the back casing of the volume pot.
Example 1

Vintage Telecaster Wiring
Since we are already talking about Fender guitars, it makes sense to move on to the Fender Telecaster pickups. The bridge pickup on a Telecaster is very similar to the one on a Strat, but it features a special shape designed to work with the Telecaster. The neck pickup is often a little smaller than the bridge and is unique in the guitar world. Many players don’t like the stock neck pickup, but aftermarket parts really open up the tonal possibilities. Telecaster pickups use the same two wires connected to a coil design as the Strat pickups.
Van Zandt makes several Telecaster pickups, including the Vintage Plus and the True Vintage. Van Zandt keeps it simple and sticks with the same black is Ground and white is Hot wiring scheme as the Stratocaster pickups. In Example 2, we illustrate the Van Zandt pickup installation into a Fender Telecaster. Notice that the Hot goes to the switch once again while the Ground goes to the back of the volume pot.
Example 2

Vintage P90 Wiring
The Vintage P90 is the single-coil pickup that Gibson created for their guitars. This pickup looks quite different and has a unique sound that many guitar players search for. It is, however, essentially a coil of wire around a magnet.
Also, like the Fender pickup, the P90 uses two wires but with a bit of a twist. Gibson style pickups typically use something called braided wire for their pickups. With this design, a single Hot wire is in the center while a braided metal wire surrounds it on the outside. This braided wire is the second (Ground) wire.
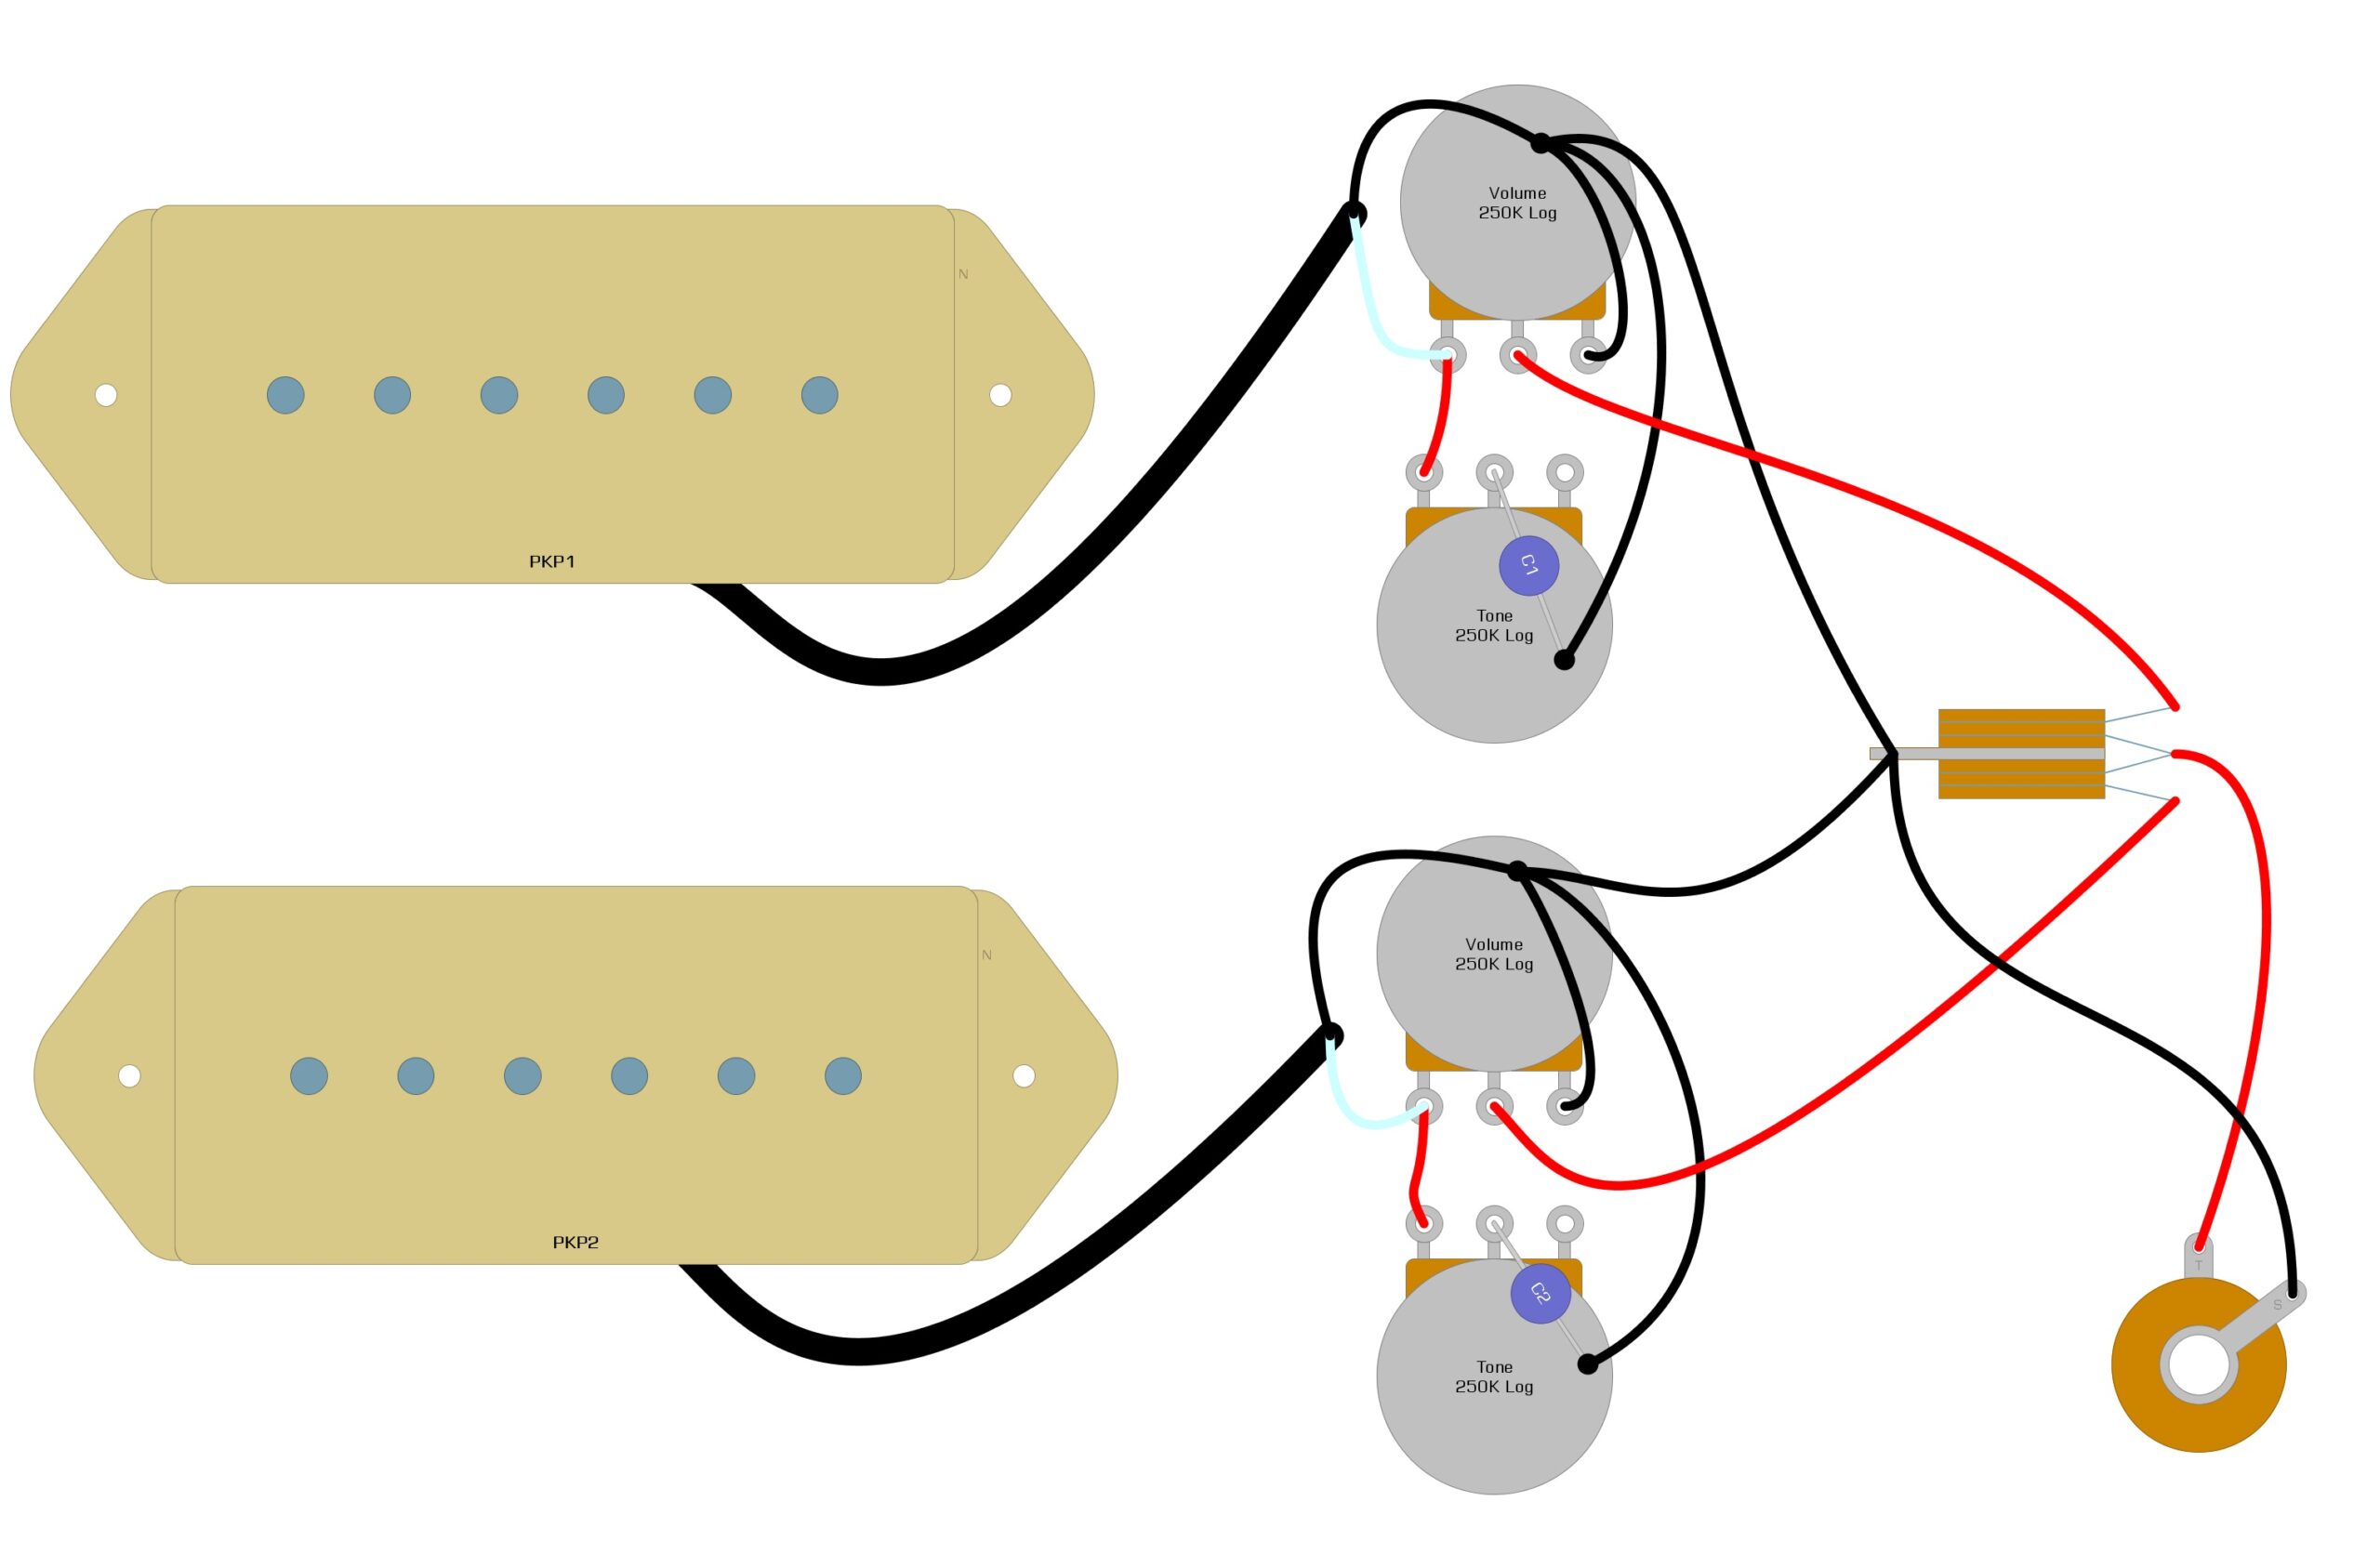
Van Zandt does make a model of the P90, and we illustrate how to install this pickup into a Gibson Les Paul style guitar in Example 3. In Gibson guitars, the Hot goes to a lug on the volume pot, while the Ground once again goes to the volume pot’s casing.
Example 3
Humbucker Wiring (Braided)
Humbuckers use two coils to create a fuller sound. The windings of the two coils are opposite each other, which eliminates the noise through phase cancelation. Vintage humbuckers only had two wires and usually used braided wire like the P90.
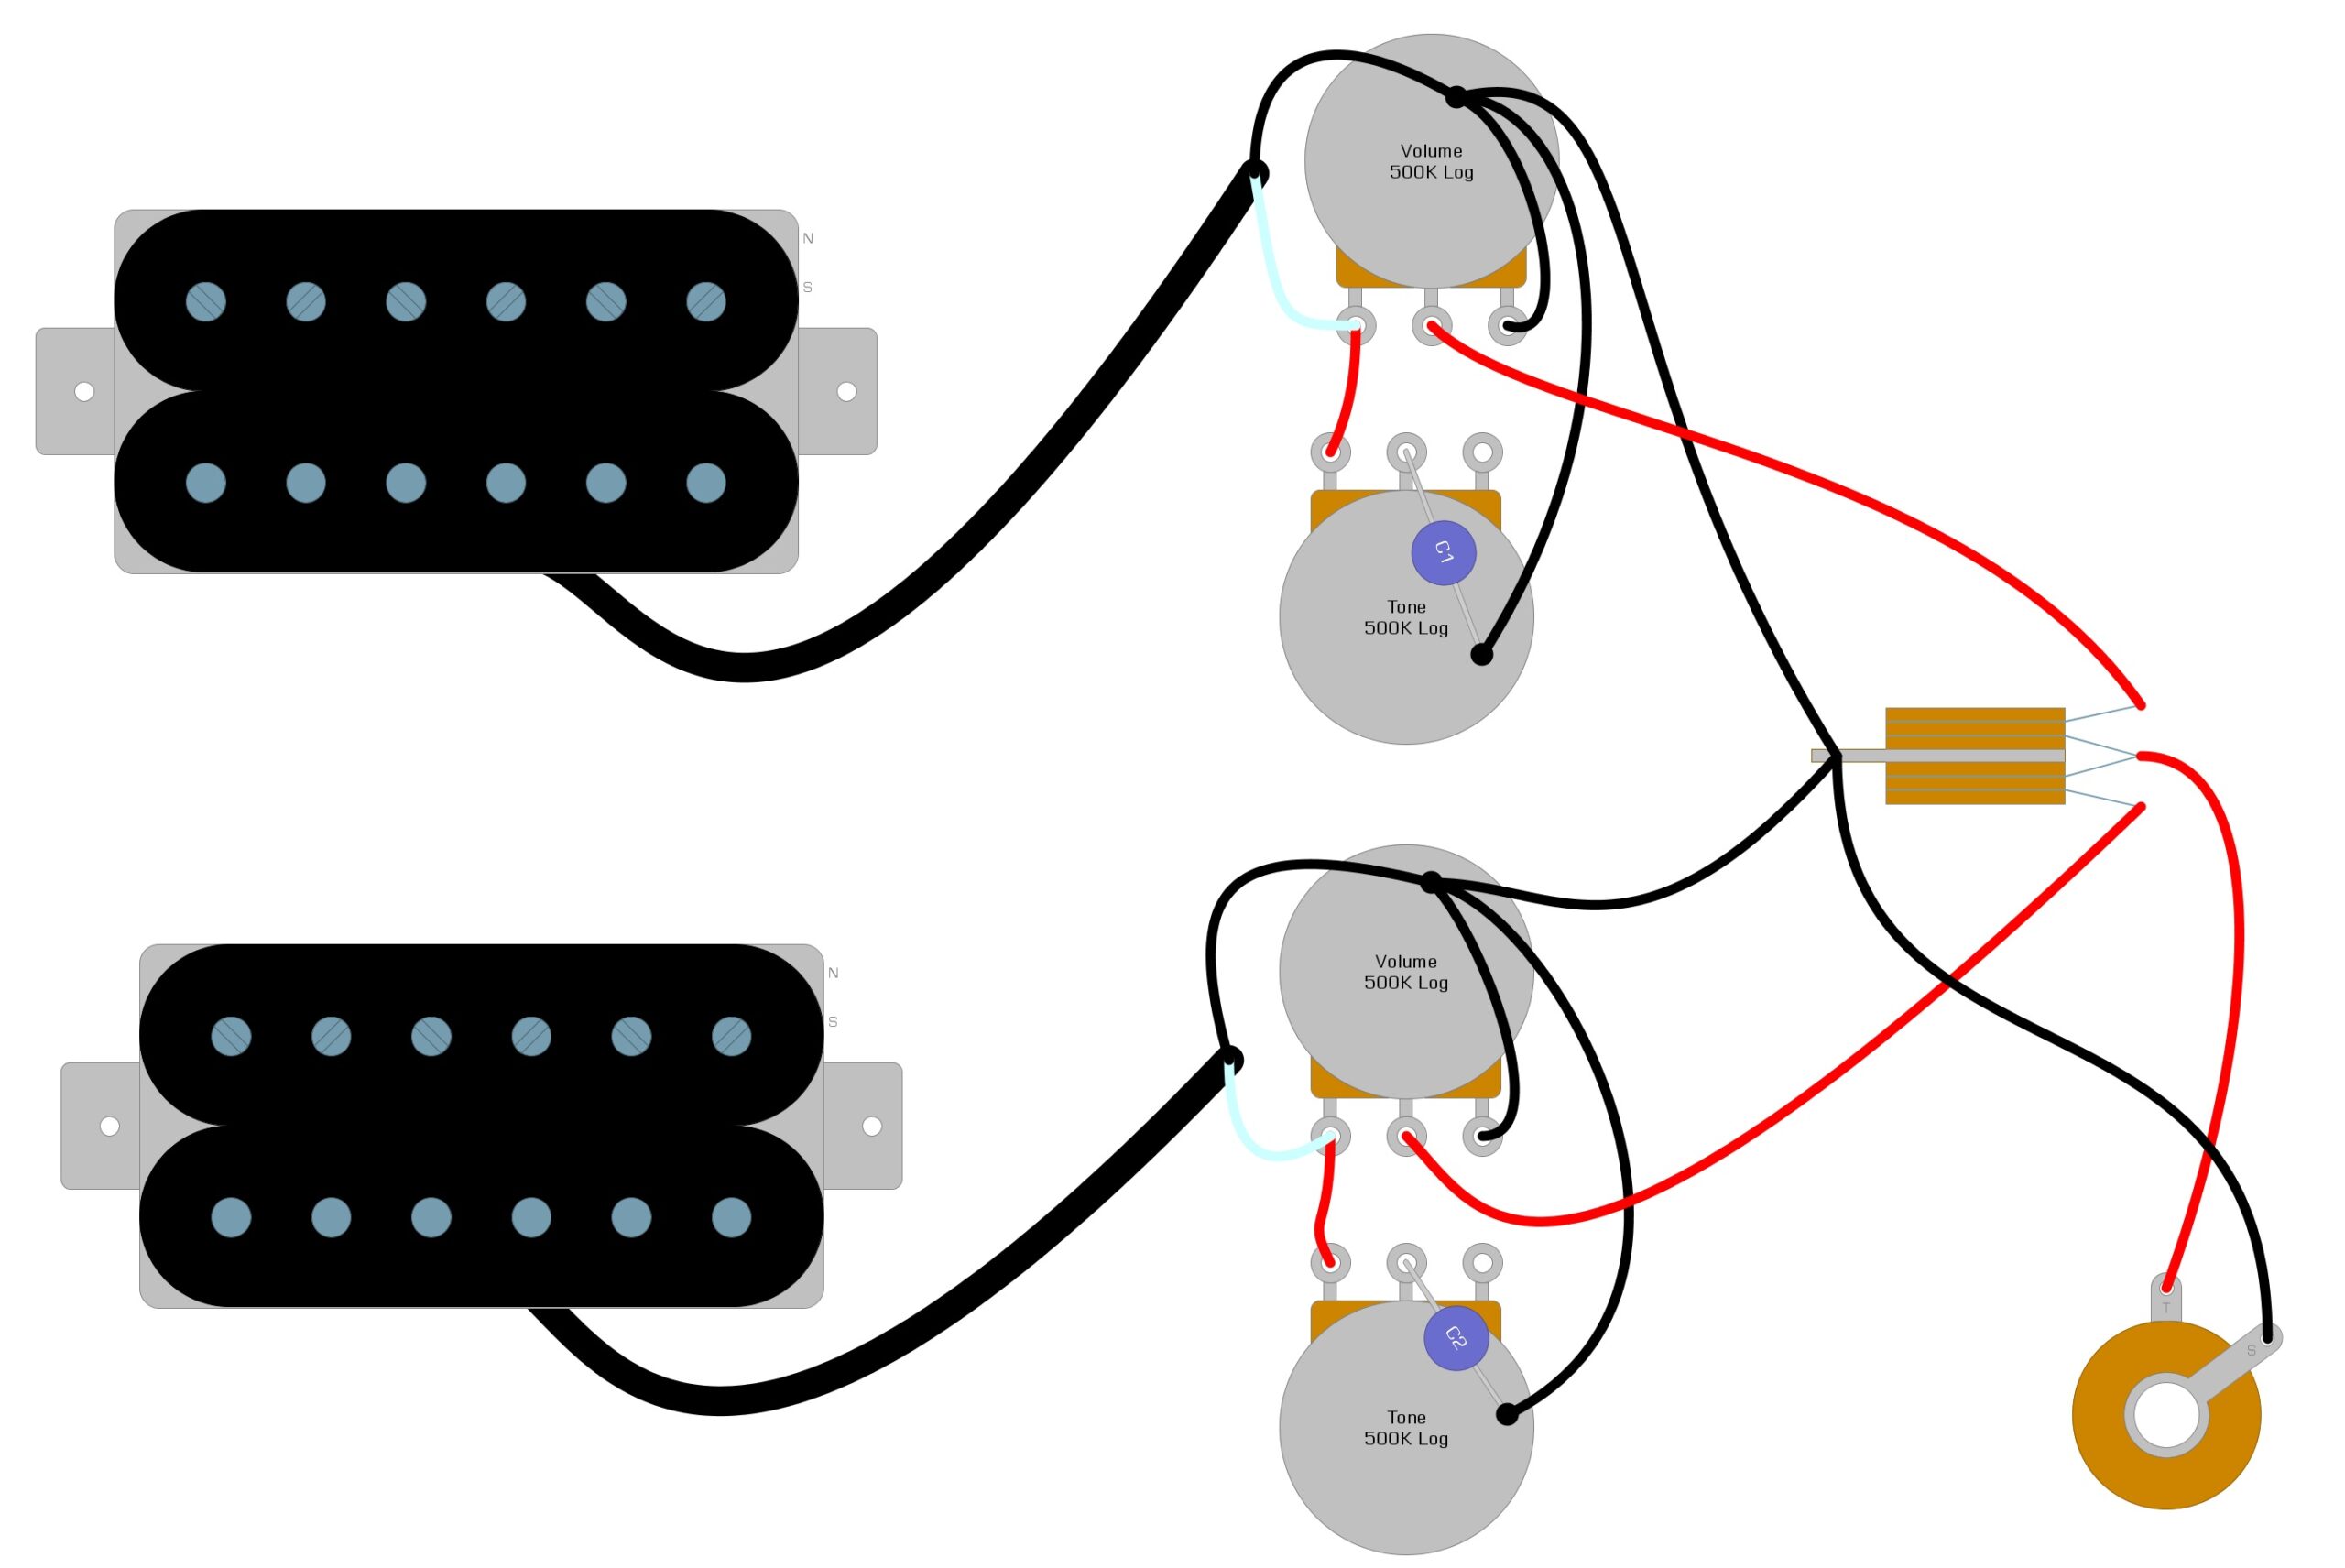
Van Zandt has one humbucker model available in the braided wire design, and that is the Tru Bucker Vintage. It uses the same wiring as the P90, and we illustrate how to install it in a Gibson Les Paul style guitar in Example 4.
Example 4
Humbucker Wiring (4 Wire)
After the humbucker had been out a few years, guitarists learned that they could modify the guitar for new tones if they had access to all four wires for the two coils, and the four-wire humbucker became a thing. The four-wire humbucker actually has five wires, four colored, and one bare. The bare is a shield that connects to the Ground along with the Ground from the pickup.
The downside to four-wire humbuckers is that it burdens the guitarist with figuring out which is the Hot and which is the Ground. Usually, this information, (the wiring code), comes with your pickup, but you will need to look it up online if you lose the documentation. Fortunately, we know the wiring code for Van Zandt pickups.
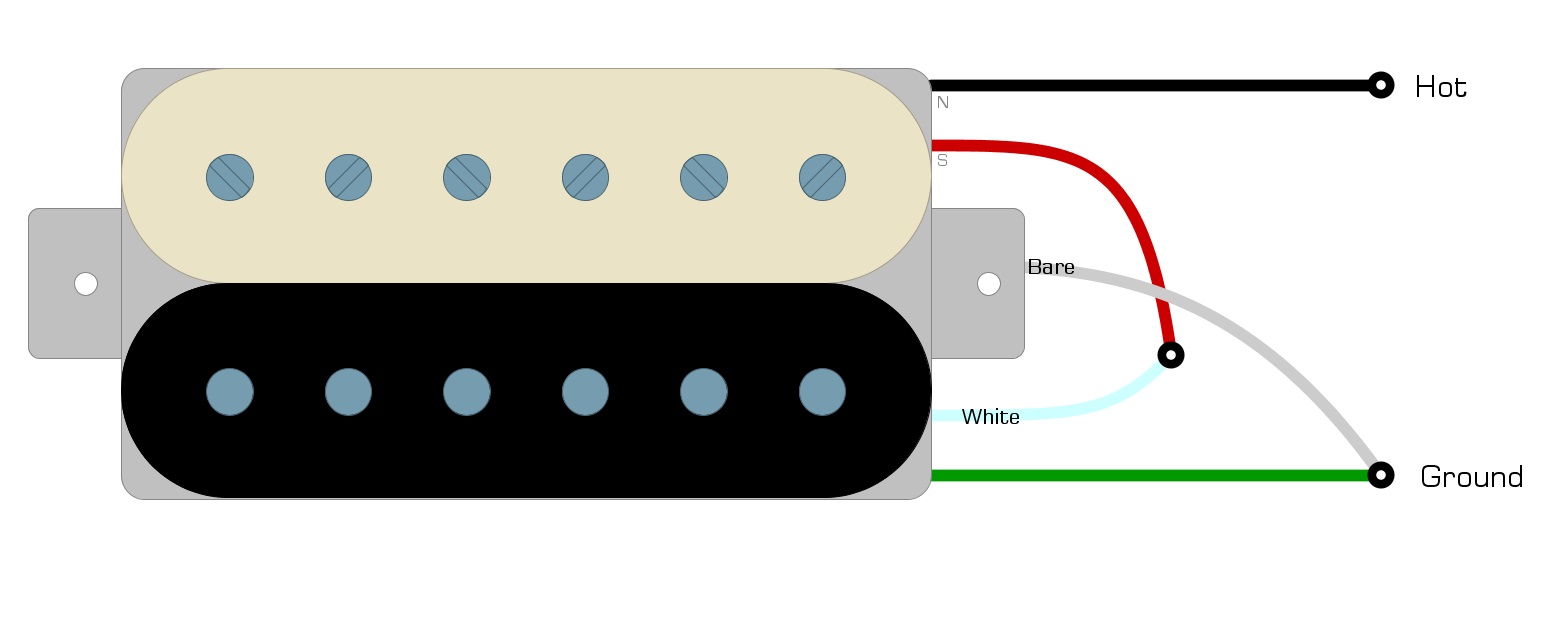
Van Zandt Wiring Code
- Black = Hot
- Red + White = soldered together and taped off
- Green + Bare = soldered together and Ground
We’ve illustrated this wiring code in Example 5
Example 5
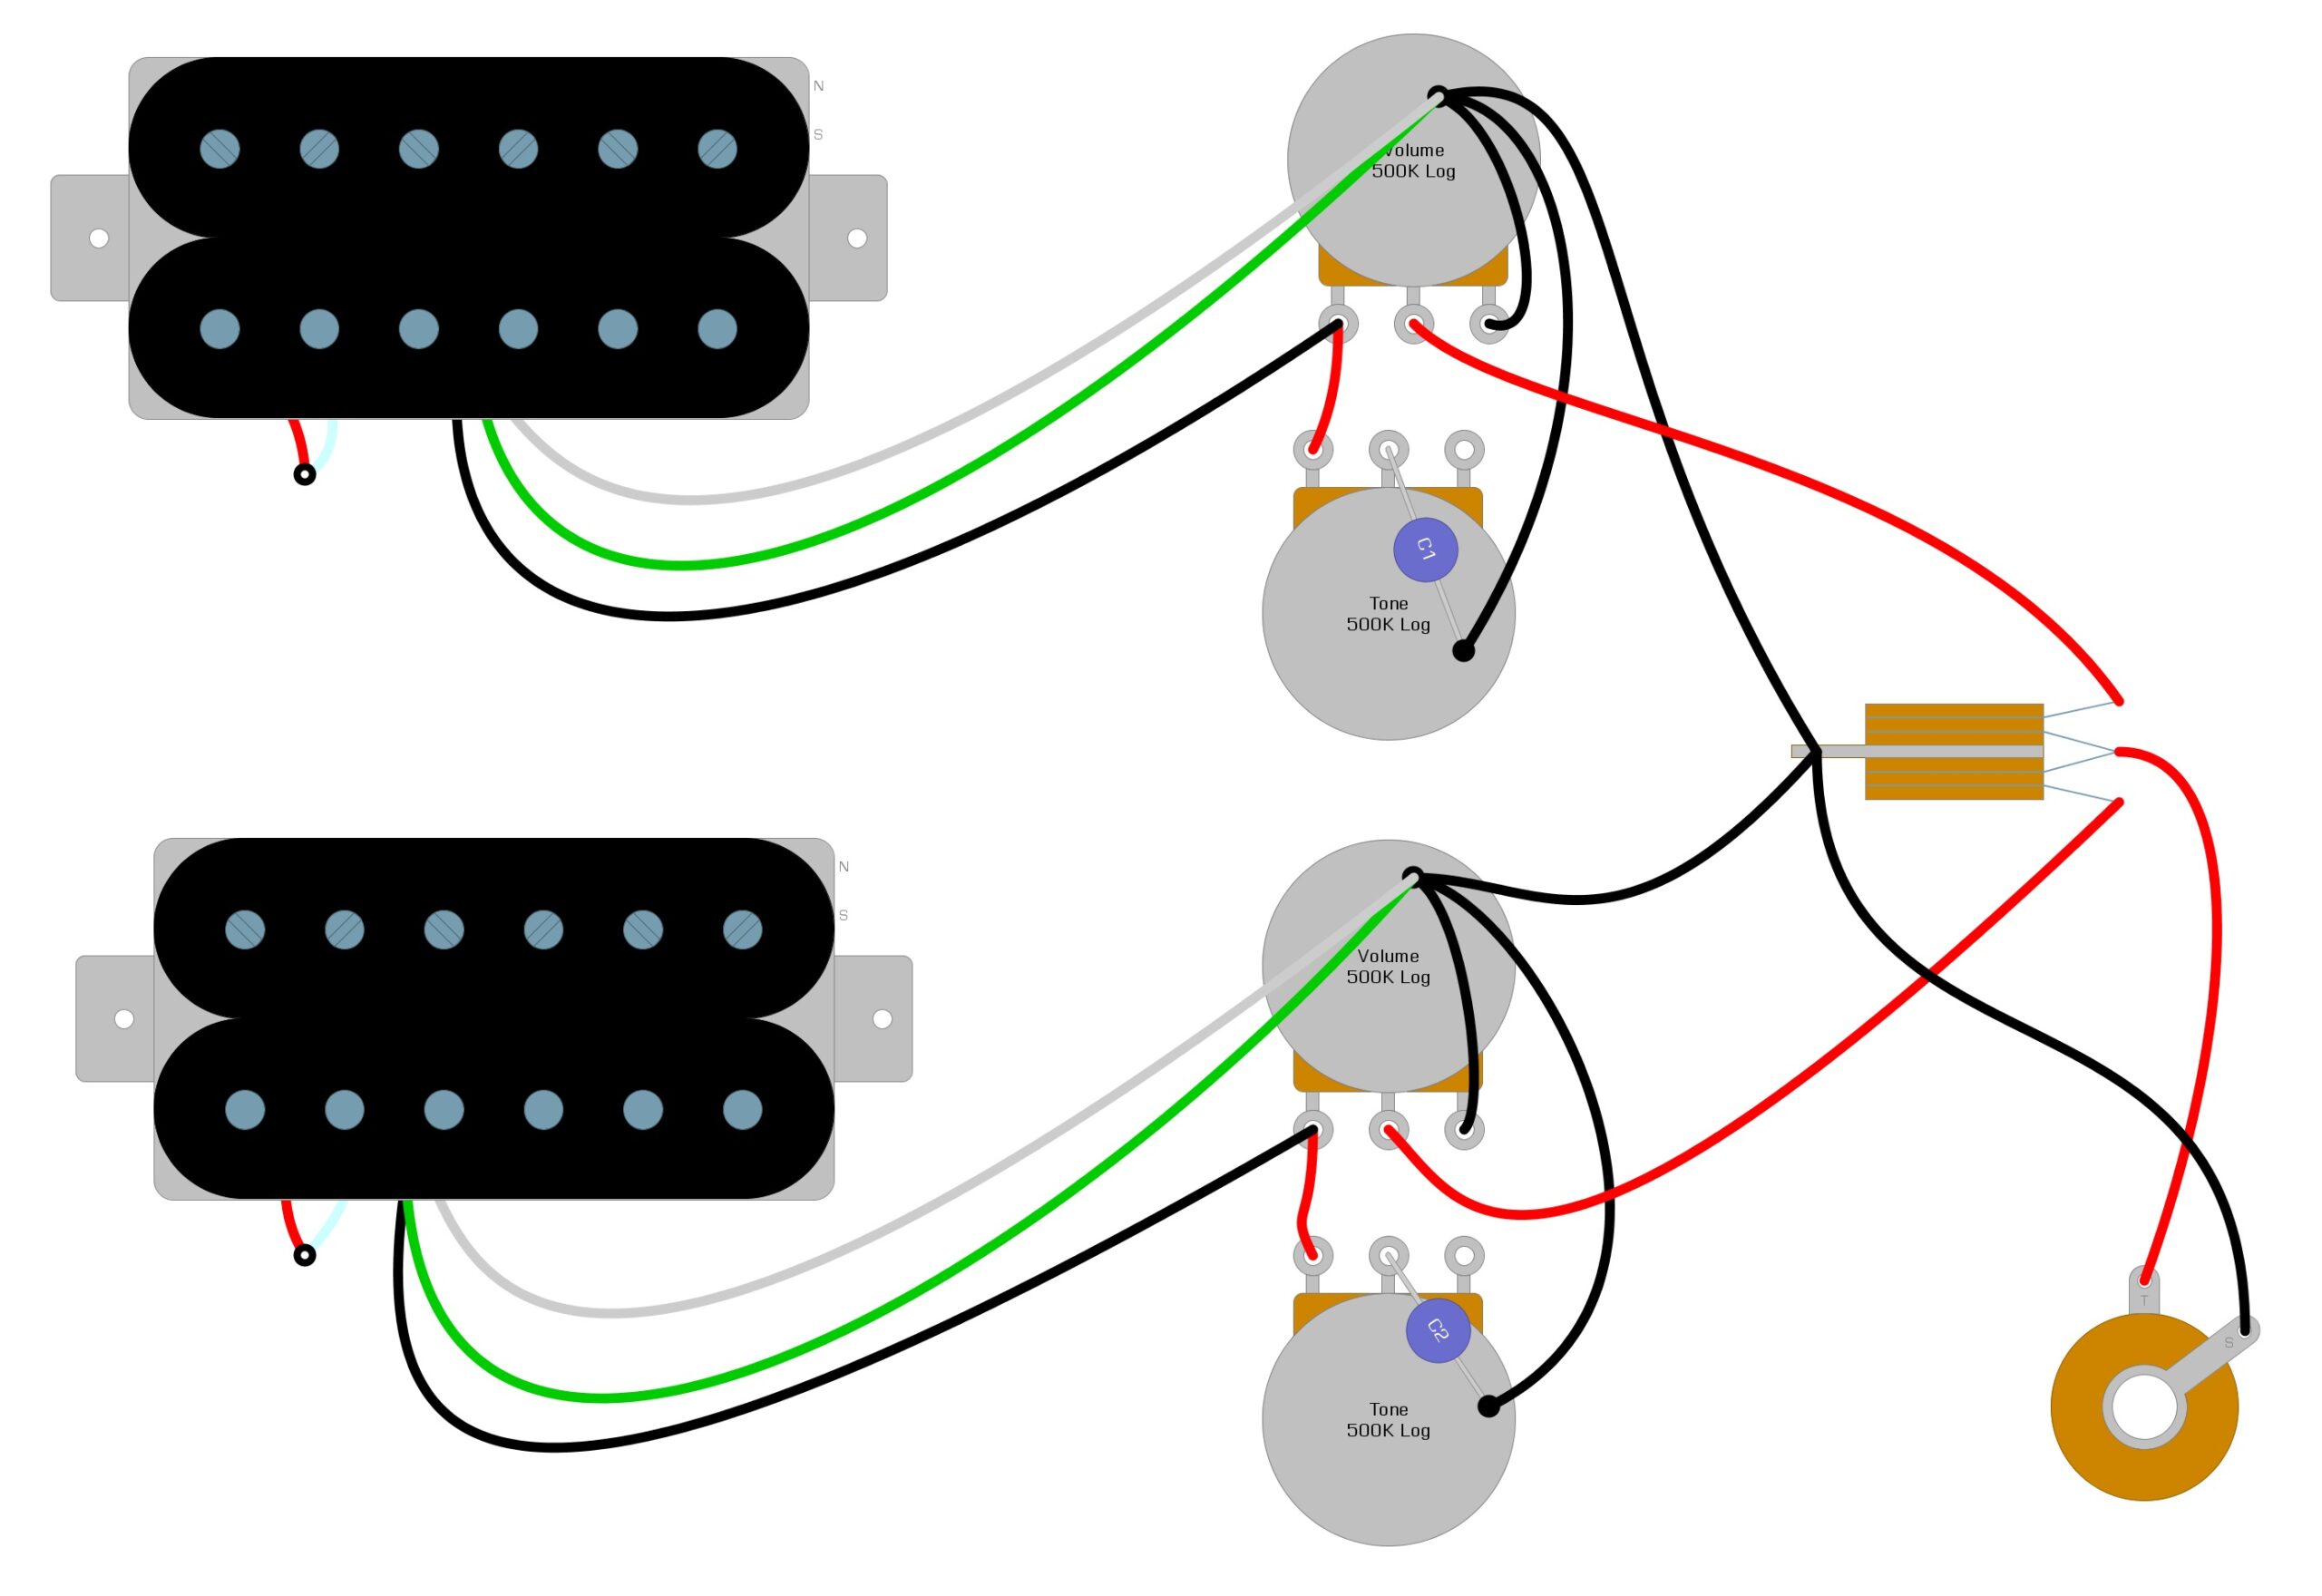
Once you have the wiring code, you install it the same as the others, with the Hot going to the switch or volume pot and the Ground going to the volume pot casing. We’ve illustrated how to install Van Zandt four-wire humbuckers into a Gibson Les Paul in Example 6.
Example 6
Humbucker Coil Splitting (4-Wires)
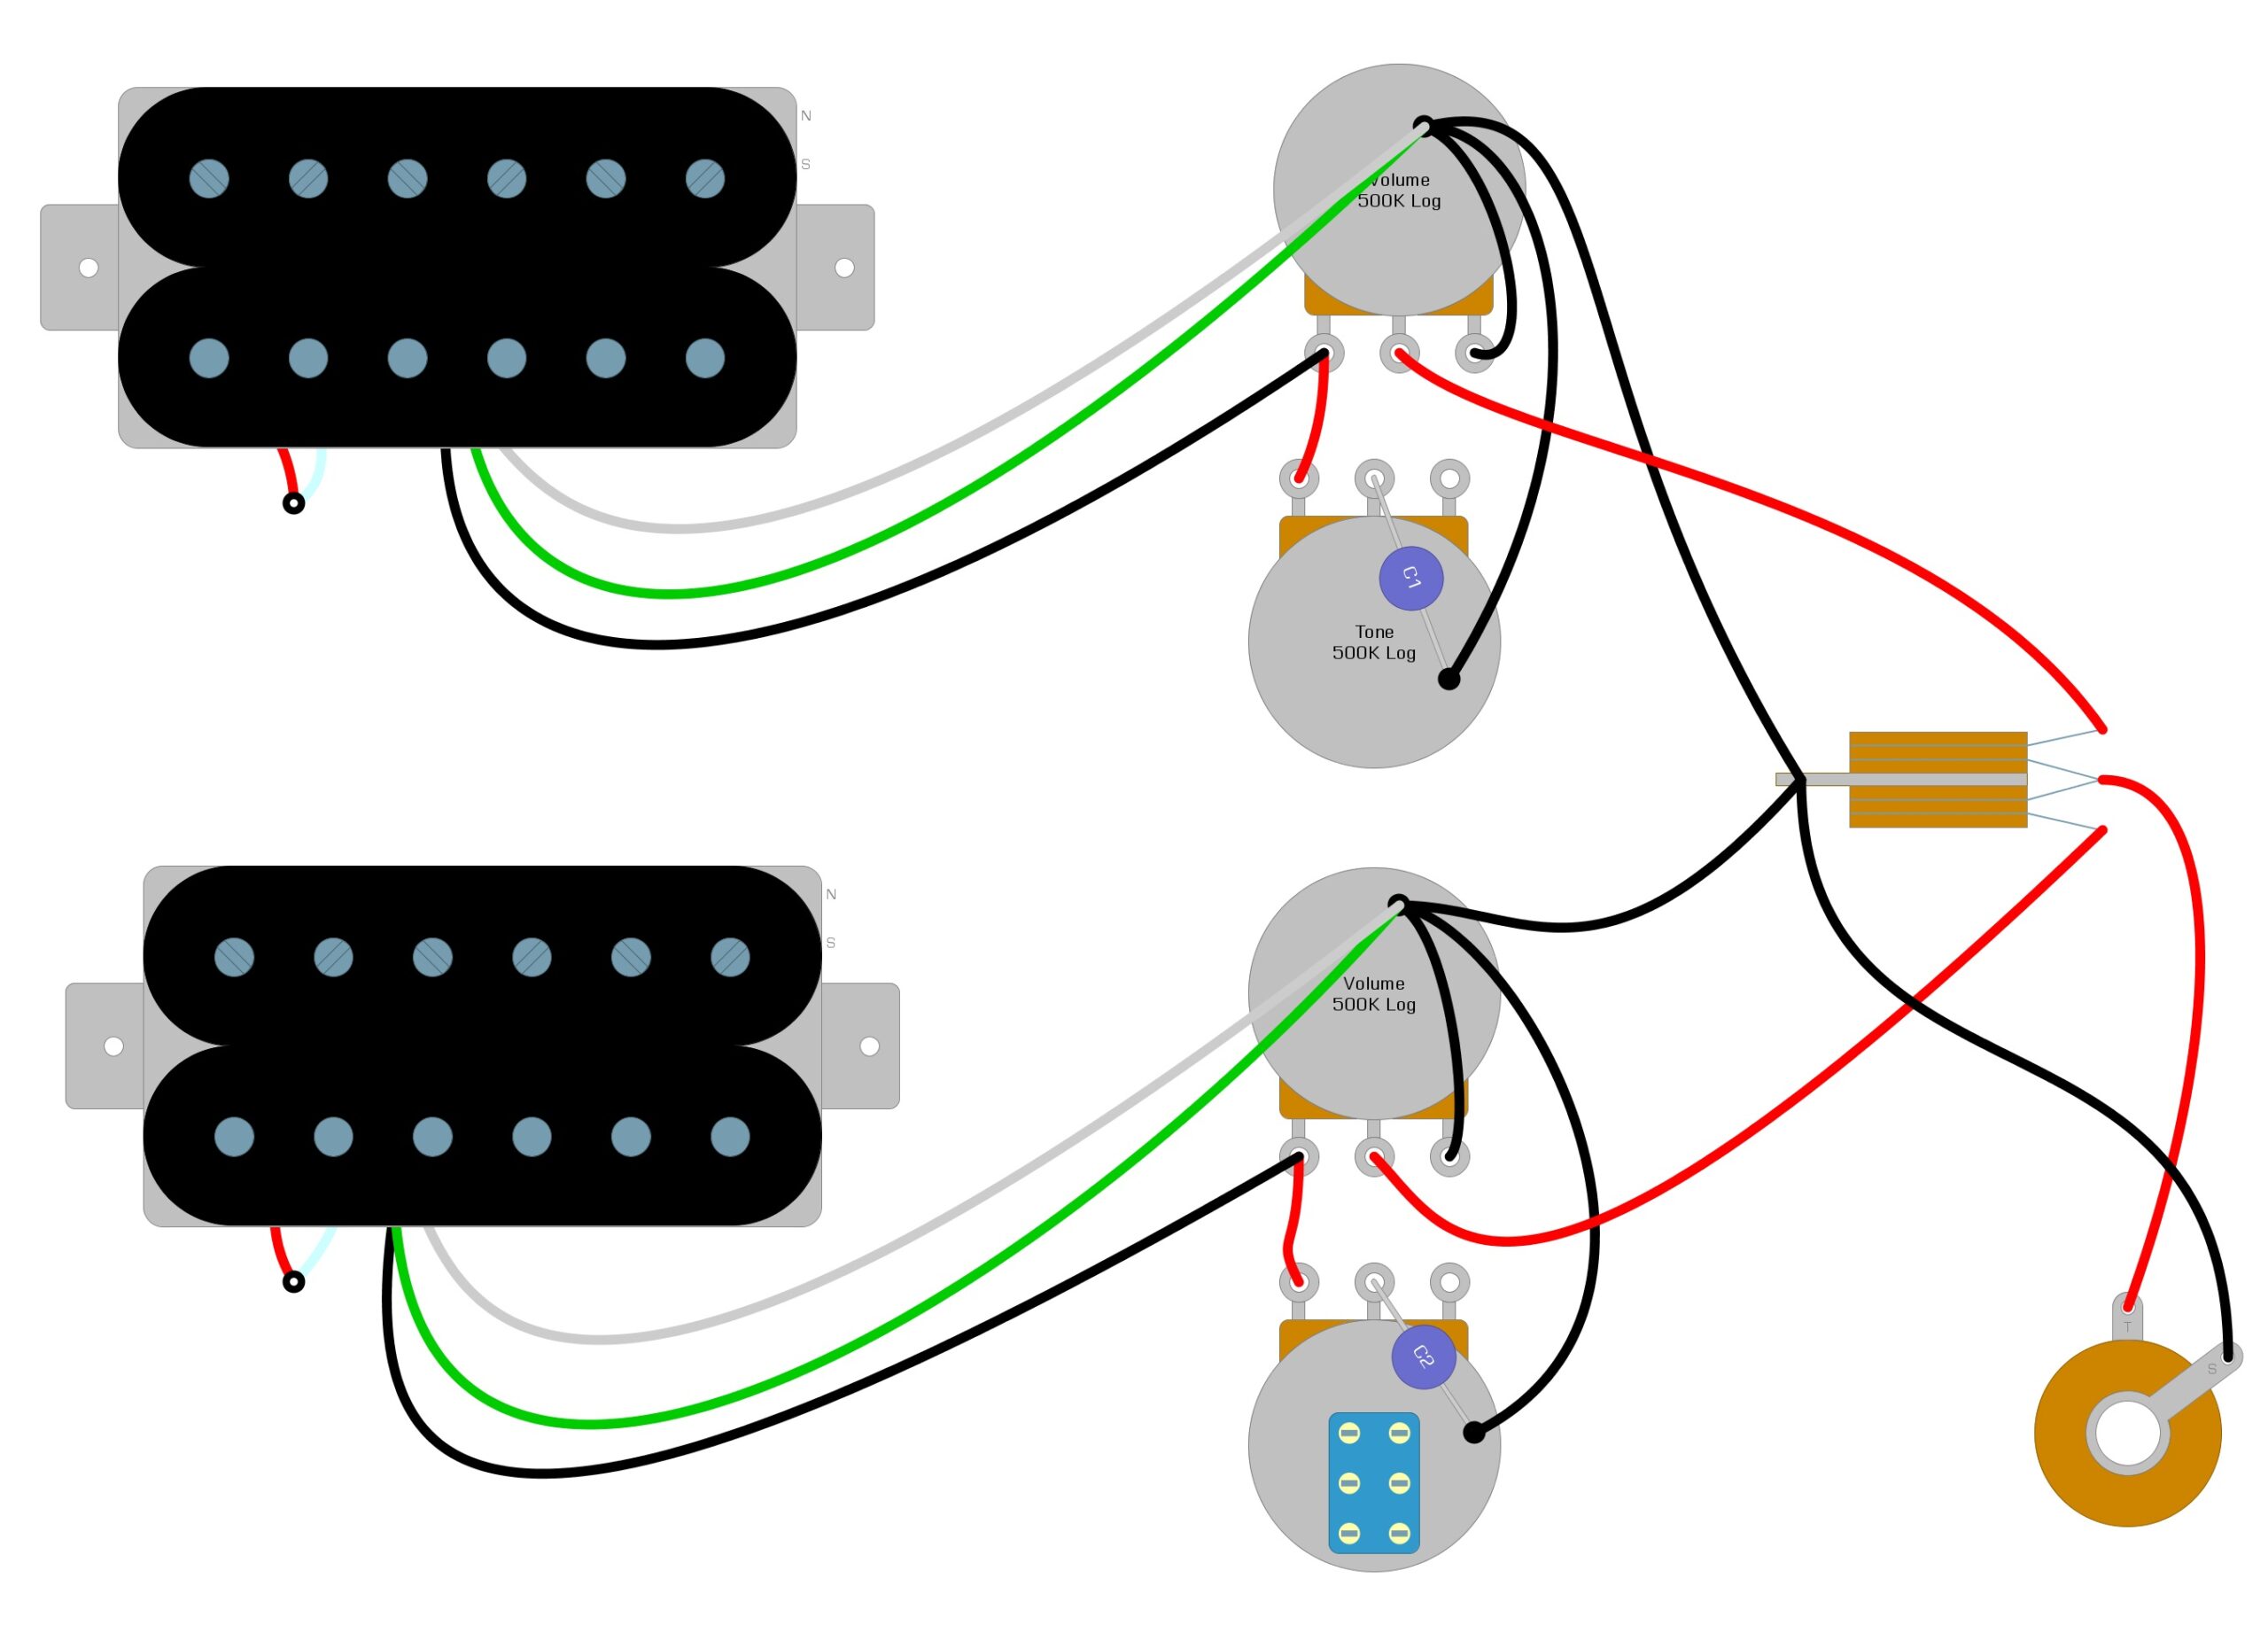
With the four-wire humbucker installed, you can take a few more simple steps to add a coil-splitting mod to your guitar to unlock extra tones. To complete this mod, you will first need to convert one of your tone controls to a push-pull pot. You will install the push-pull pot the same way, and the only difference will be the push-pull has an extra switching component we’ll put to use in the next step.
We’ve illustrated what a Gibson Les Paul might look like with the push-pull pot installed in Example 7
Example 7
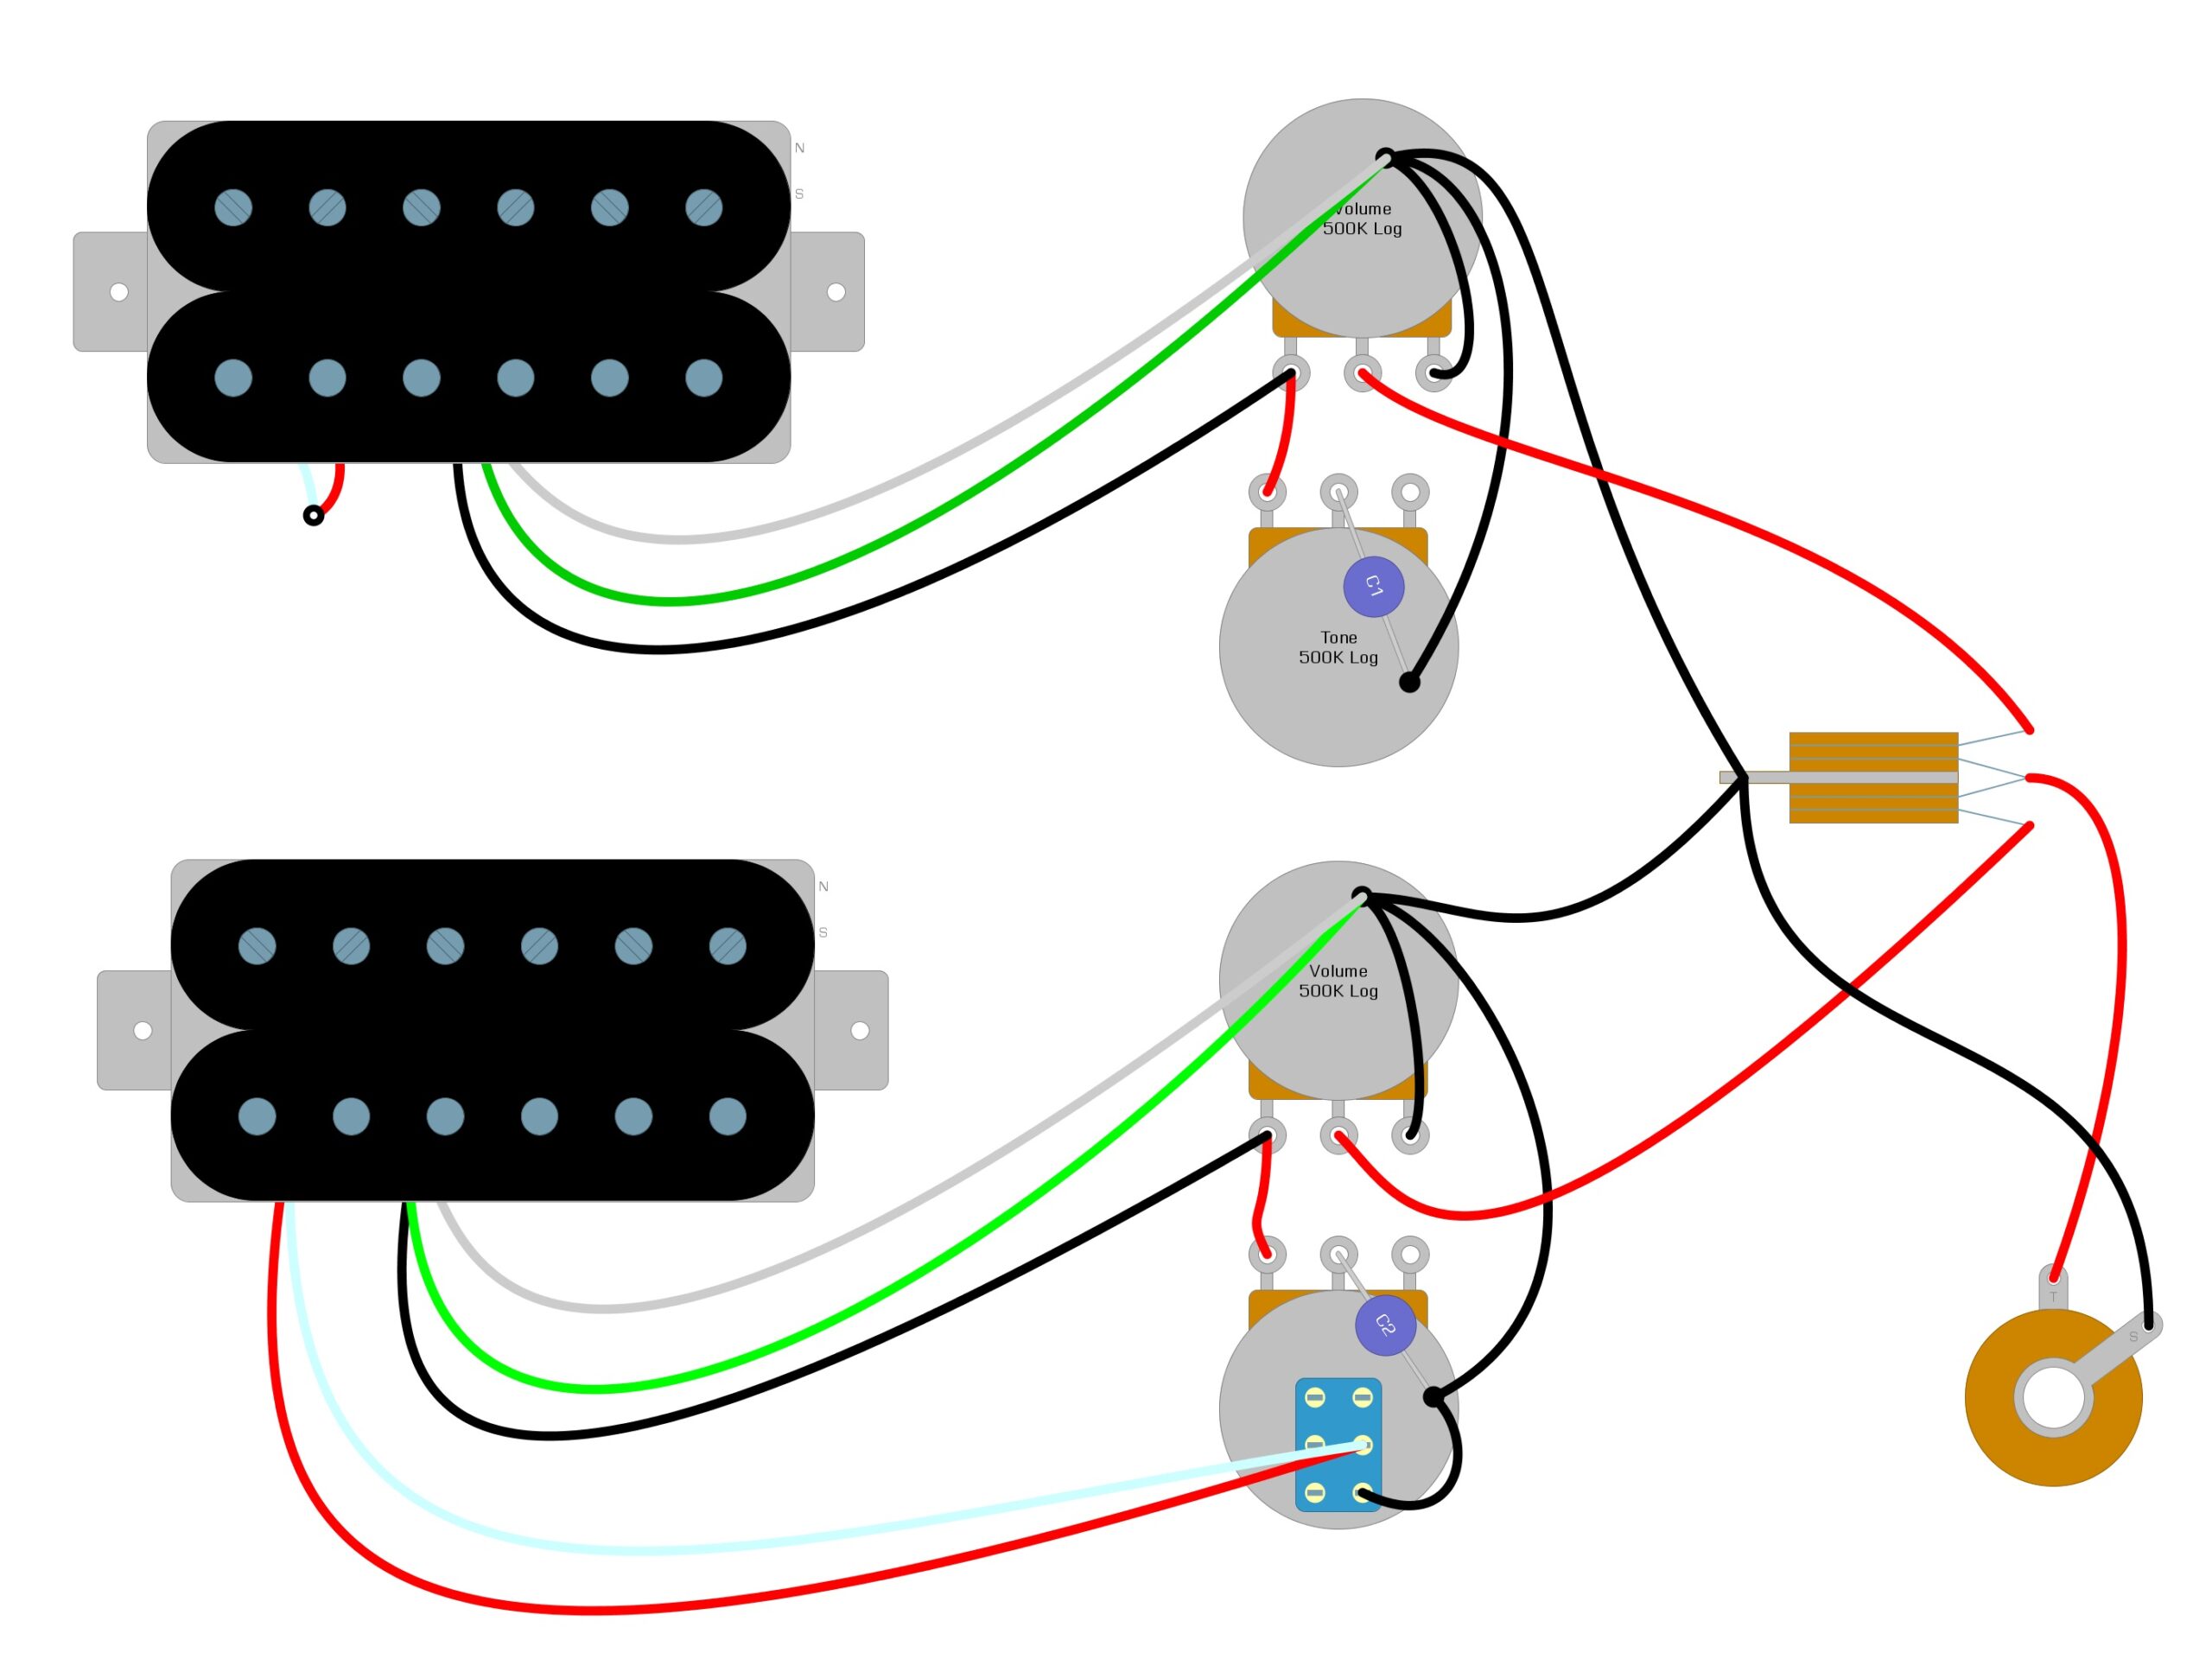
With the push-pull pot installed, you only need to connect the Red and White wires from the pickup to the push-pull pot’s switch part. You will also need to connect a short Ground wire from the switch to the back of the tone pot.
We’ve illustrated these final connections in Example 8.
Example 8
Conclusion
Installing these pickups is not hard, and any model Van Zandt can help improve a budget guitar’s tone. The coil splitting modification will help you get more tones from your guitar with a 100% reversible mod. We hope you enjoy your new pickups, and that we have answered any questions you had. If you think others would find it interesting, please share this Van Zandt installation guide on Facebook and Twitter.


