By Ed Malaker
Posted 01/22/2020
If you’d like to know more about how to use shielded guitar wire, this is a good place to start. We’ll help you decide if this insulated wire is the right thing to use for your situation, and we’ll show you how to install it.
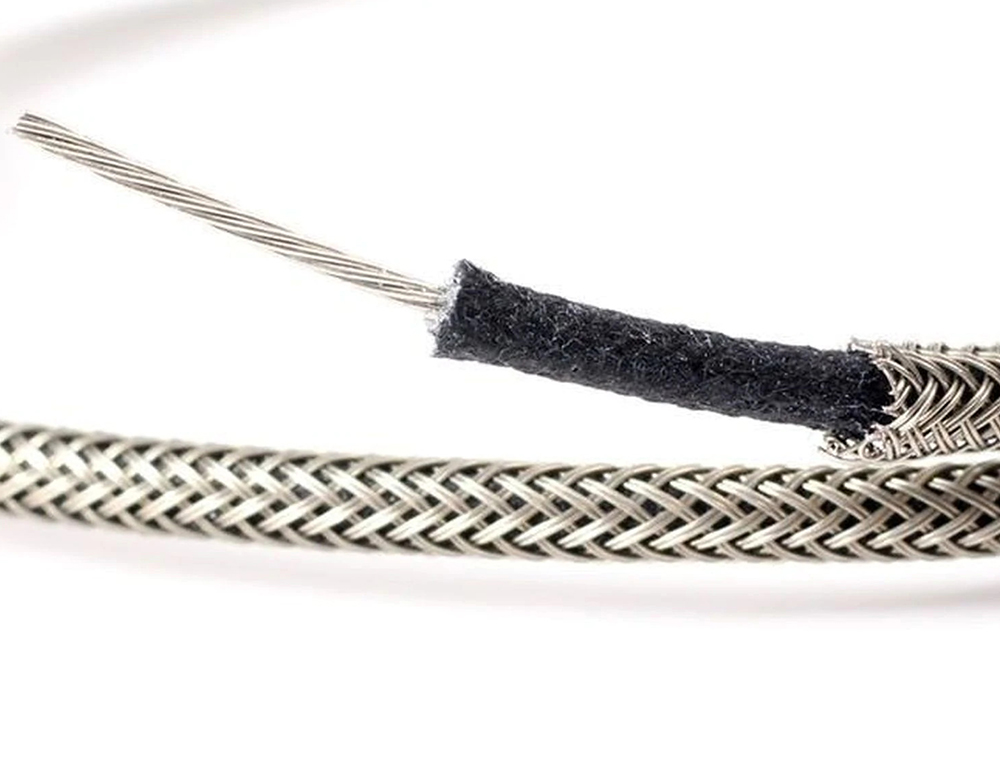
Shielded wire is made up of a core and an exterior. The core wire is like standard wire, while the shield is a braided exterior wire. The core wire replaces the stock wire when converting to the insulated wire and each end of the outer wire gets soldered to the nearest ground.
Grounding the braided wire creates a shield that protects the core from electromagnetic and radio frequency (RF) interference. If you play your guitar in an environment that receives a lot of this kind of interference, the shielded guitar wire modification can help quiet your guitar considerably.
Things to Consider
In our discussion of how to use shielded guitar wire, and making any changes to your instrument, there are several things to consider.
Capacitance
One of the most recognizable examples of shielded wire in association with your guitar, is the cable. If you’ve been playing the guitar for a while, you’re probably well aware that the longer your guitar cable is, the muddier your tone will be. The closeness of the core and shield wires causes a capacitance, or high-end loss. This same type of capacitance can also occur in the insulated wire you use in your guitar.
The thinner the insulation between the core and the shield wires, the higher the capacitance. The higher the capacitance, the greater the loss will be with high-end frequencies. So, for our consideration of how to use shielded guitar wire, we have to remember that the shielding in the wire we will use in our instrument is much thinner than the one in our cable, which means the capacitance will be higher. In fact, the capacitance can be as much as twice as high in our insulated wire, resulting in a significant amount of high-end loss per foot, often more than two times that of a guitar cable.
However, we’re only going to be using a few inches of insulated wire at most, opposed to the several feet often used in a guitar cable. The resulting high-end loss will be minimal, but it will be more than plain wire, so it’s something to consider before making the switch.
Limited Room
If you are using shielded wire to avoid the need to remove all of your electronics, you might find it more challenging to work in the guitar cavities. It can be cumbersome to work with a soldering iron in this small environment, and there is a danger that you might melt the other wires.
Removing the electronics may still be necessary to ensure a good clean connection for both the core and shield wires.
Guitar Ground Loop
When replacing your standard wire with shielded wire, there is no need to replace every wire in the guitar; doing so could potentially create a ground loop. A ground loop is when you have more than one path to ground. Two connections to ground essentially create a circle path for electricity to follow infinitely. Ground loops act as an antenna for electromagnetic and RF interference, which is what we are trying to eliminate.
For example, there’s usually a ground wire running from the back of the volume pot to the back of the tone control. If we were to switch out this wire with shielded wire, the result would be two wires going from the volume to the tone control, which creates a ground loop.
You only need to insulate the hot, signal-carrying wires in your guitar circuit. Any ground wires connecting to the back of a tone or volume control should remain as is.
Best Choice for Guitar Wiring
Your guitar only requires very thin wire, because very little electricity is created by the guitar pickups. The most common guitar wire gauge is 24 AWG, and the most common pickup wire gauge is 27 AWG. The insulated wire that you use will be a little thicker, but as long as the core wire is 27 AWG, there should be no problem. A wire that is too thick will only cost more and take up more space in your guitar. It will have no significant effect on the signal.
You will use a single conductor shielded wire for most purposes, which is what we recommend. You might be able to use a multi-conductor insulated cable on rare occasions. When making your connections, you will want to make sure there is as little core wire exposed as possible. Any exposed wire is unshielded.
Alternative Guitar Shielding
In our discussion of how to use shielded guitar wire, we should also consider alternatives, such as guitar shielding paint or copper/aluminum foil tape. For both methods, remove the electronics and cover the inside of the electronics cavity with the chosen substance.
The shielding paint usually contains the conductive mineral graphite and is painted onto the guitar cavity. The copper and aluminum foil tapes are highly conductive and stick to the cavity. The benefit of these methods is that you create a complete shield around all of your electronics. Also, you don’t lose any high-end frequencies through capacitance. The wiring is simplified because you remove any ground wires and leave only the signal-carrying wires.
In most cases, shielding the guitar with paint or tape will be the preferred method, but every case is different, and the shielded wire will work. If you cannot apply tape or paint, the shielded wire is the only solution. Some guitars have long channels that the wires must run through. You will need to use an insulated wire to add shielding in that case.
Shielding a Strat
Shielding a Stratocaster is quite common because this guitar uses single-coil pickups that are very noisy. The high amount of noise often leaves guitarists searching for ways to quiet them down, so our discussion of how to use shielded guitar wire is particularly useful here. This is an excellent guitar to try this modification on.
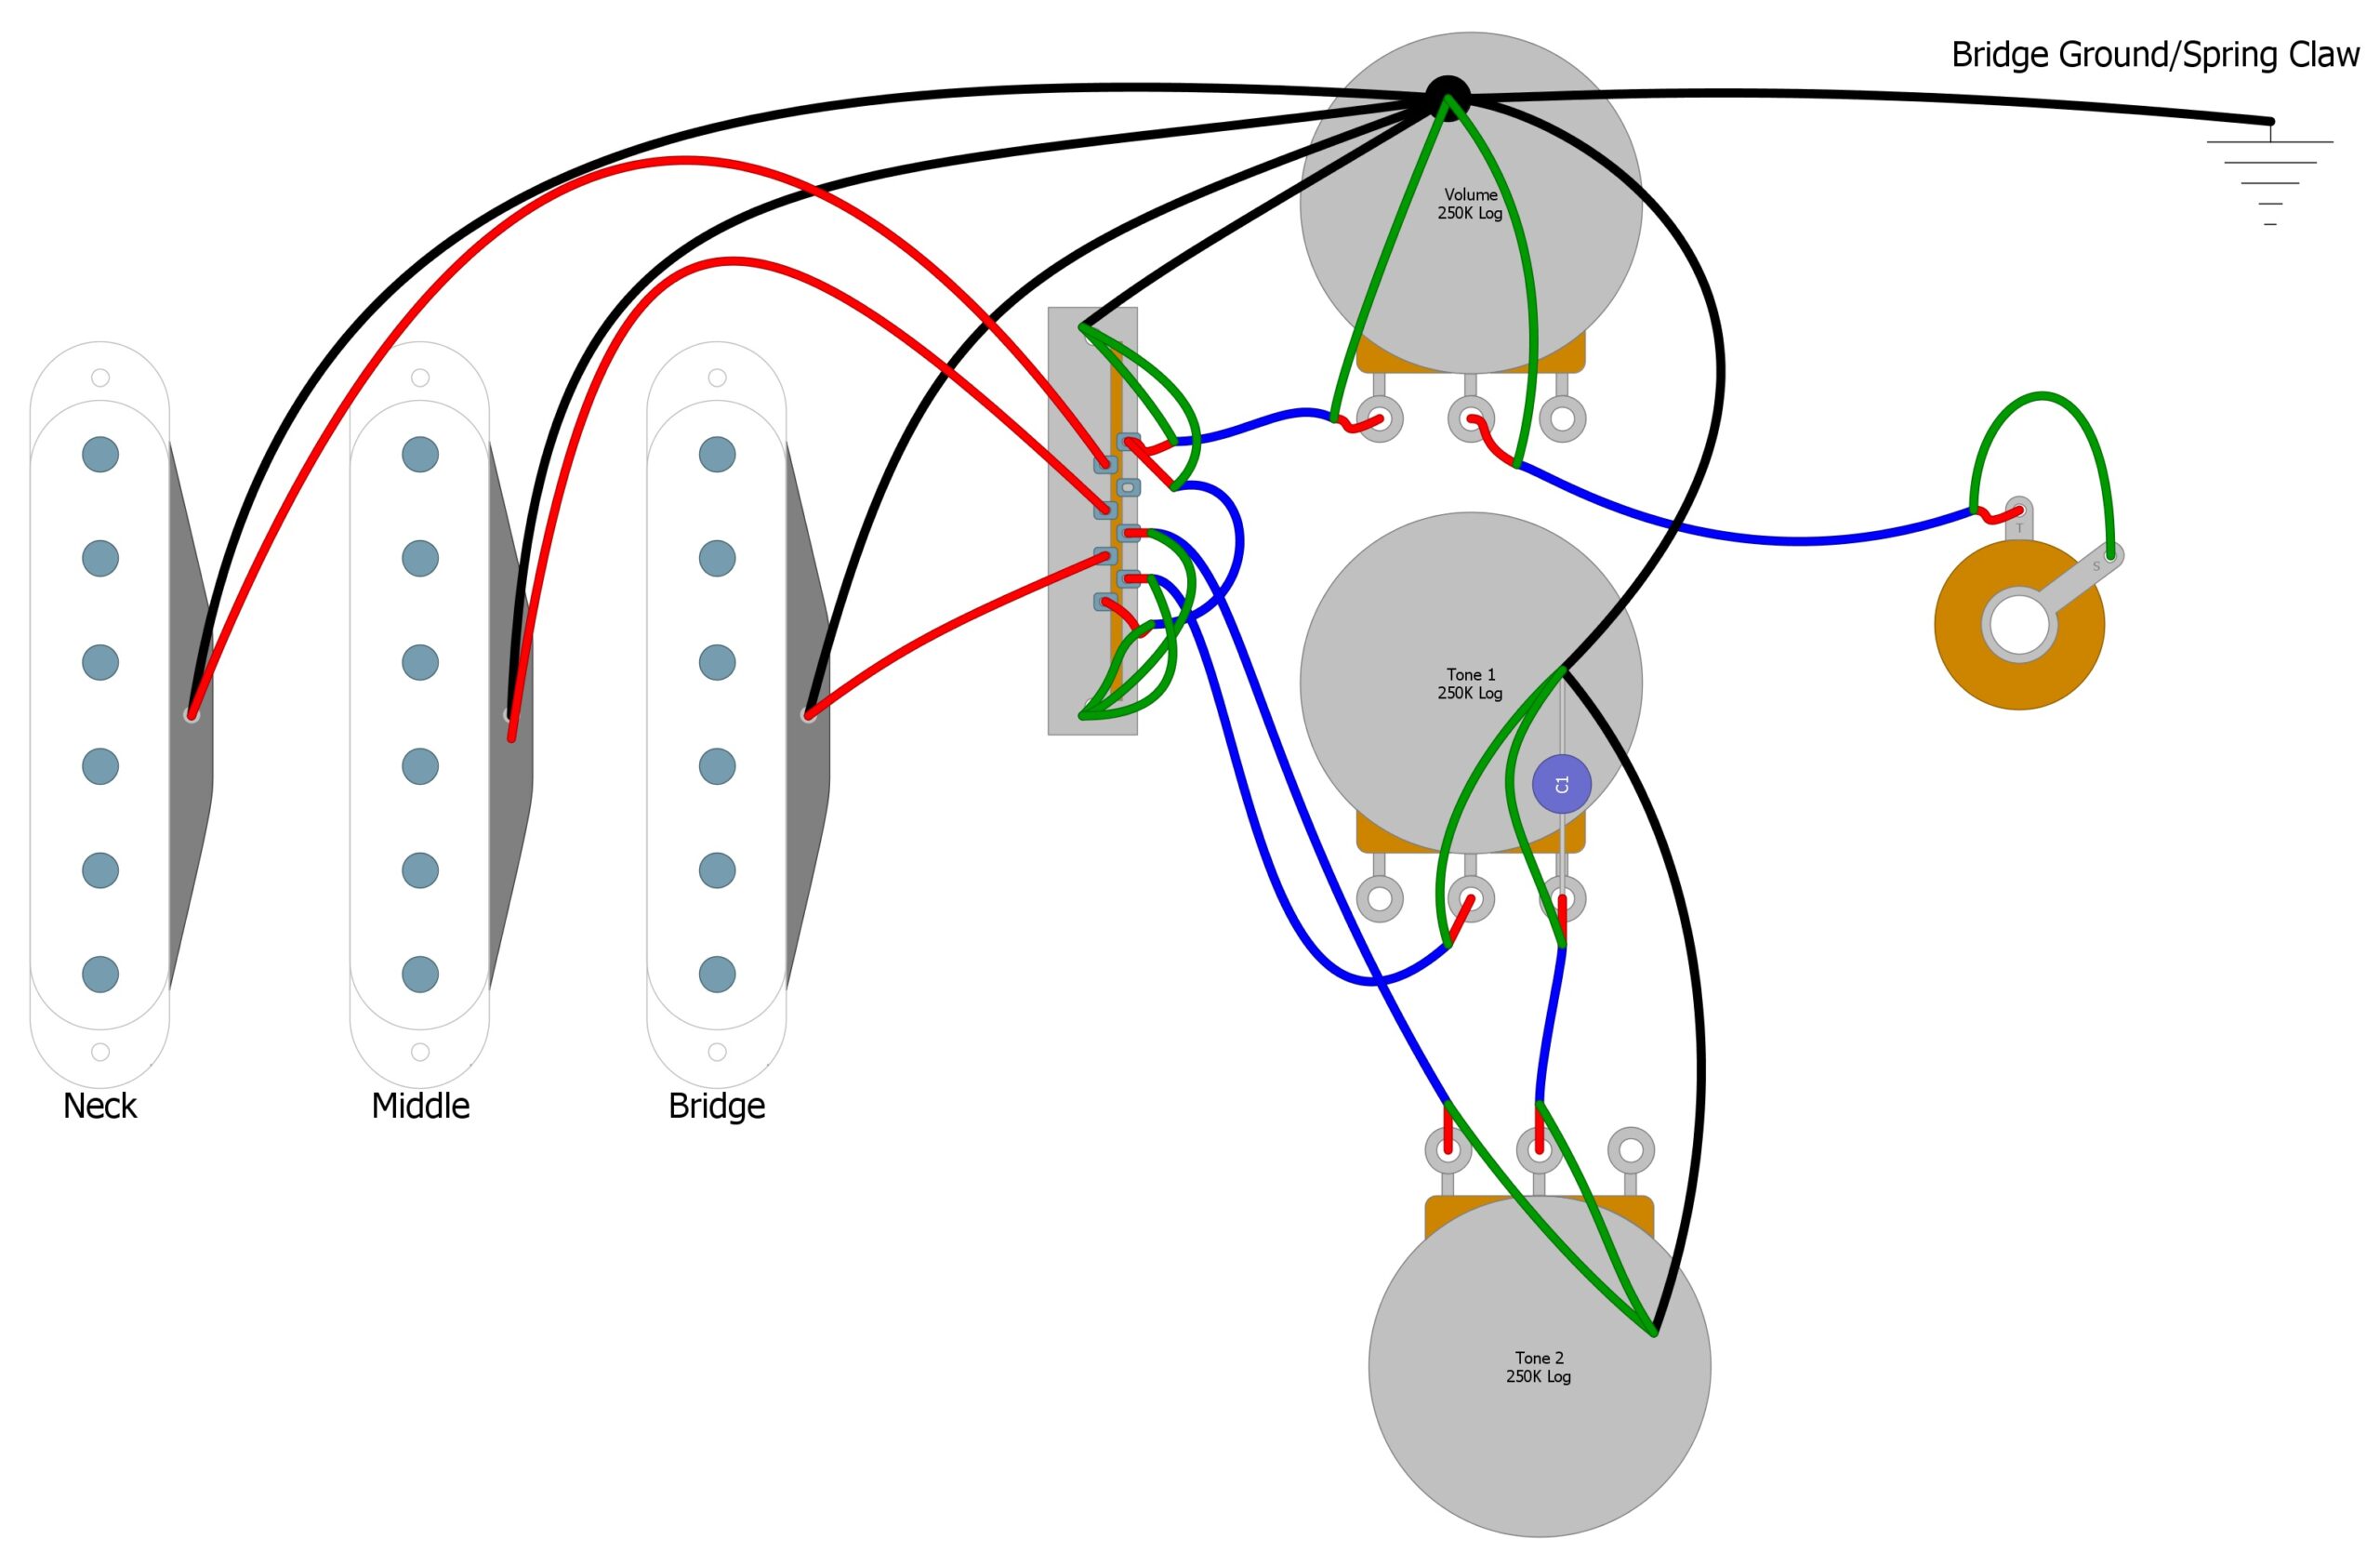
Figure 1 shows a common way to wire the Fender Strat. All of the orange/brown wires carry important signal that we will want to shield. Figure 2 is the same wiring, but with the shielded wire. In Figure 2, the blue wire represents the shielded wire, the red wire is the core, and the green wire is the shield.
If you take a look at Figure 2, you will notice that we need to add a ground wire from the back of the volume pot to the casing of the switch. We do this because the switch is not grounded; there’s nowhere to connect the shield of our wire. With the switch case grounded, we can solder our shield wires right to the switch casing.
You may also notice that the output jack has changed slightly. We can connect the wire insulation to the ground side of the jack and the core to the tip.
Fig 1
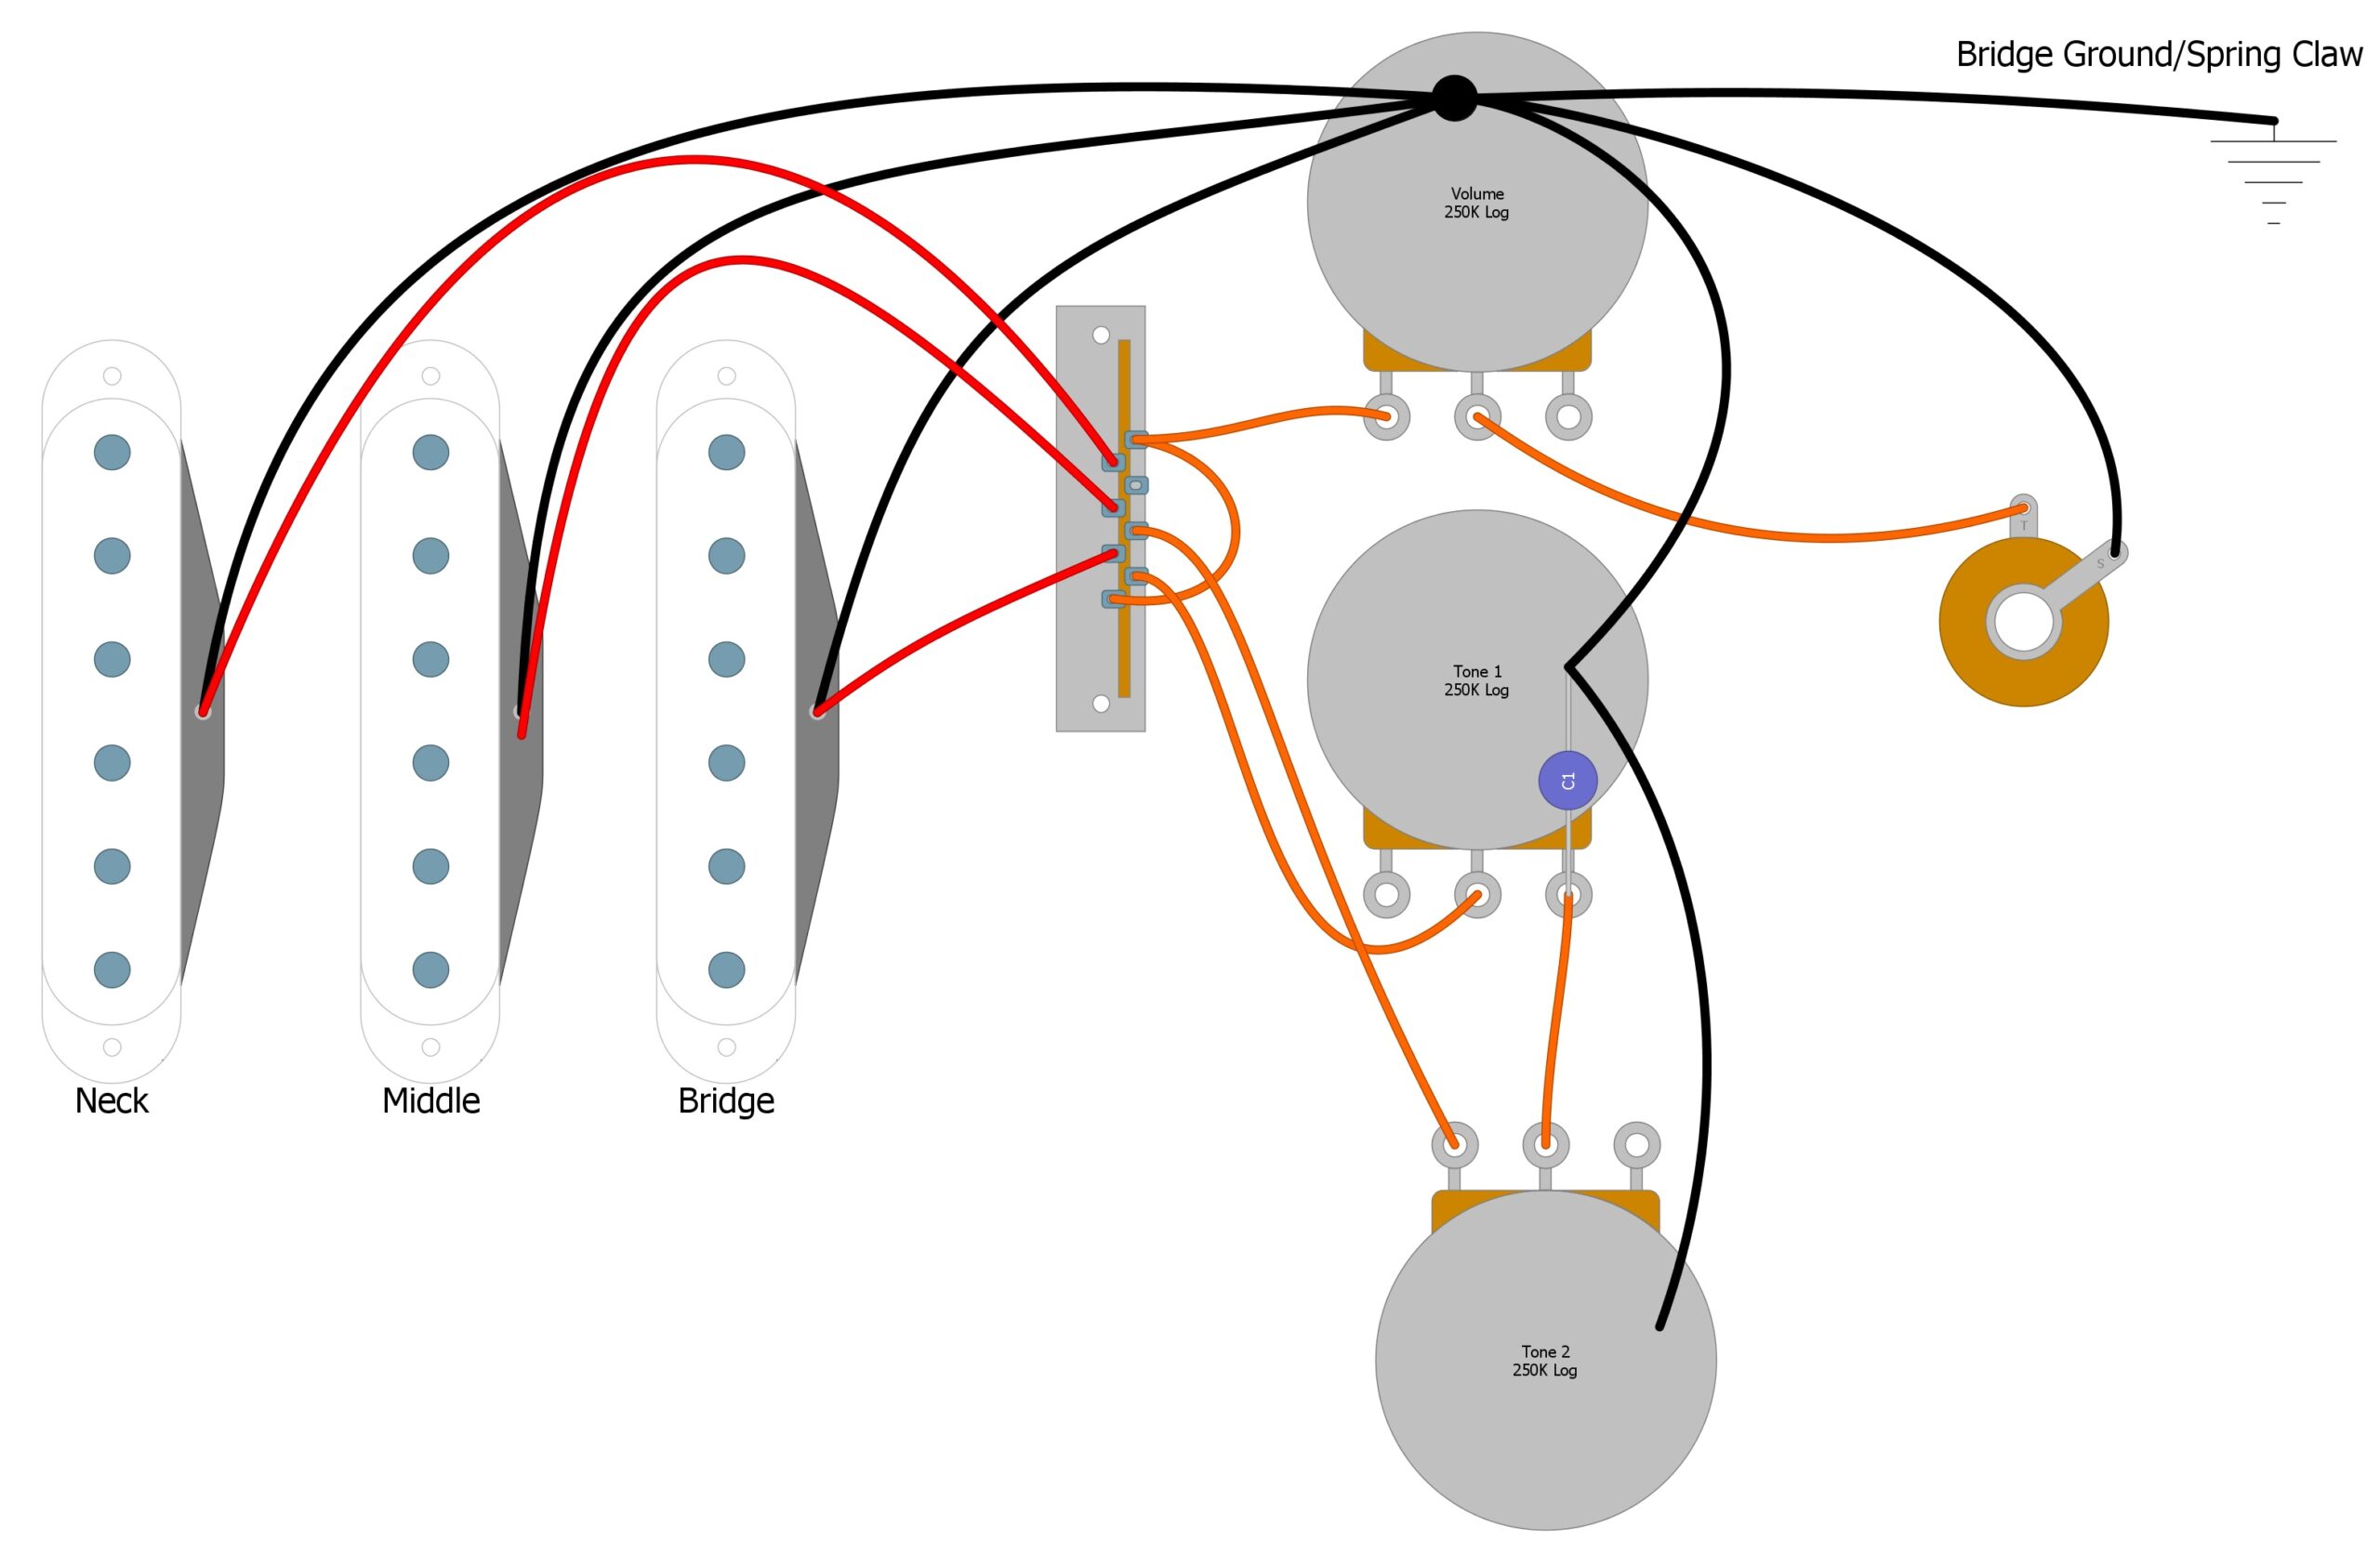
Fig 2
Summary
As you can see, it’s not that difficult to switch to the shielded wire. It will work pretty well to eliminate most of the unwanted noise in your signal caused by electromagnetic interference. If it’s not practical to shield your guitar using paint or tape, using shielded wire is the next best option.
If you enjoyed this article and it’s helped you learn how to use shielded guitar wire, please feel free to share this article on Facebook and Twitter. For more articles on guitar electronics, visit humbuckersoup.com.


