By Ed Malaker
Posted 04/27/2018
There are many values in circulation, but the most common ones are a 250k Volume pot and a 500k Volume pot. Generally speaking, a 250k pot is used for single coil pickups and a 500k pot for humbucking pickups. When a Volume pot of any value is added to the circuit, high frequencies are lost because of the way the circuit works; i.e., the lower the value of the pot the more high-end frequencies get rolled off, even when the Volume knob is all the way up. The higher the value, the higher the resistance, and more resistance prevents frequencies from “leaking out,” which leads to a brighter tone.
Those leaked tones are also responsible for a drop in overall signal level. Since the topic of which value to use is quite heated, I recommend that you use your own ears and decide what works best for you and your guitar. Start with a 500k pot and use your bridge pickup; if the sound is too brittle or harsh to your ears change over to a 250k.
The next thing to consider in volume control wiring is the quality of the potentiometer. Many off-brand and beginner guitars use lower-quality potentiometers to control cost, but these could have the wrong value and are likely to wear out and add static and crackle to your sound. I recommend searching around for the best quality potentiometers that you can afford. WD Music WD500 pots, for example, are a good place to start, but there are quite a few other quality brands available.
Now let’s consider the wire that you’ll use. This might seem like a minor matter, but it really is an important part of volume control wiring. For most of the short jumper wires inside the guitar, we’ll want to use a good, high-quality wire of between 20 and 26 awg. We want the wire to be multi-stranded and twisted or braided, because the multi-strand wire has more surface area that will transmit high frequencies better and the braiding may help with signal phase, and is easier to use.
A larger wire is not better, so choose one that is small and easy to work with. Pick a color scheme and stick with it. Most people use black for “Ground” wires and white or red for “Hot” wires but any colors will work as long as you’re consistent, since that’s the key to successful troubleshooting later on.
And your final consideration for a volume control wiring plan, is the best type of solder to use, and this would be a 60/40 rosin-core, with a thin .032 to .062 inch diameter. There are many suitable brands available, including Miniatronics.
Getting the “Hot” and the “Ground” from the Pickup
Wiring a Volume control to your guitar isn’t too hard. If you have a single-coil pickup, the thick wire coming out of the pickup will have two thinner wires inside of it. One will be a braided wire that surrounds a single wire. The braided wire is the “Ground,” and the single wire is the “Hot.” If you are using a humbucker pickup you will (usually) tie together the bare wire and the green wire. Tie together, and tape off, the white wire and the red wire. The black wire is the “Hot,” and the bare/green wire is the “Ground.”
Wiring the Pickup to the Volume Control
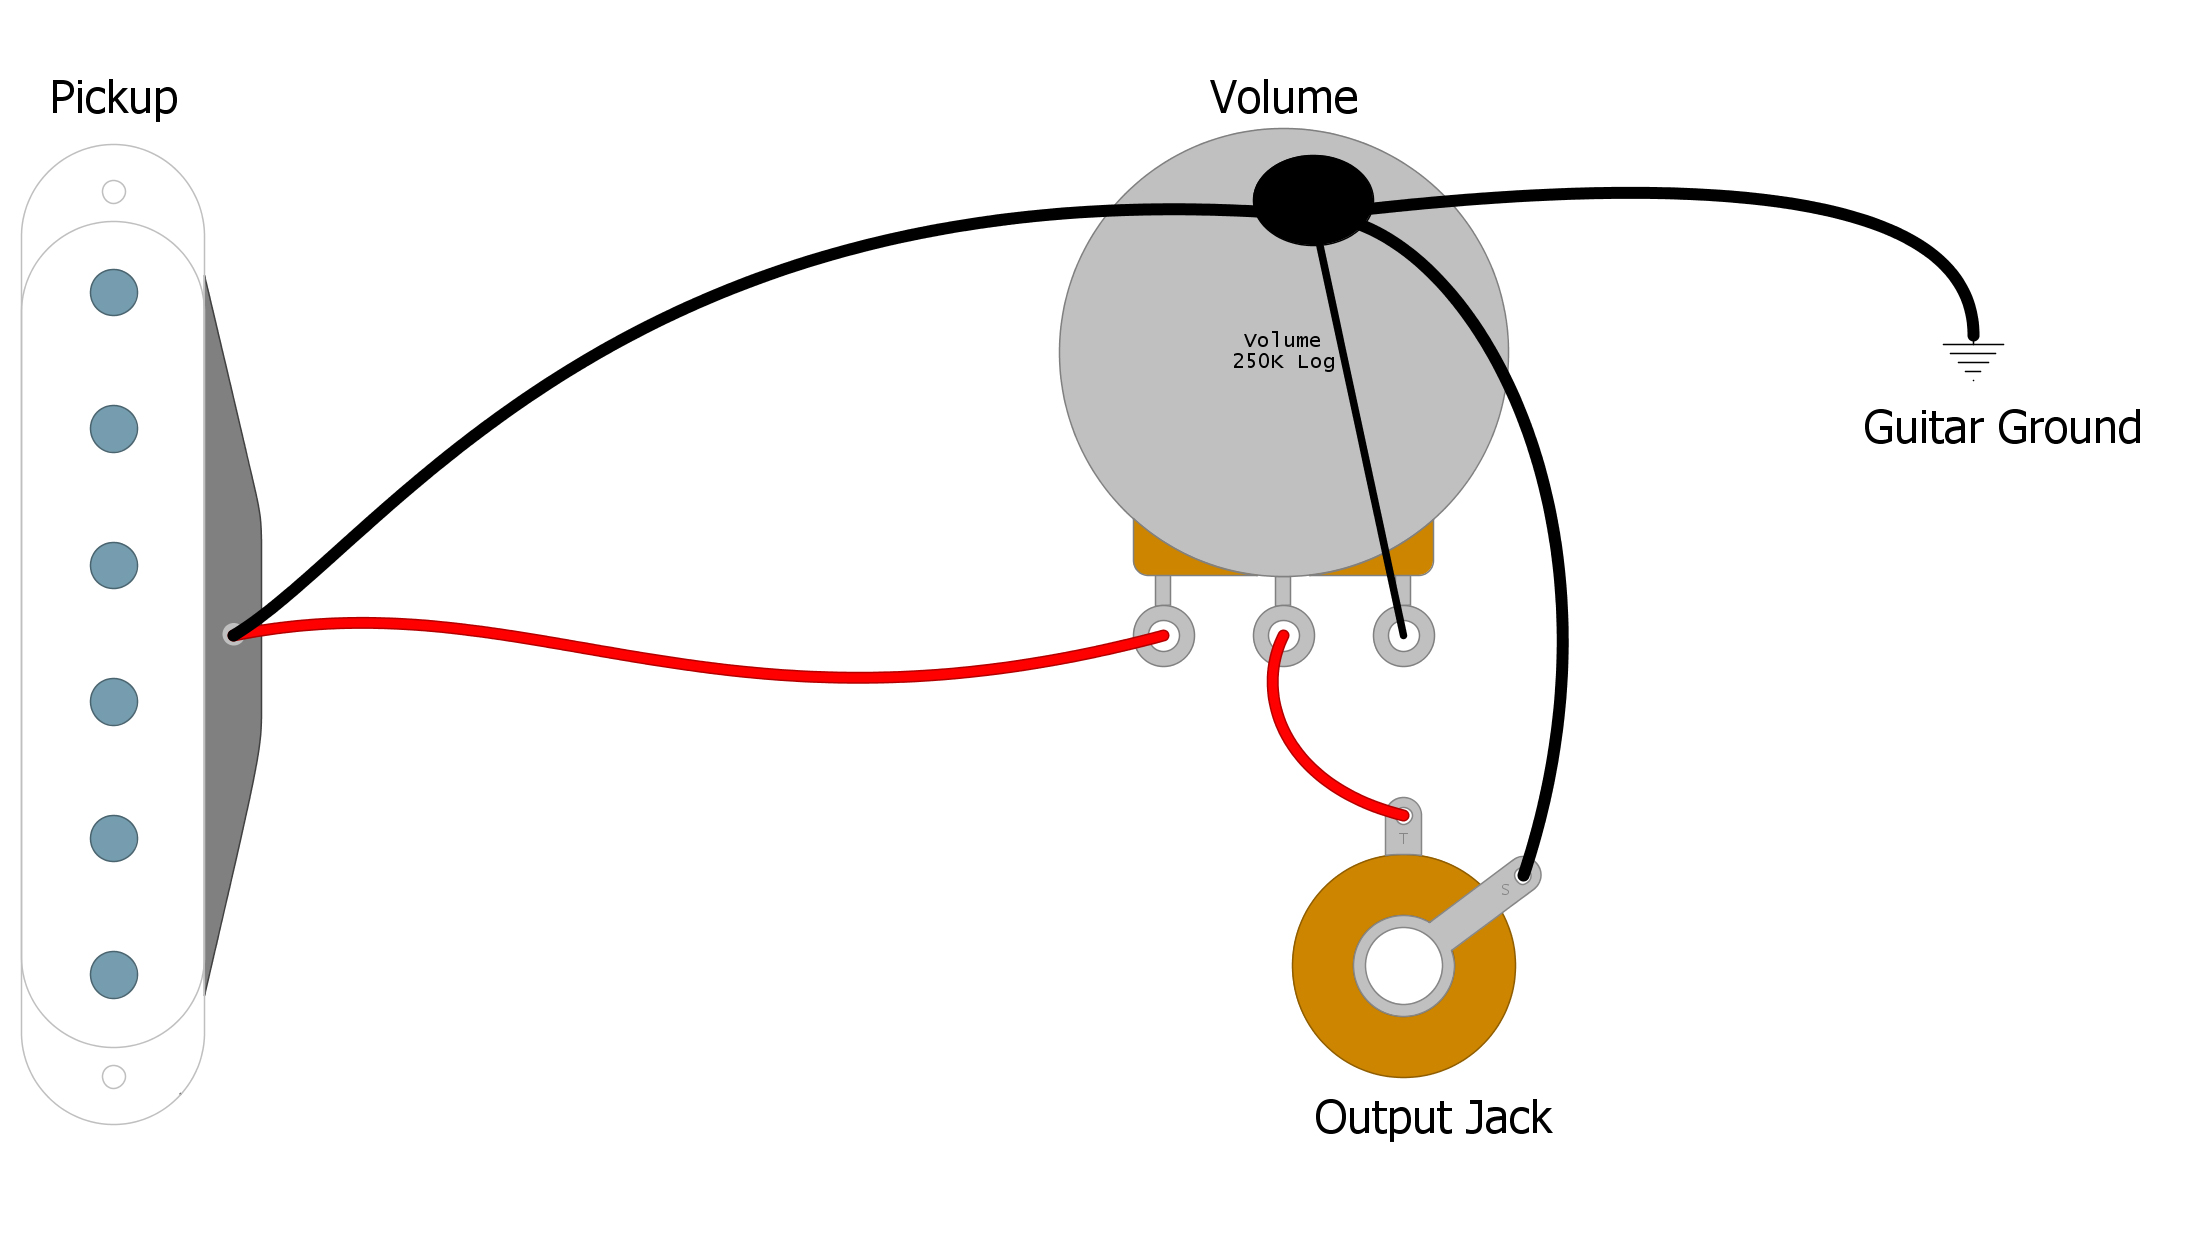
If you look at the bottom of the Volume control and have the three tabs pointing down you can number the tabs 1, 2, and 3 from left to right. We want to solder our pickup’s “Hot” wire to Tab 1 and solder the “Ground” wire to the back case of the volume pot. We also want to solder Tab 3 to the back of the pot.
Completing the Circuit in Your Volume Control Wiring Plan
The Output Jack of the guitar has two tabs, a Sleeve, and a Tip. The Sleeve Tab is the one that’s connected to the center part of the jack that will be in contact with the guitar cable. The Tip Tab will be the one attached to a post that will connect with the tip of a guitar chord when it’s plugged in. You want to solder a wire from Tab 2 of the Volume control pot to the Tip Tab of the Output Jack. Then solder a wire from the Sleeve Tab to the back of the Volume control.
And that’s it… you’ve completed your volume control wiring!
If you’ve found this article helpful, please feel free to share this with your friends on Facebook and Twitter. For more articles on guitar electronics, visit humbuckersoup.com.

