
By Ed Malaker
Posted 08/30/2022
This article will cover how to completely wire a Stratocaster with a stock wiring diagram. We mount almost all of the electronics used in a Fender Stratocaster to the pickguard, and the only component separate from the rest is the output jack. This configuration makes it easy to wire up your electronics away from your guitar. It also led to the invention of the pre-wired pickguard.
Pre-wired pickguards are available in every variation with nearly any brand of pickup pre-installed. When you receive your pre-wired pickguard, you simply solder two wires to the output jack and screw the pickguard onto the guitar, and you are ready to go.
We are approaching this article on stock Stratocaster wiring as if you have the parts (or are looking to purchase them), and are looking to build one of these pre-wired pickguards from scratch.
Parts and Supplies
Before you begin, let’s make sure you have all of the necessary parts on hand. The parts listed will be for a standard Fender Stratocaster, but there are lots of options, and we’ll tell you a little about how you can modify values and components in the relevant sections.
Here’s what you’ll need in this Strat wiring kit:
- Fender Stratocaster pickguard and mounting screws
- Three single-coil pickups and mounting hardware
- One 5-way switch
- Three 250k potentiometers
- One .047uf capacitor
- One-foot wire
- Solder
- Screwdriver
- Soldering iron
- Pliers
The Fender Stratocaster Pickguard
To get started, you are going to need a blank Fender Stratocaster pickguard. There are plenty of designs and colors available from many locations online. The main thing that you want to be concerned about when choosing a Fender Stratocaster pickguard is that it has the correct number of holes. The two most popular are 11-hole and 8-hole configurations, but there are others, and you will need the correct one for your guitar.
Most Fender Stratocaster pickguards will have the shape illustrated in Example 1.
Example 1
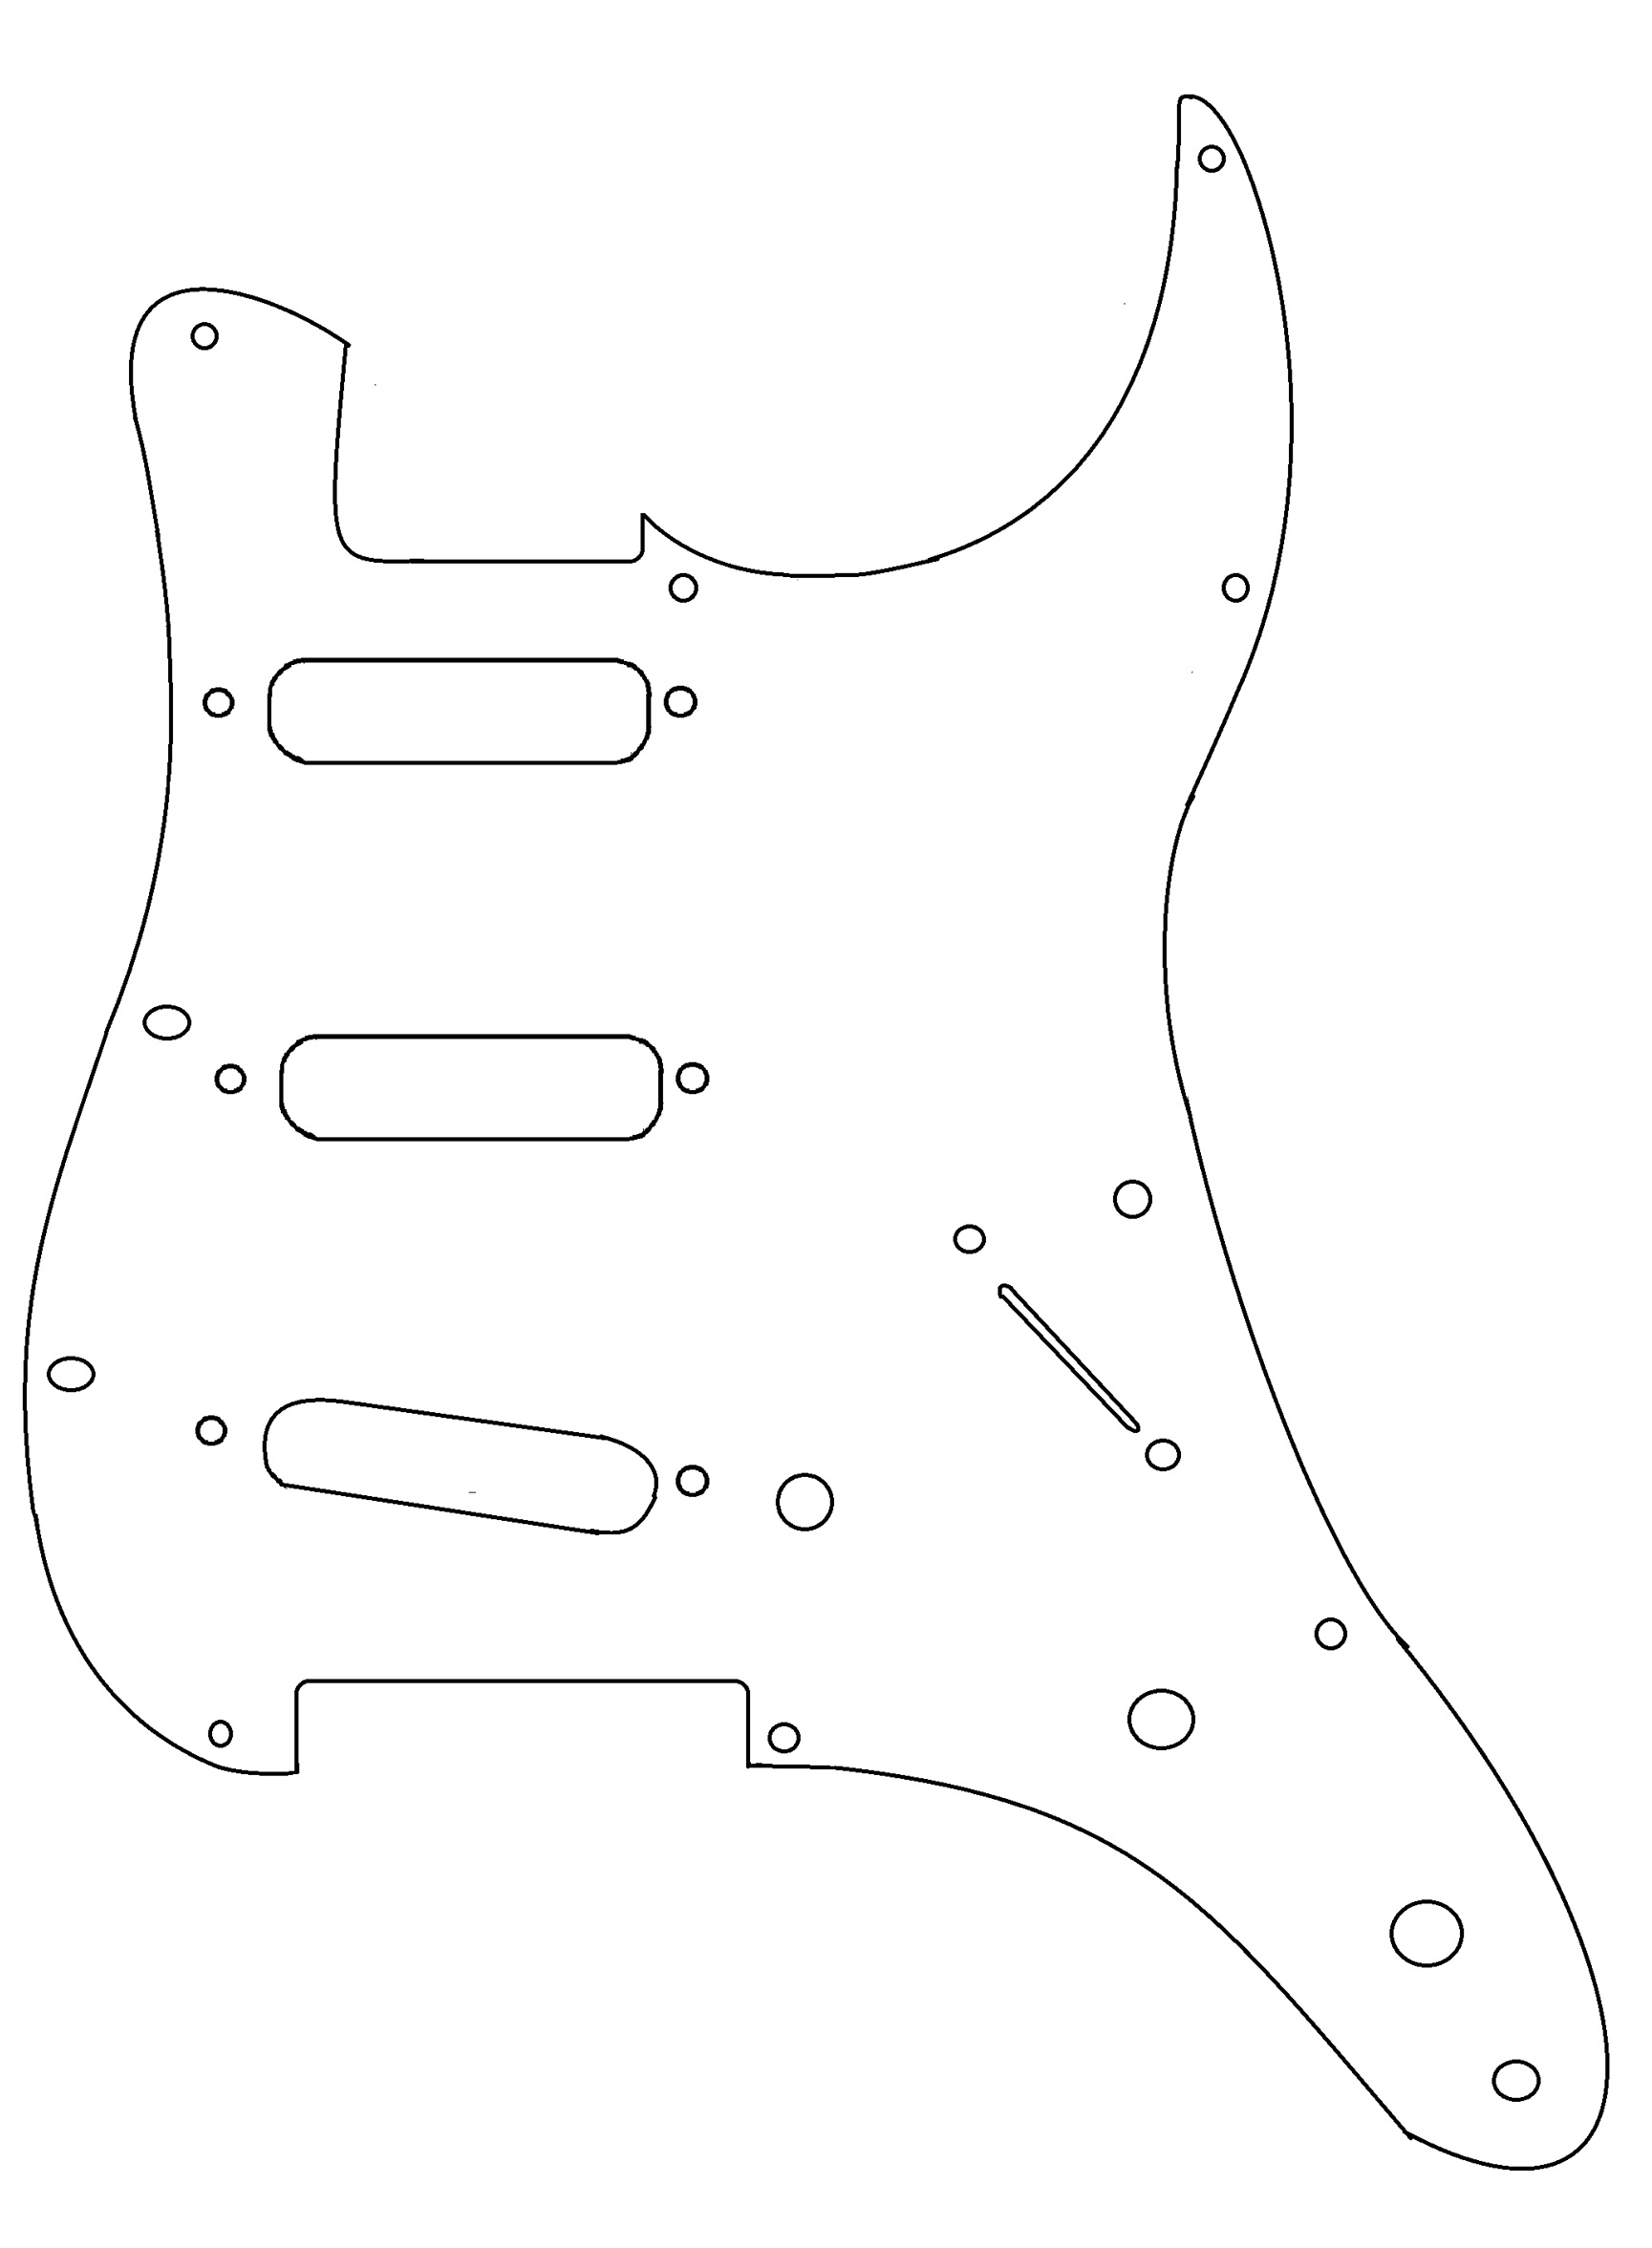
If you’re building these to sell, we recommend going with the 11-hole. The 11-hole pickguard is for modern guitars that are more likely to be modified.
Shielding
Since there’s nothing attached to the pickguard yet, this is an excellent time to apply shielding tape or paint. Applying shielding material to the inside surface is a good idea, even if you don’t intend to shield the electronics at this time, or if you want to sell the pre-wired pickguard.
If you’re going to coat the surface, we recommend using copper tape with a conductive adhesive. Make sure you cover the entire inside surface of the pickguard with the tape.
Pickups
The next part of our project is to install the pickups into the pickguard. Installing pickups is not difficult and only requires attaching two screws for each pickup. The screws will not tighten, however, and instead raise and lower the pickup so you can achieve the ideal distance from pickup to string.
It doesn’t matter what brand of pickups you use, but there are some things to consider when installing them.
- You can use single coil pickups or humbuckers, but to use humbuckers, they must be of the “mini” variety, so they fit in the pickguard. Humbuckers generally have more wires than the two-wire single-coil, but the pickup manufacturer will supply directions on how to turn it into a two-wire pickup.
- Strings move less by the bridge, so you need a stronger pickup in this position.
- Strings move more by the neck, so you need a lower output pickup in this position.
- The middle pickup is usually reverse-wound, so your single-coil pickups can act like a humbucker when playing in the second and fourth switch position. In these positions, you should notice reduced noise.
- You can test the output of your pickup with a multimeter. Set it to measure resistance. A higher number means more output.
The Five-Way Switch
The five-way switch is the next component we want to add to our pickguard. This component is simple, inexpensive, and you can purchase one at most guitar shops or online. These switches come in many variations, but the basic five-way switch is all you need. The other types are usually vintage models, or you might run across a five-way super switch, but these are much rarer and detectable by their high cost. Super switches are great for many guitar mods, but they are beyond the scope of this post.
This switch will attach to your pickguard with two small screws.
The 250k Potentiometers
You should have three 250k potentiometers to use for one volume control and two tone controls. The way we wire the guitar determines whether a pot is a tone control or volume control, so it doesn’t matter which you install in the volume control position and which you place in the tone control positions. These should attach to your pickguard with a bolt.
The standard potentiometer value for use with single-coil pickups is 250k, because these pickups often sound bright and this value allows some high frequencies to escape to Ground. If you are using mini-humbuckers, you may want to use a higher value, like 500k, because these pickups tend to sound warmer so you will not want to let so many high-end frequencies escape to Ground. You can also experiment with mixing the values to fine-tune your tone and make it more personal, especially if your pickups sound too bright or too dark.
Strat Wiring
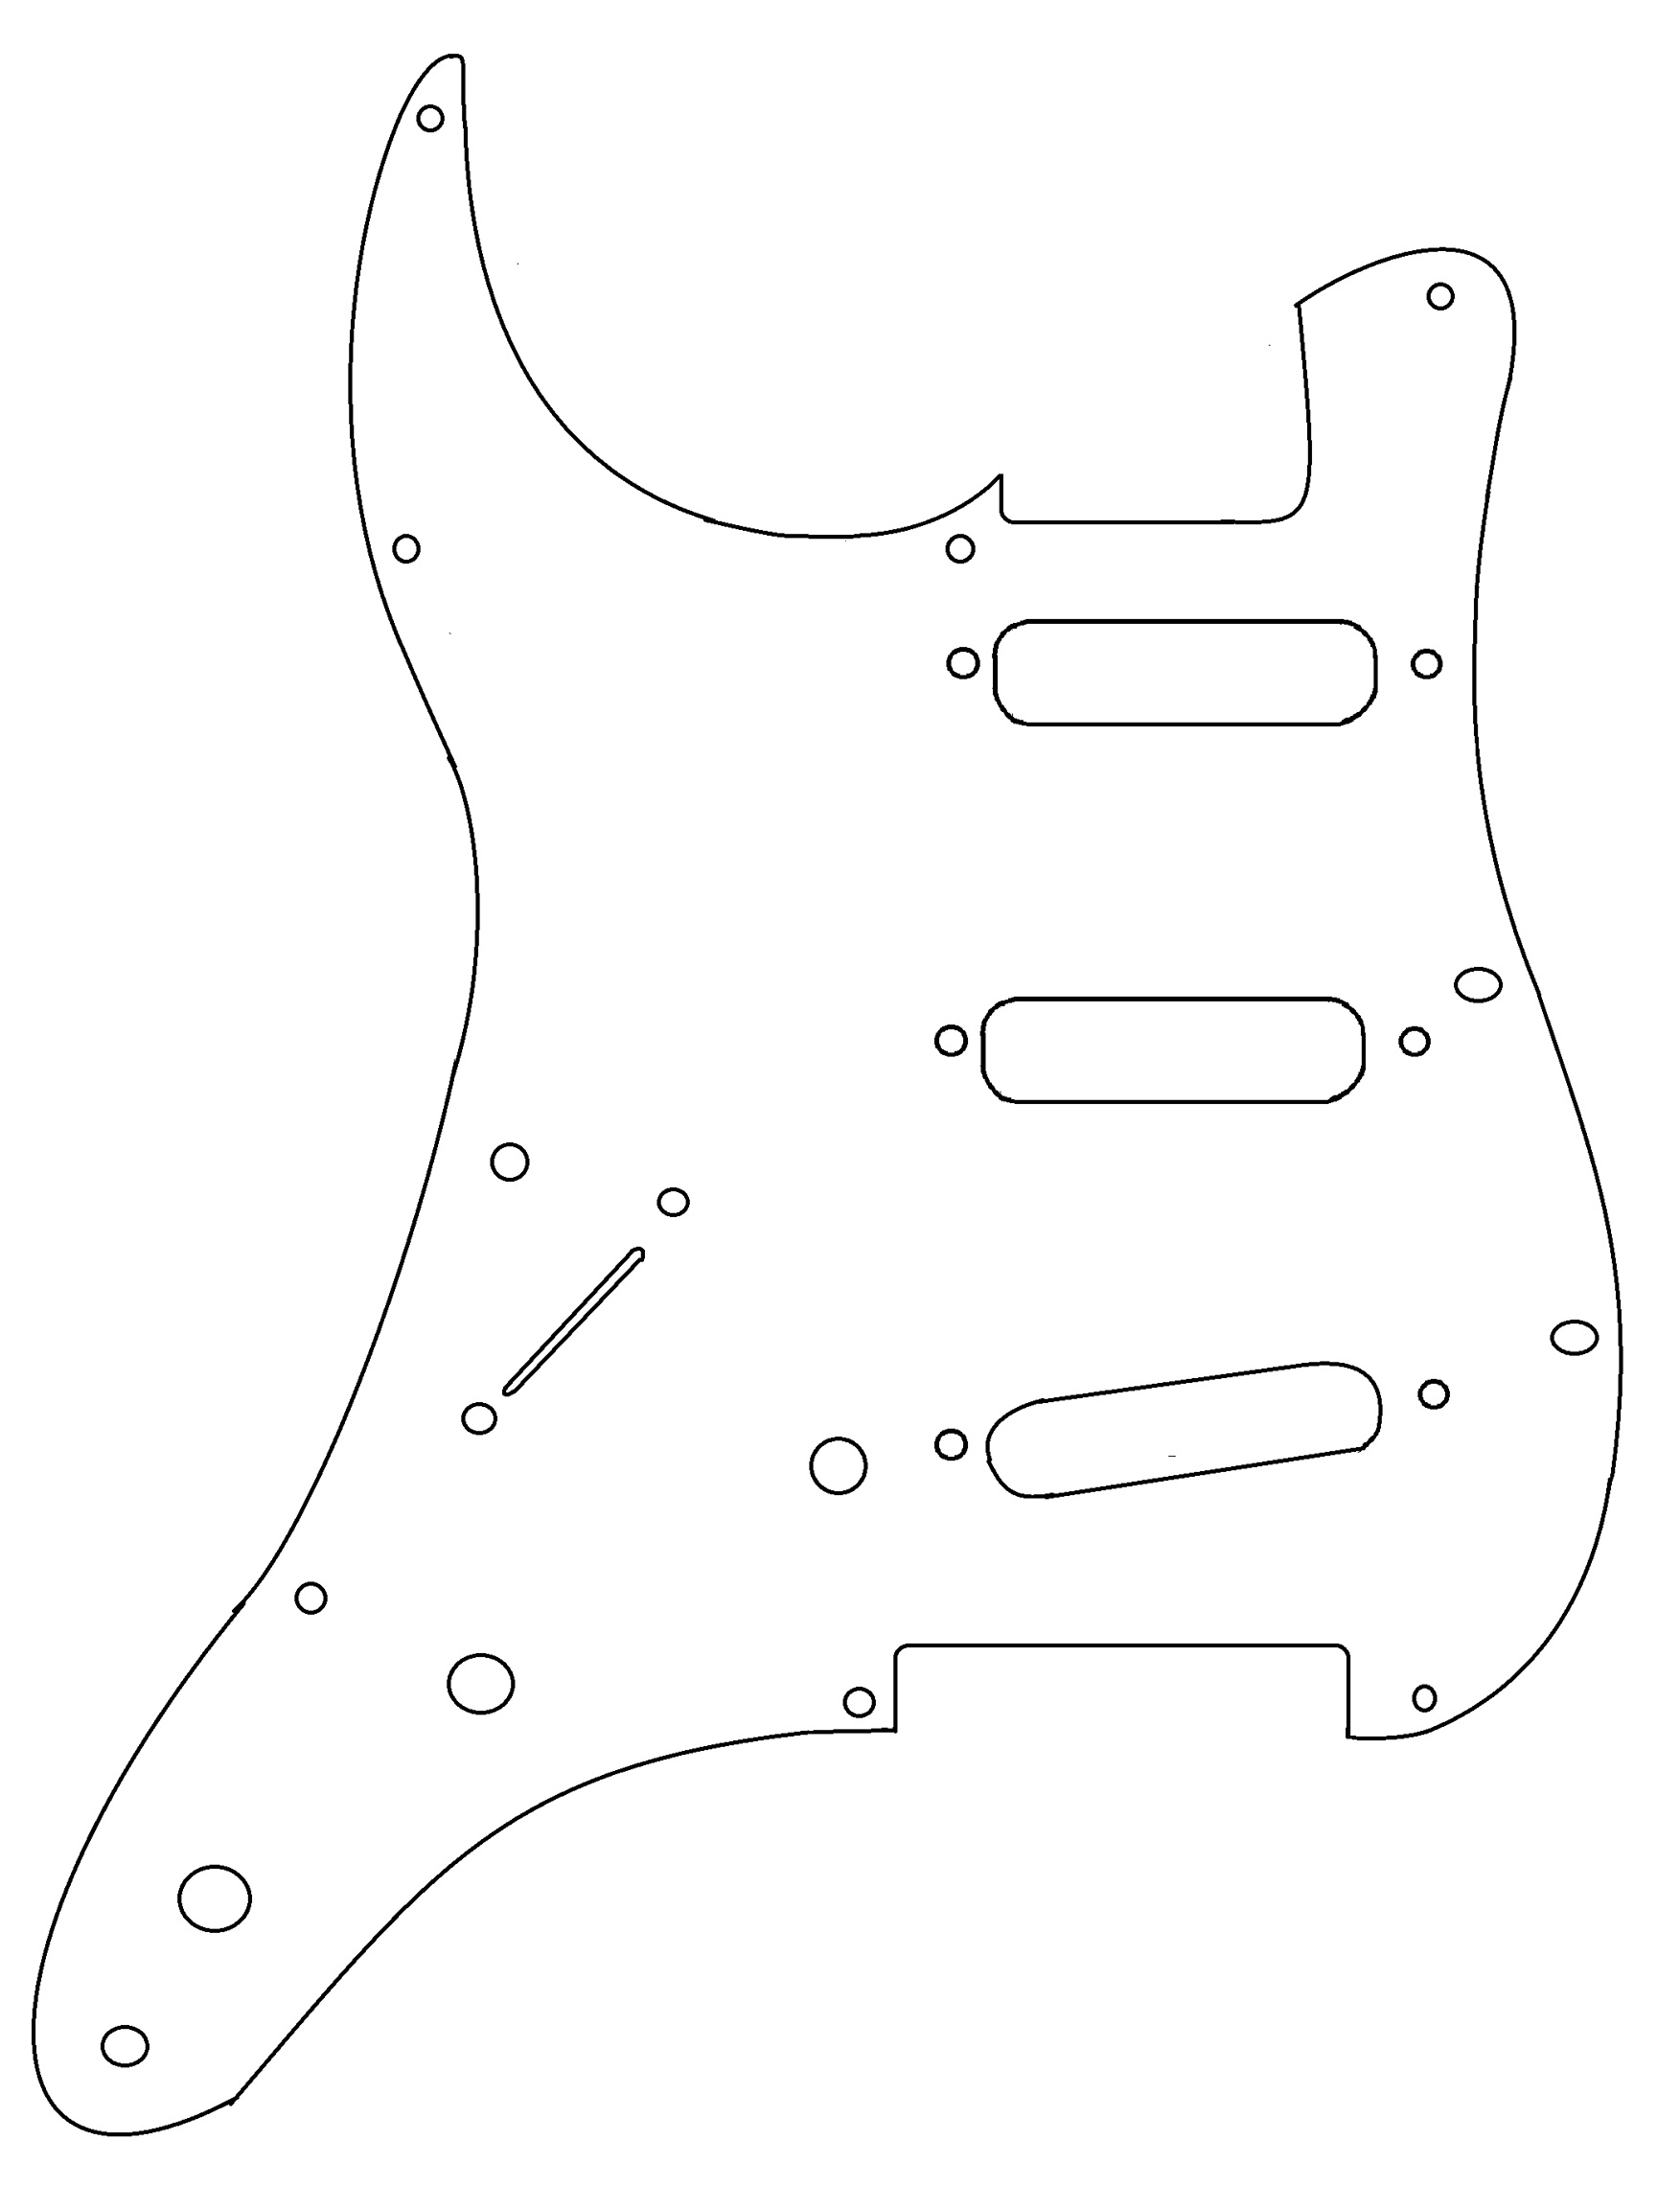
Once we have all of the components installed into the pickguard, we can begin the wiring. When we are looking at the wiring side of the pickguard, the components are arranged like they are in Example 2.
Example 2
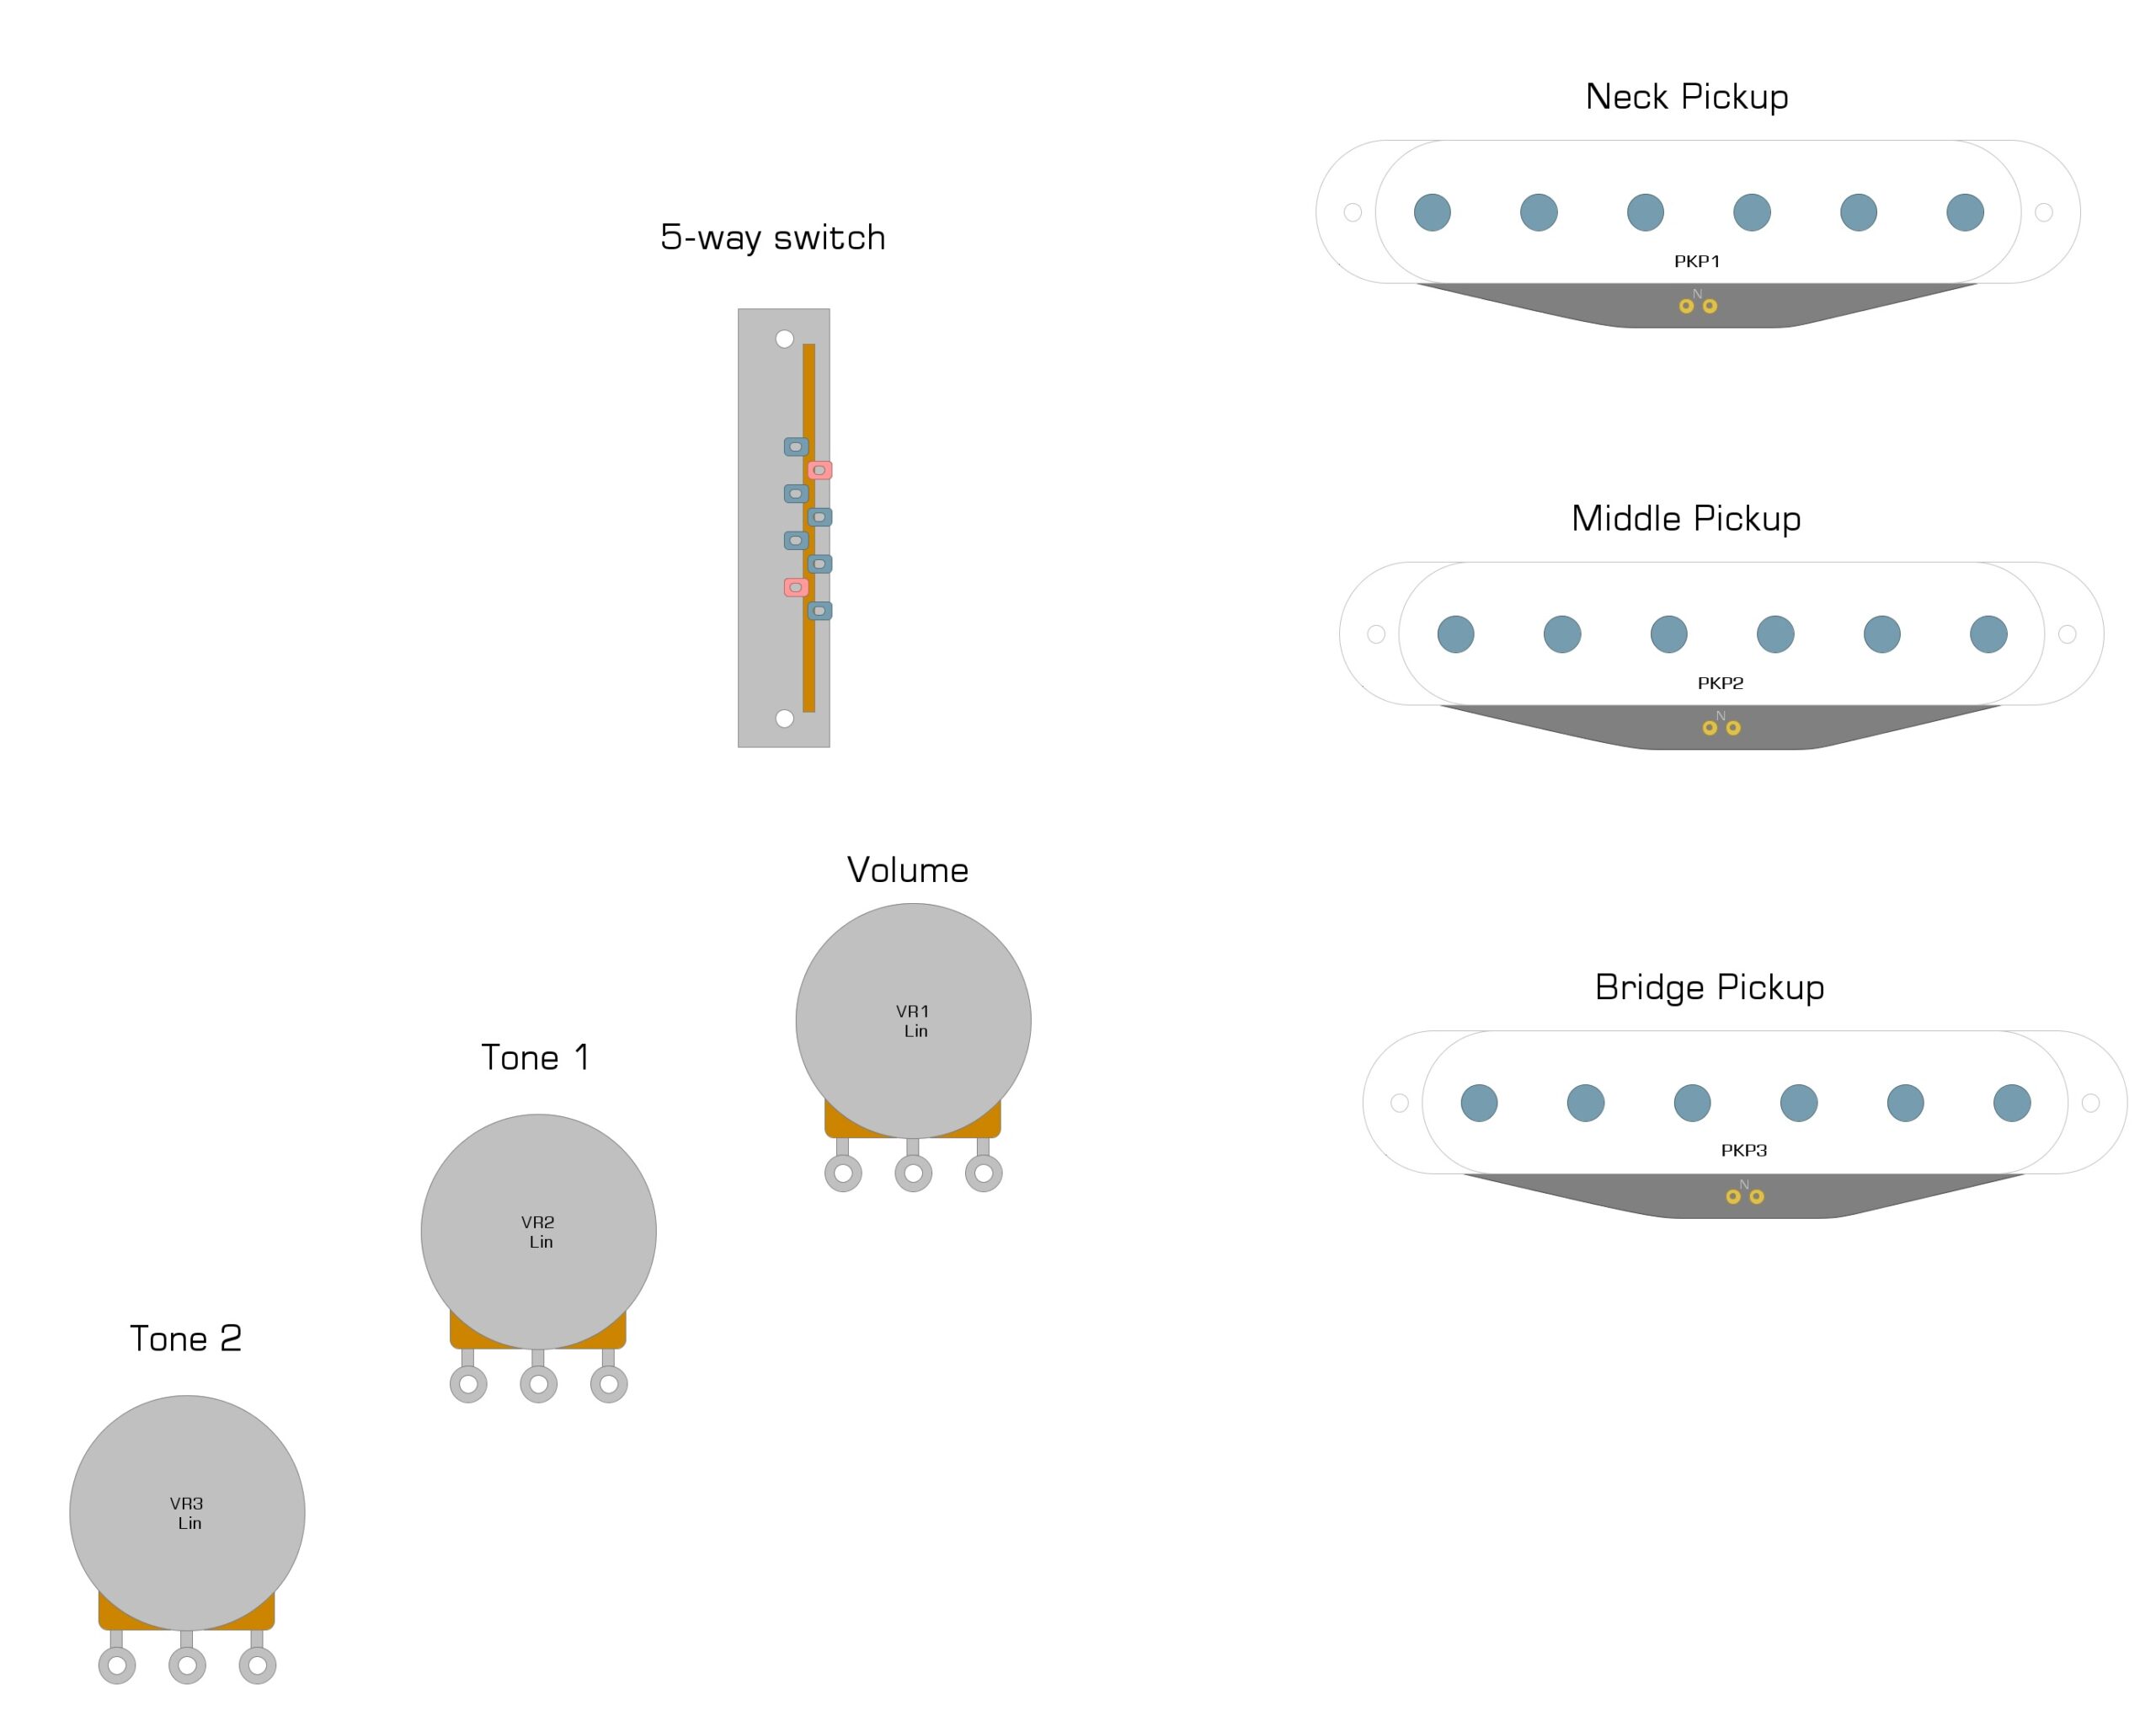
In Example 3, we show the components as they will be in the diagram.
Example 3
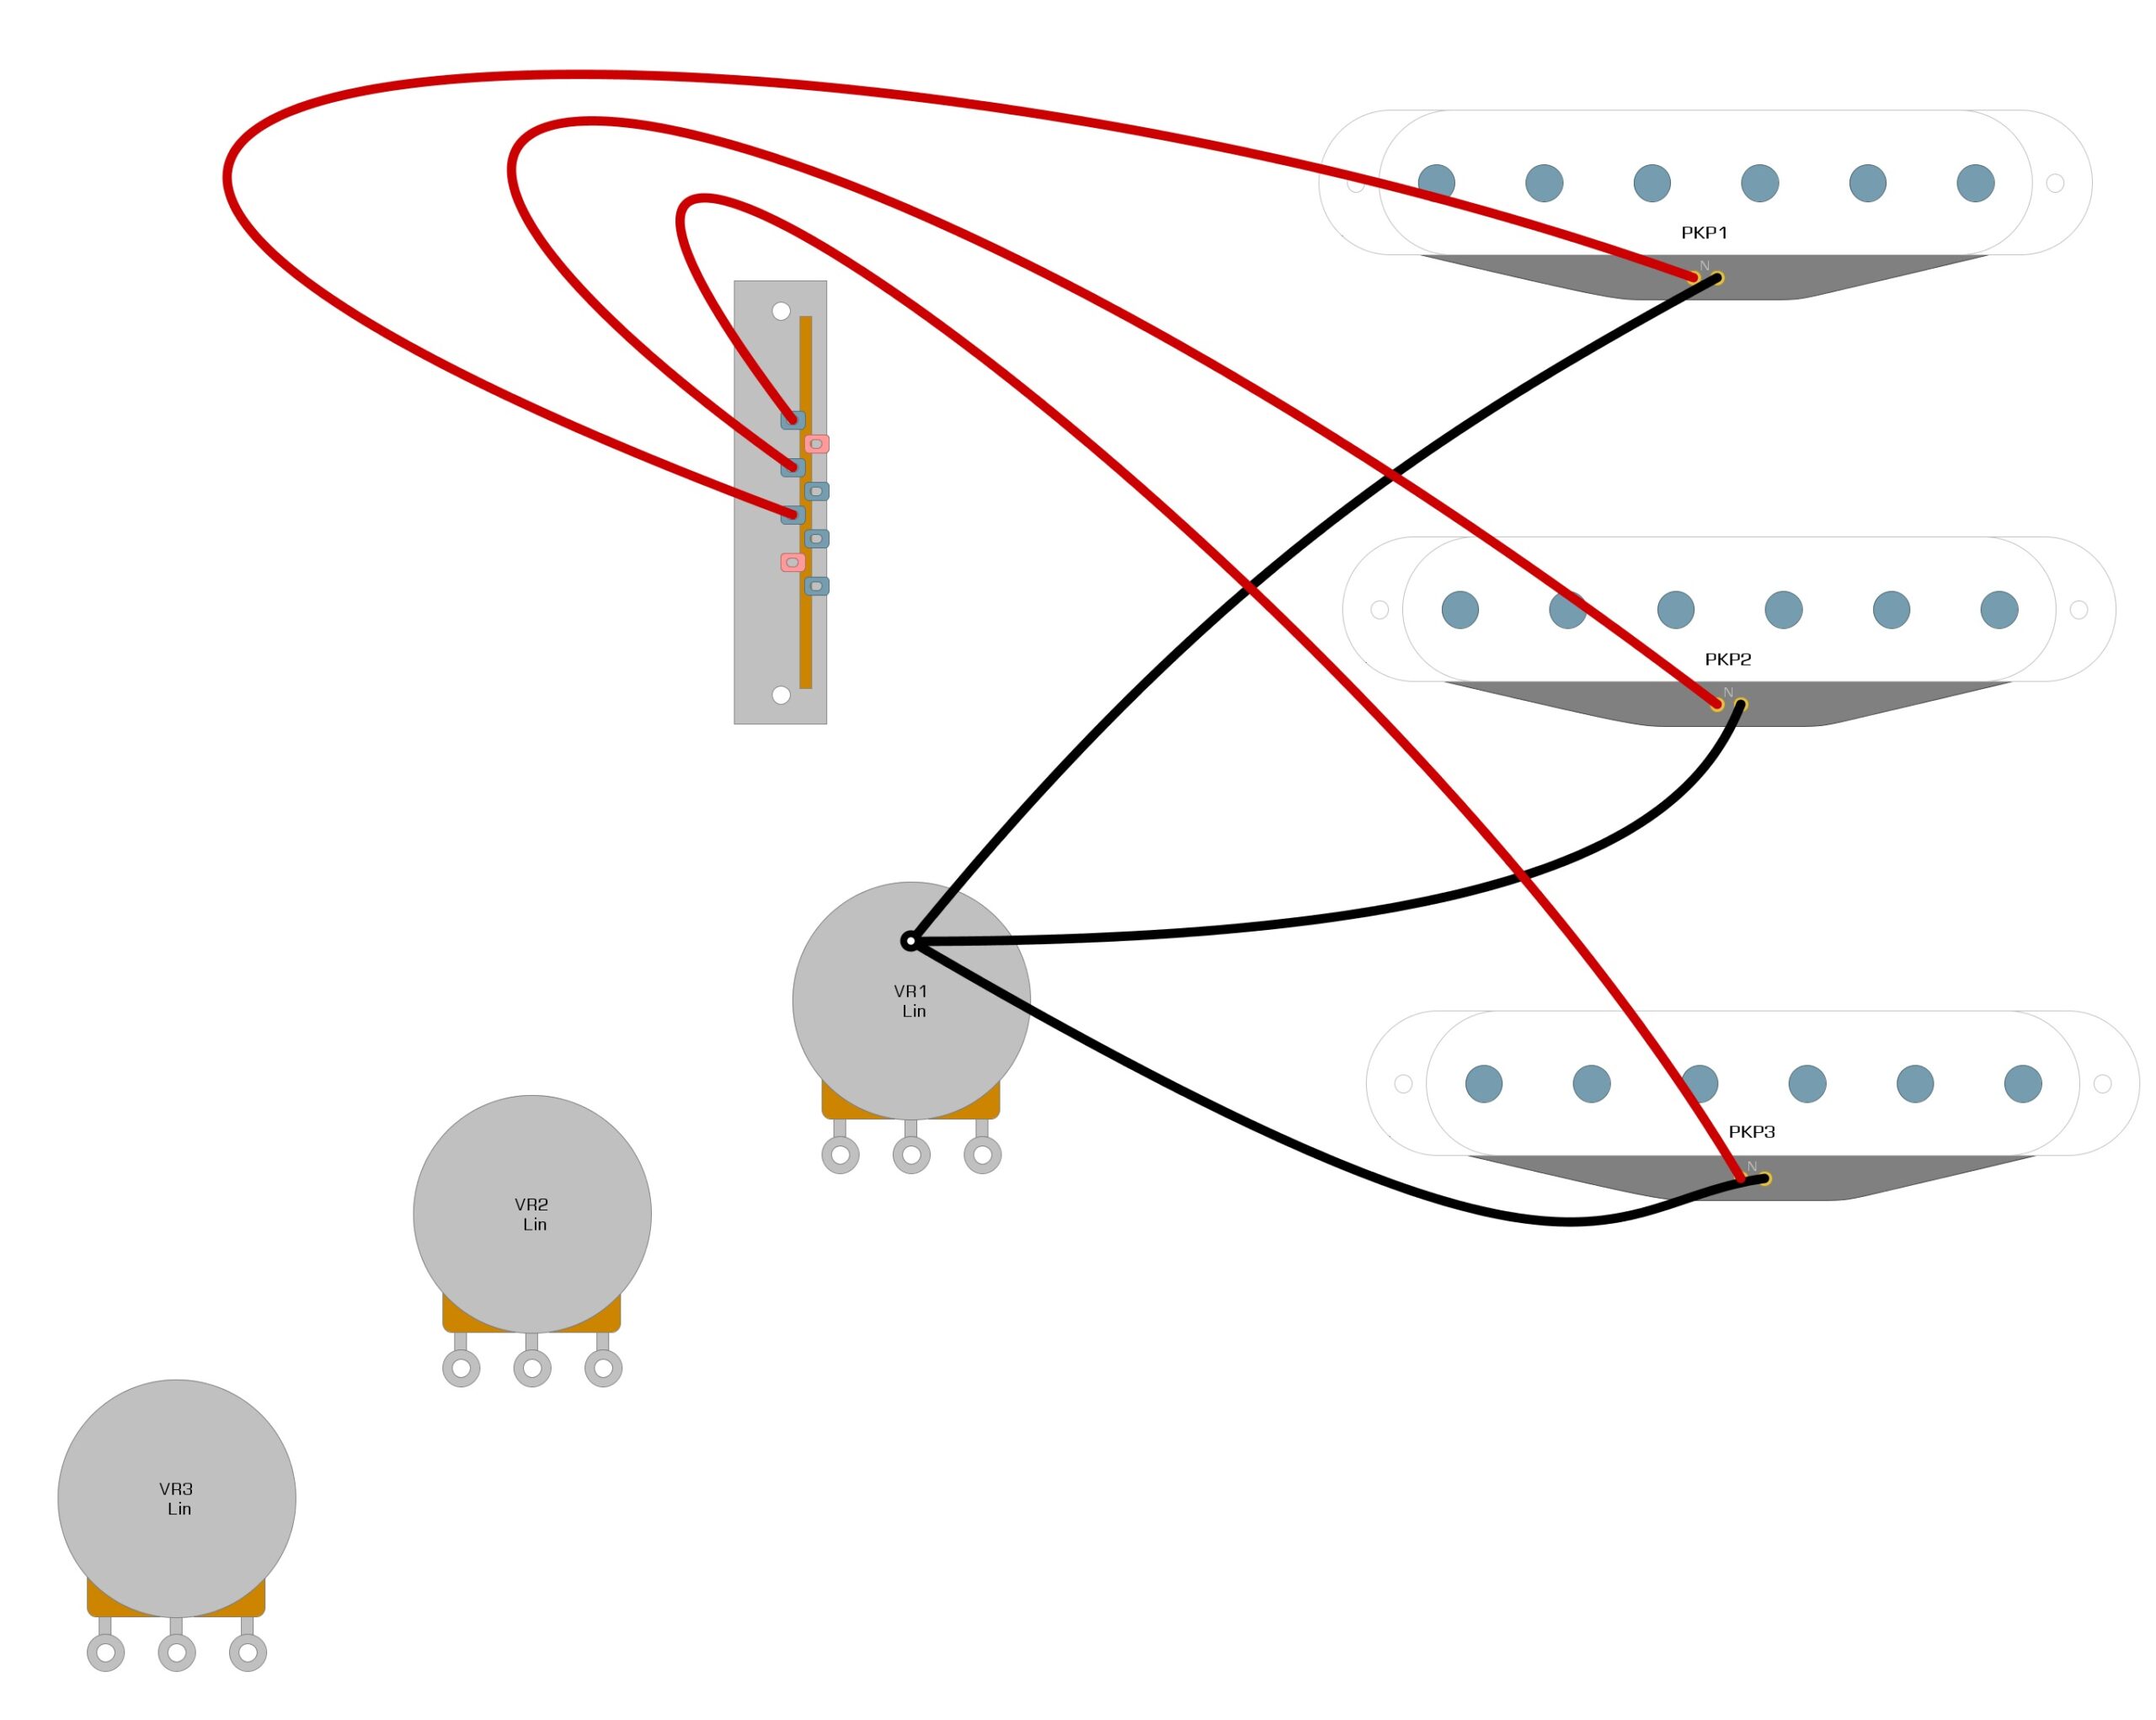
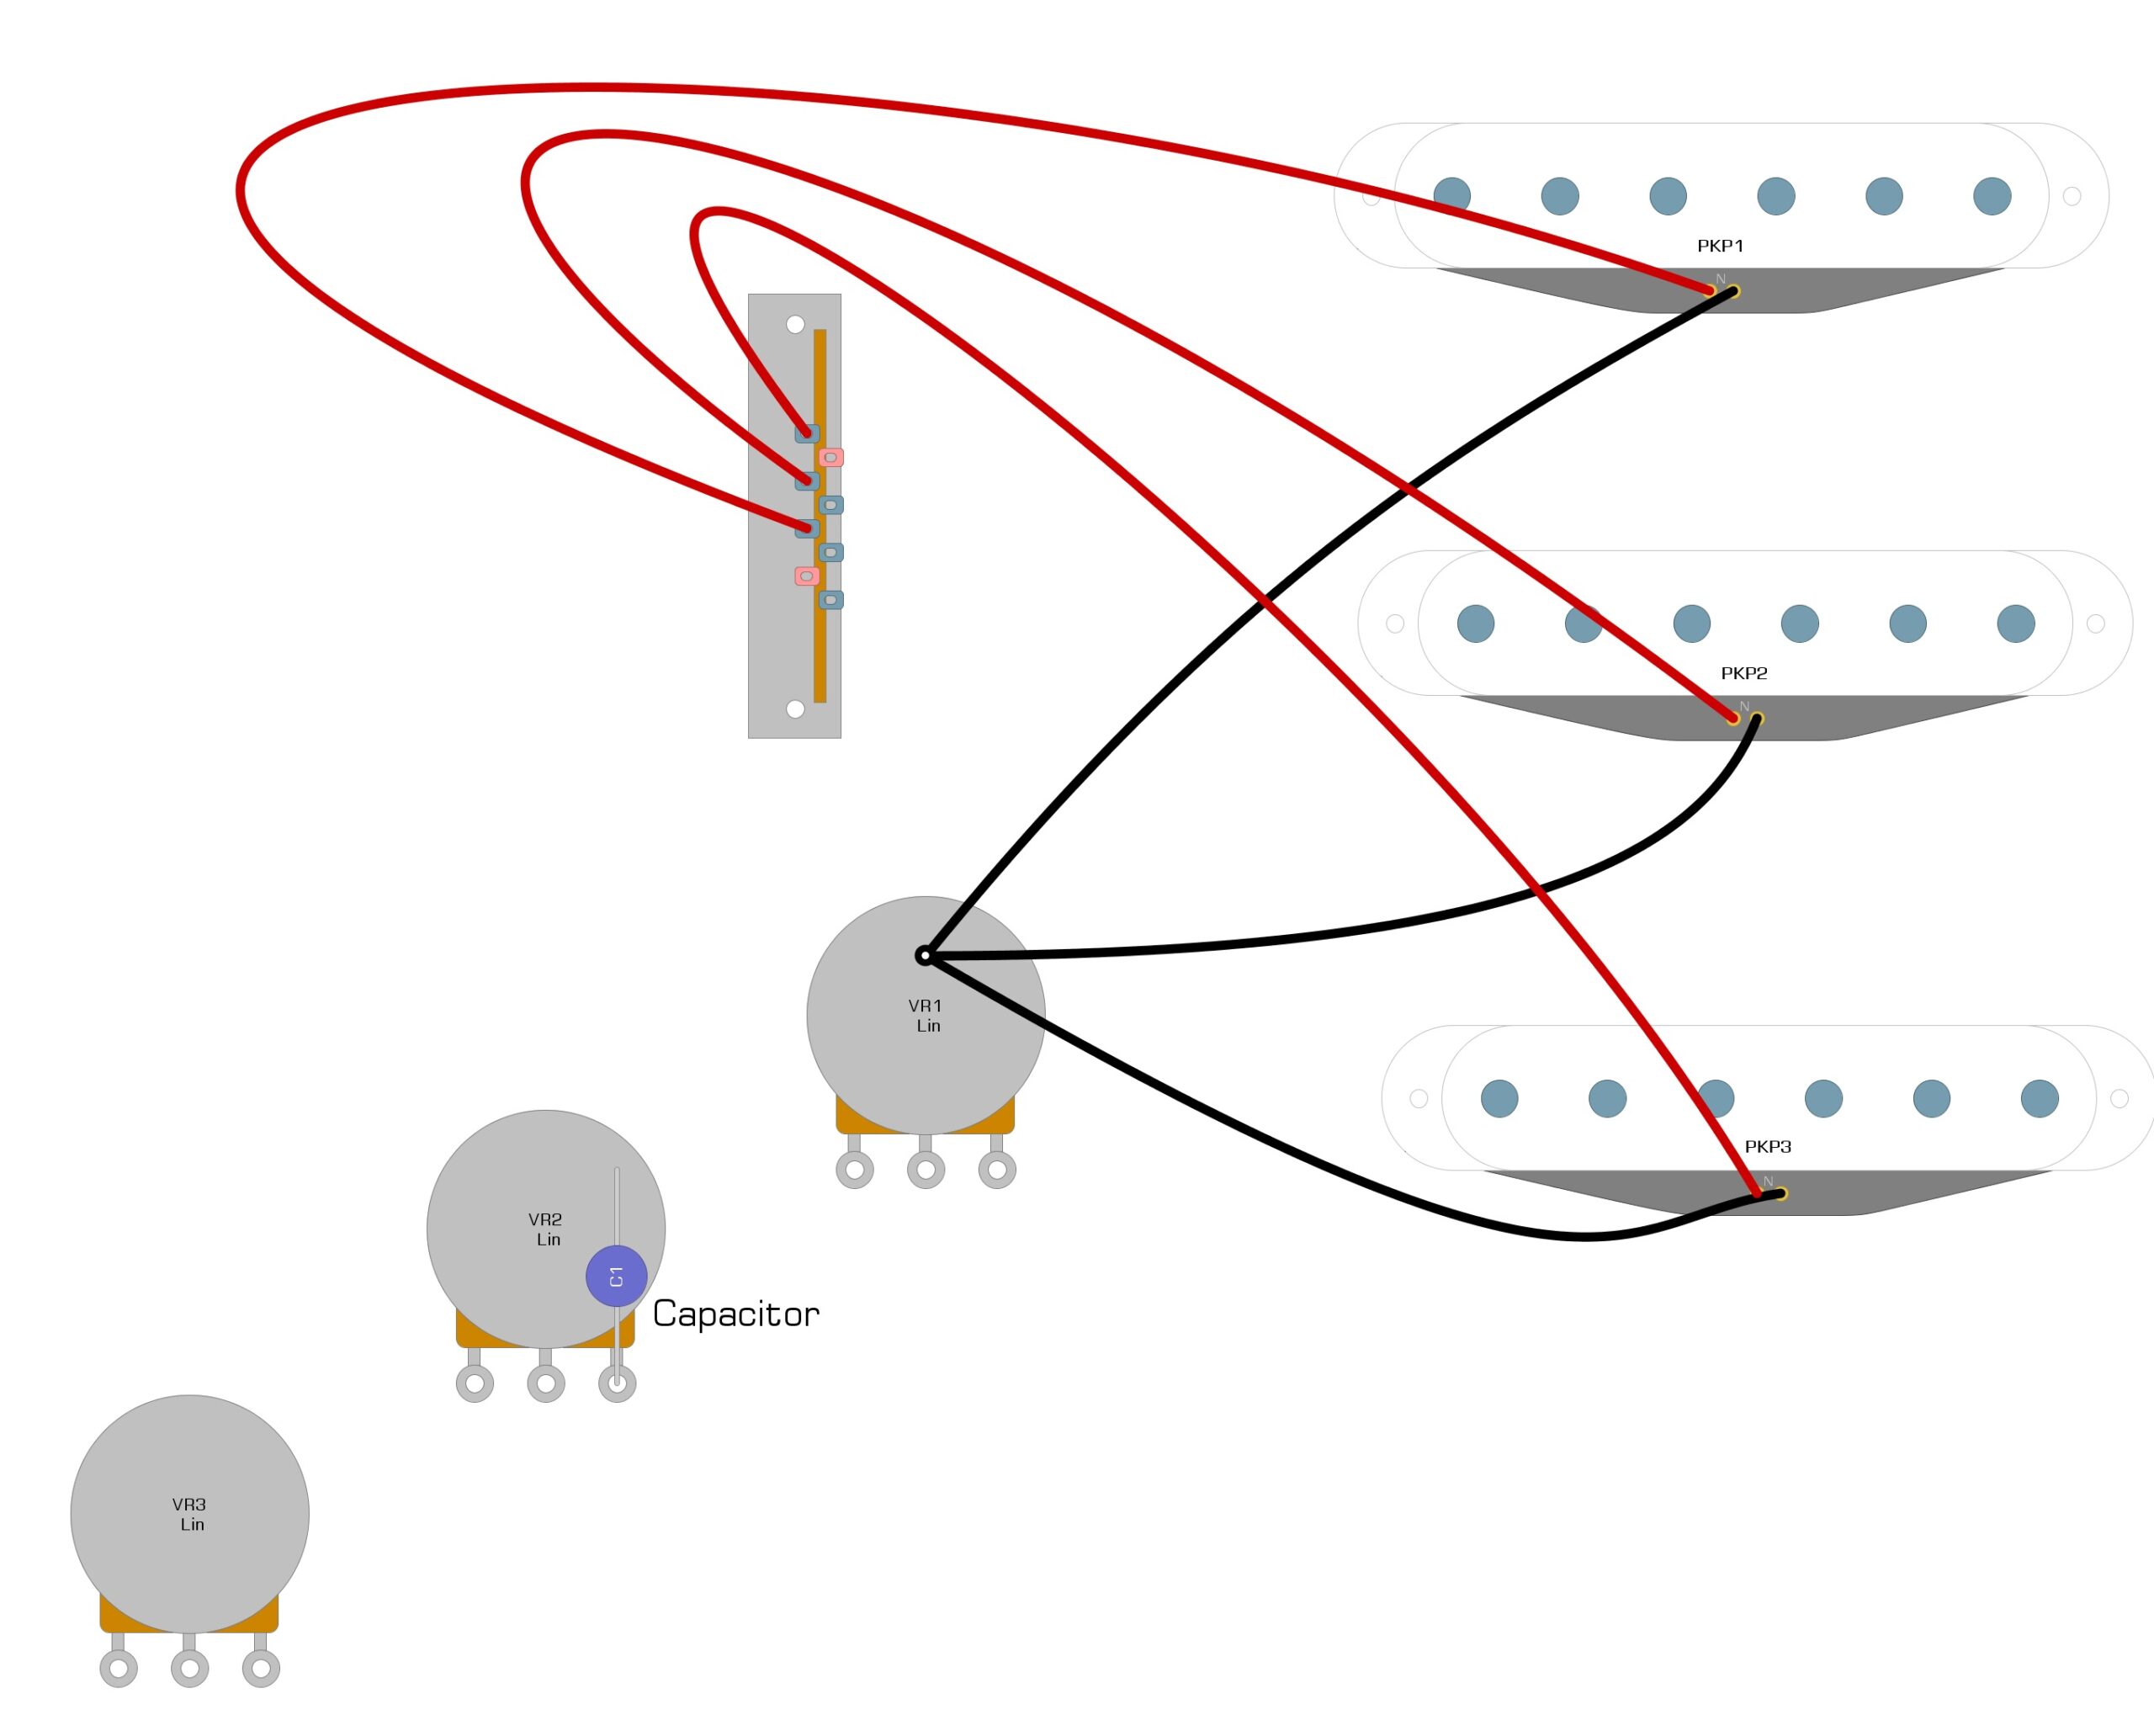
Step 1: Connect the Pickups to the Switch
The first thing we need to do is connect the pickups to the switch. The Hot (Red) wire of each pickup goes to the switch, while the Ground (Black) wire goes to the back of the volume pot.
Example 4
Step 2: Connect the Capacitor
In this step, we will install the .047uf capacitor to Tone Control 1. It should look similar to Example 5.
Example 5
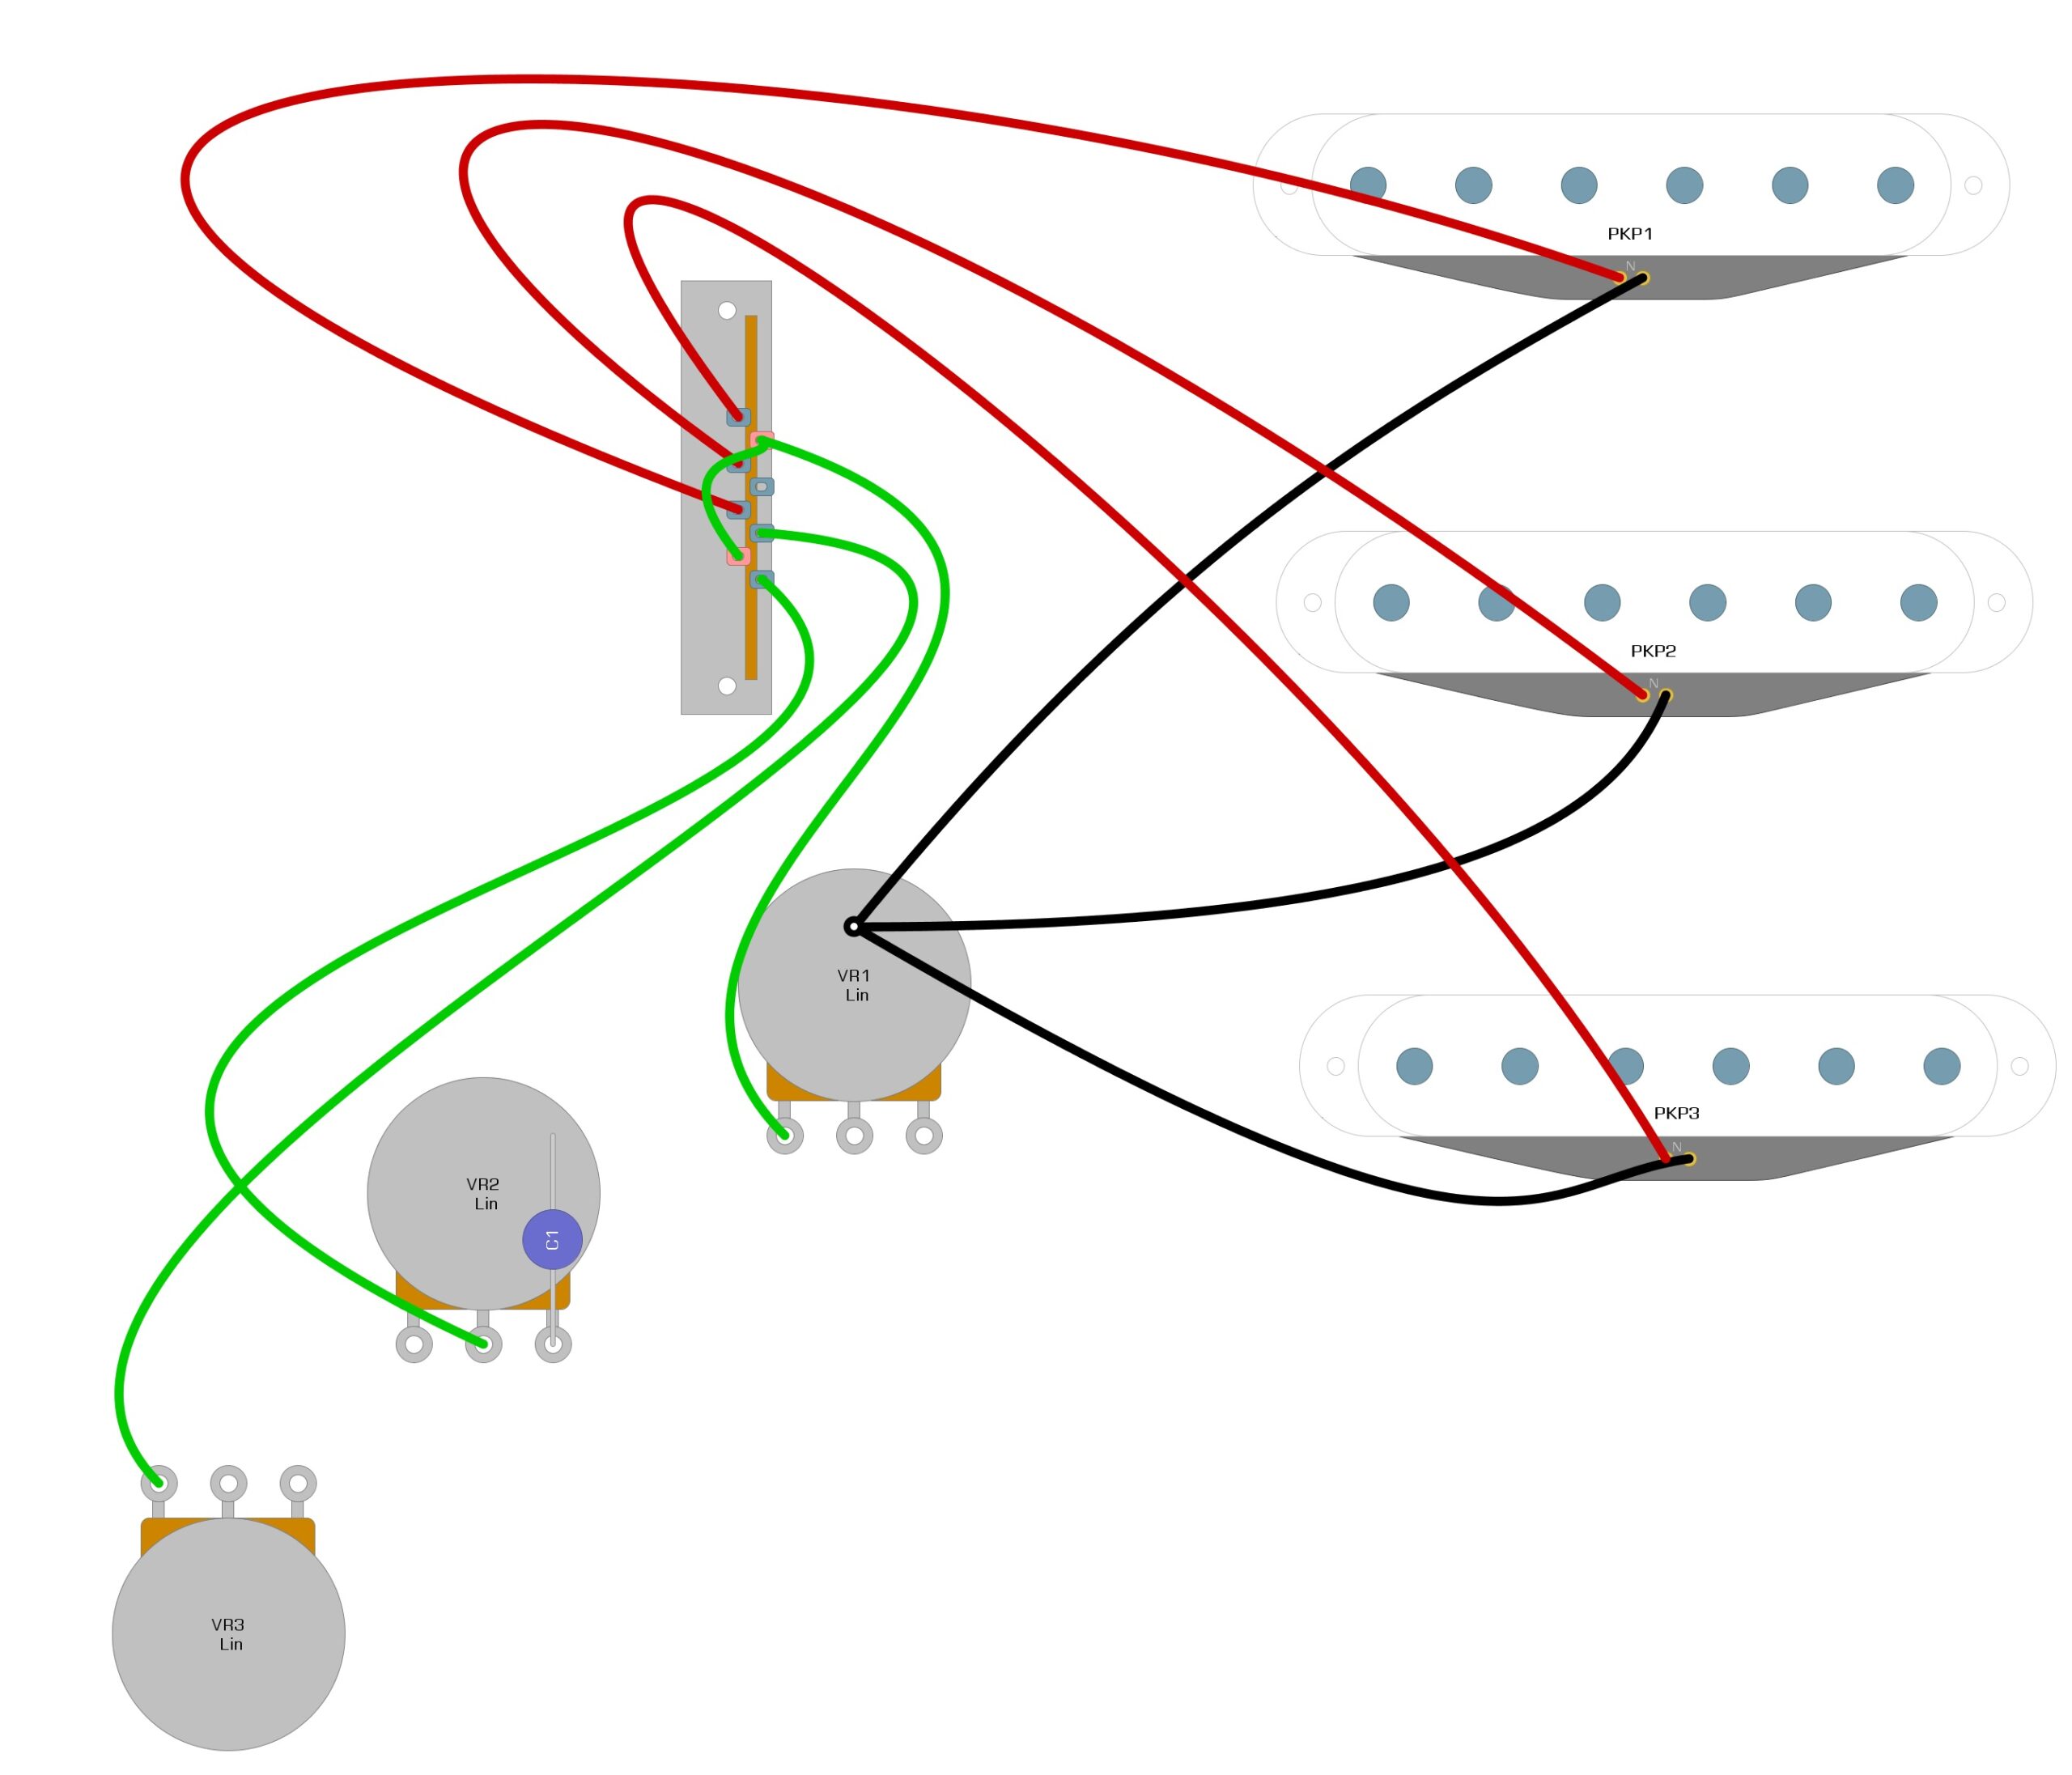
Step 3: Connect the Switch to the Volume and Tone Controls.
Connecting the switch to the volume and tone controls will require several small wires. These wires are green in Example 6, to help you see them better. We connect the switch to the volume control and each of the tone controls.
Example 6
Step 4: Finish the Pre-Wire
To finish our pre-wire, we need to connect the first tone to the second, shown as a purple wire in Example 7. We also need to make several Ground connections, shown as blue wires. Finally, we need to leave a Hot wire and a Ground wire to connect to the output jack shown in this example as yellow wires.
Example 7
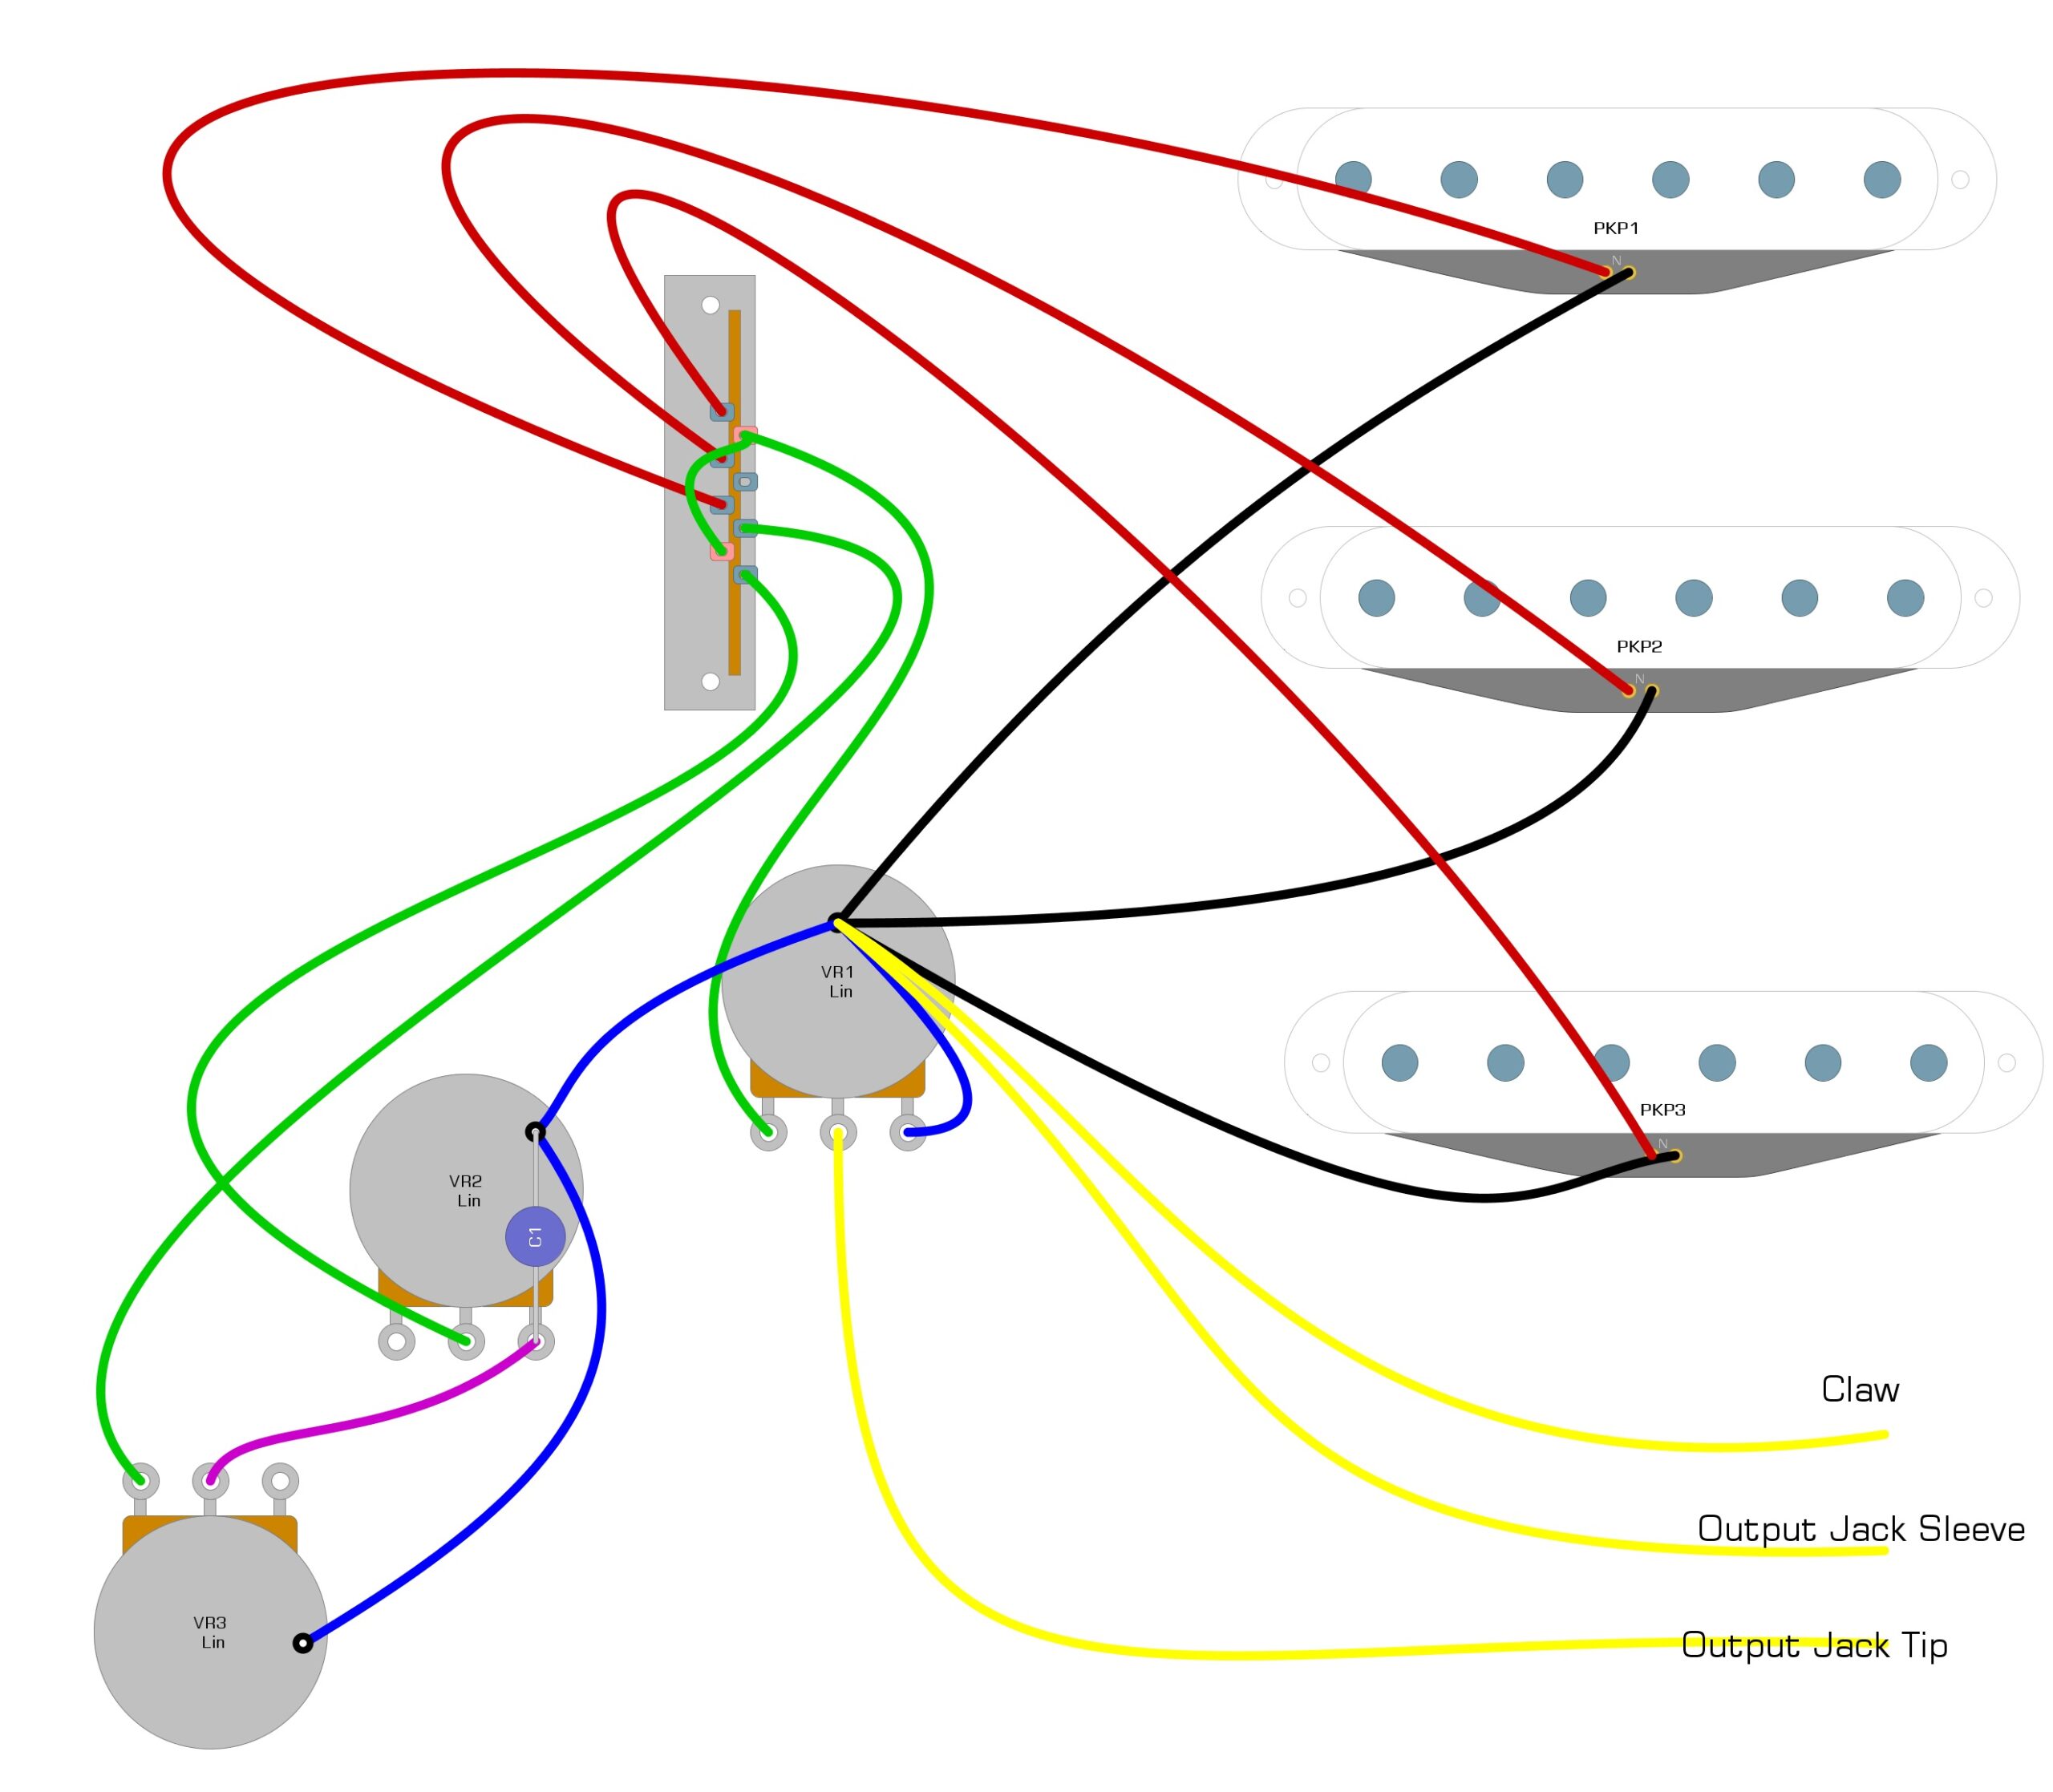
Step 5: Completion
In this step, we simply admire our work! If you connect the Hot wire to the tip of the output jack and the Ground wire to the sleeve, the guitar will be completely wired. The only thing remaining is to screw the pickguard into your guitar, and it should work perfectly.
Summary
Creating a pre-wired pickguard is not very challenging, and it can make great practice for doing guitar mods. There are also several companies making money selling pre-wired pickguards loaded with all types of pickups and configurations. Pre-wired pickguards allow us to transform our guitar in minutes with a minimal amount of wiring.
We hope that you’ve enjoyed reading over our in-depth guide to creating a pre-wired Stratocaster pickguard. If we have helped you complete this project or you have learned something new, please feel free to share this guide on Facebook and Twitter. For more articles on guitar electronics, visit humbuckersoup.com.


