By Ed Malaker
Posted 06/16/2020
Single pickup guitars are quite common, and wiring them up or changing the pickup is not too difficult. The challenge is finding a wiring diagram for the brand of pickup you’re installing. So, for this article, we’ll provide steps and a wiring diagram for a single pickup guitar.
In fact, we’ll show you how to install any pickup into your guitar — single coil or humbucker. If your single pickup guitar has a humbucker, then you’ll need to install a humbucker, but if you have a single coil, you have the option of installing a mini humbucker instead, if you choose. No matter the type, you can use the following diagrams to install your pickup.
Step 1: Find the Hot and Ground
Every pickup has a Hot and a Ground; we just need to figure out which is which.
Single coils
Single coil pickups usually have two wires: one will be the Hot, and the other will be the Ground. Often, the documentation will let you know which is which. If you don’t have your documentation, you can try searching online for your pickup brand or use a multimeter to test your pickup.
Humbuckers
If you have a humbucker, it will most likely have two wires for each coil and, usually, one that is bare. The bare wire shields and grounds the pickup housing and is not part of the sound-producing part of the humbucker.
We usually twist together the negative from the first coil with the positive from the second. Connecting the coils this way is called wiring your coils in series. When we wire our coils in series, the positive from the first coil becomes our Hot, and the negative from the second coil becomes our Ground. It’s common to twist together the Ground and the bare shield wires, since they are both soldered to Ground. You will need to consult your humbucker’s documentation, Google it, or use a multimeter to figure out which wires are which.
Step 2: Volume Control Wiring and Soldering
Once we have our Hot and our Ground wires, we can begin to install the pickup. Most single pickup guitars have no switch, so we are going to leave it out of this diagram.
Because we only have one pickup, logically we’ll only have one volume knob as well. As a general rule, single coil pickups use 250-k pots, while humbuckers use 500-k pots. Both values are identical from the outside, and the only difference between them is the amount of resistance they apply to your signal.
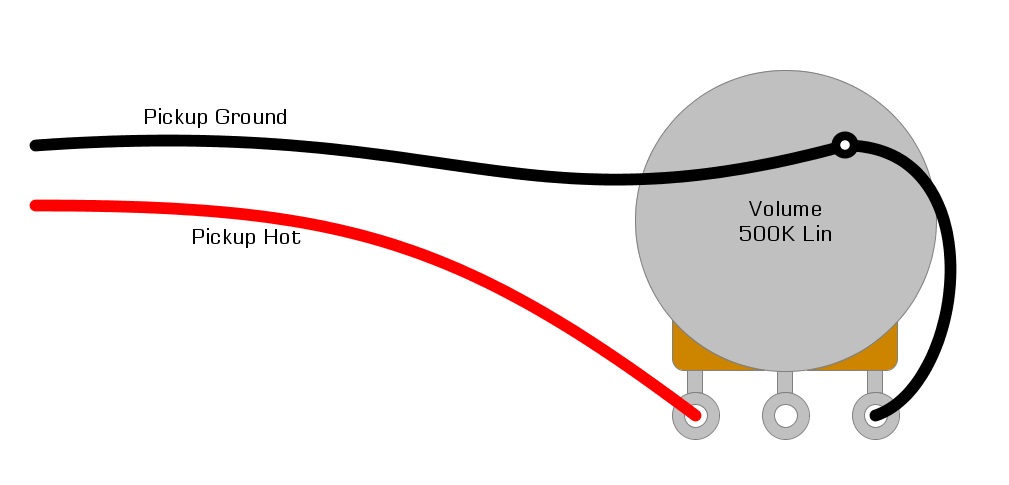
- Start by soldering the Hot wire to the first lug on the Volume pot. We’ll call this lug “Lug-1”.
- Skip the center lug for now and solder a wire from Lug-3 to the back casing of the Volume pot. You can also bend the lug back and solder it directly to the casing if you prefer.
- Solder the Ground wire, and the bare wire if you have one, to the back casing of the Volume pot with Lug-3.
When finished with this step, it should look something like Figure 1.
Fig 1
Step 3: Tone Control Wiring and Soldering
Once you have your pickup soldered to the Volume control, it will be time to add your Tone control. To add the Tone control, you will need another Volume pot. We usually go with the same value as the Volume pot, so if you used a 250k Volume, use a 250k Tone. The Volume control and Tone control pots are the same component and are interchangeable. We add a capacitor to the Tone control to give it its sound-shaping capabilities.
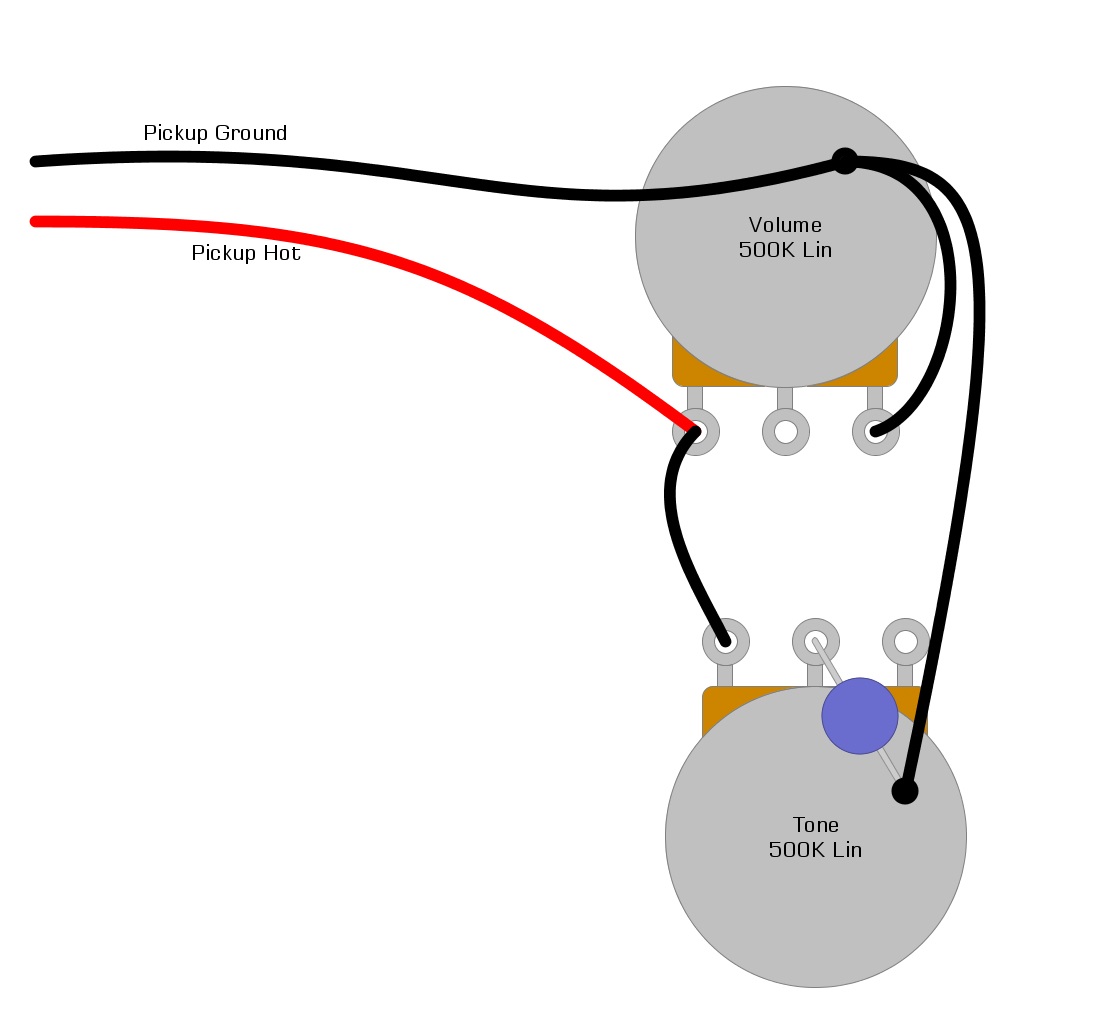
- To add the Tone control, solder a wire from Lug-1 of the Volume control to Lug-3 of the Tone control.
- Solder a capacitor from Lug-2 of the Tone control to its back casing.
- Solder a wire from the back of the Tone control to the back of the Volume control.
You can see this in Figure 2.
Fig 2
The value of the capacitor is a hotly debated subject, and we have several articles about them here at humbuckersoup.com. To make it easy, we recommend starting with the .047uf capacitor as it’s one of the more popular values.
Step 4: Connect the Output Jack
Finally, we’ll connect the Output jack. You can get a standard Output jack at most guitar shops.
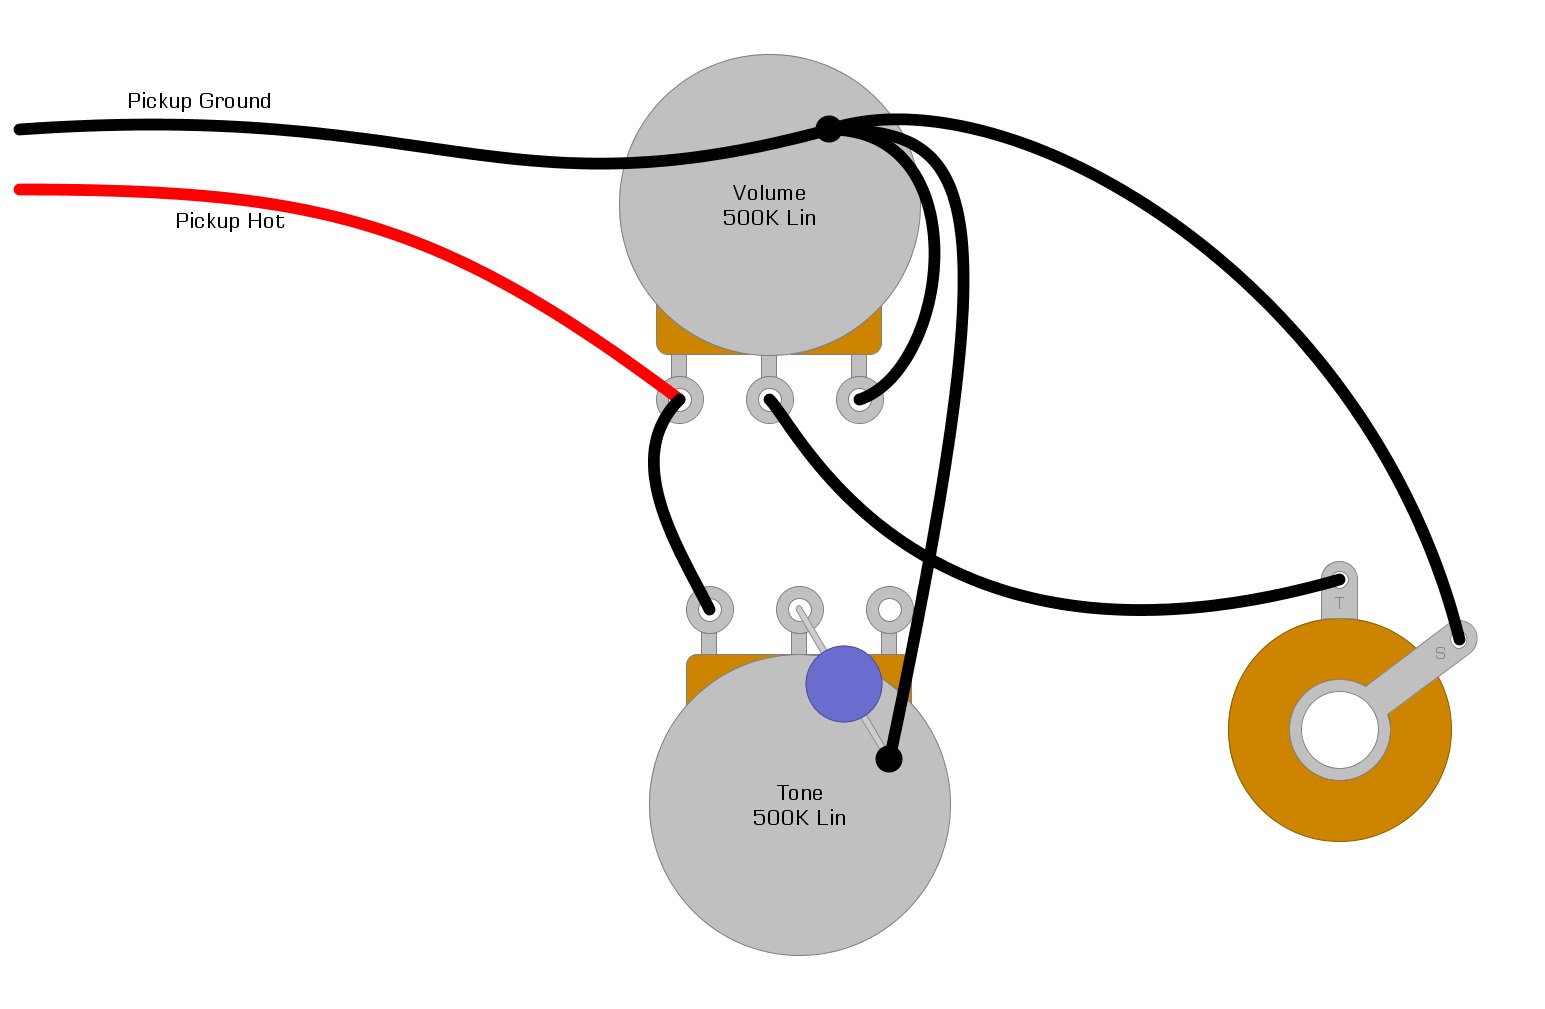
Connect a wire from Lug 2 of the Volume control to the “tip” lug of the Output jack.
You can see what we’ve done so far in Figure 3.
Fig 3
Single Pickup Guitar Wiring Diagram
Here is the complete single pickup guitar wiring diagram.
Conclusion
We hope that in illustrating these single pickup guitar wiring diagram steps, we’ve provided some helpful information about how to wire a one-pickup guitar. It’s not a hard project to accomplish, and it opens you up to new things about your guitar to think about, such as the capacitor value, and the values of the Volume and Tone controls.
If we’ve helped you to understand a little more about one pickup guitar circuits, please feel free to share this single pickup guitar wiring diagram plan with your friends on Facebook and Twitter. And don’t forget to check out our other great articles on guitar electronics at humbuckersoup.com.
Buy Us a Coffee!
https://buymeacoffee.com/humbuckersoup


