By Tyler Connaghan
Posted 10/27/2020
When it comes to recording guitar, there is no right or wrong way to go about it.
When I first started recording, I was overwhelmed by the number of techniques available. But, after a month of working at a professional recording studio, I realized it was best to begin with tried-and-true techniques before getting too deep into experimentation. Here are a few of the guitar amp microphone techniques that have worked well for me in most situations…
Choosing Your Microphone
Dynamic Microphone
I could write a book on the benefits of using different microphones for different recording applications, though when it comes to miking an amplifier, it’s typically best to start with a dynamic microphone. They have high SPL ratings and do not require 48v power sources such as condenser microphones. My go-to microphone is the Shure SM57. It is one of the most widely-used guitar amp microphones and has been for many decades.
57s are great for many reasons. They’re inexpensive, they’re incredibly durable, and they’re extremely versatile. However, if a 57 sounds a bit too harsh with your particular guitar, or you don’t feel as though it’s capturing the fullness of your tone, there are other options as well. Although it is marketed as a vocal microphone, I often use a Shure SM7B on my guitar amp if I’m looking for a richer and fuller sound.
If you’re fixing to mic your amp for live purposes, I highly recommend using a Sennheiser e609. The e609 is similar to the 57 in terms of sound, durability, and portability. However, it hangs flat over the front of the amp rather than sitting on a stand in front of the amp, making it perfect for recording or performance situations with little space.
Condenser Microphone
If you’re looking to capture an amplifier’s full frequency range, you may want to consider using a large-diaphragm condenser microphone instead. Condenser microphones are great at capturing the full range of an instrument, making them an excellent choice for solo guitar recordings.
It is worth noting that condenser microphones are typically far more expensive and much more sensitive than their dynamic counterparts. You need to be careful when recording with condenser microphones at high volumes as well, as they are far more sensitive to high SPLS.
I love my Warm Audio WA87. While it is a vocal microphone at heart, it helps brighten up dark guitars in an interesting way that goes beyond the EQ on the amplifier, which brings me to my next pro tip.
Pro Tip: Rather than cranking the treble on your amp for recording, try to use a brighter microphone that accentuates highs. You’ll get a more natural “air” to your sound without unwanted harshness.
Ribbon Microphones
Similar to condenser microphones in terms of price and sensitivity, ribbon microphones are another great choice for recording guitar. Ribbon microphones are known for their warm, full tone. They are great for use in conjunction with dynamic microphones.
The Royer R-121 is pretty much industry-standard for amp recording, though these microphones are pretty far out of reach for the average guitarist in terms of price. The first ribbon microphone I ever purchased for my own home studio was the Royer R-10. It has a beautiful, warm tone that captures a guitar’s low-end goodness. I very rarely (if ever) use the Royer on its own when recording guitars, as it’s a bit too dark. Instead, I pair it with my SM57 to get the best of both worlds.
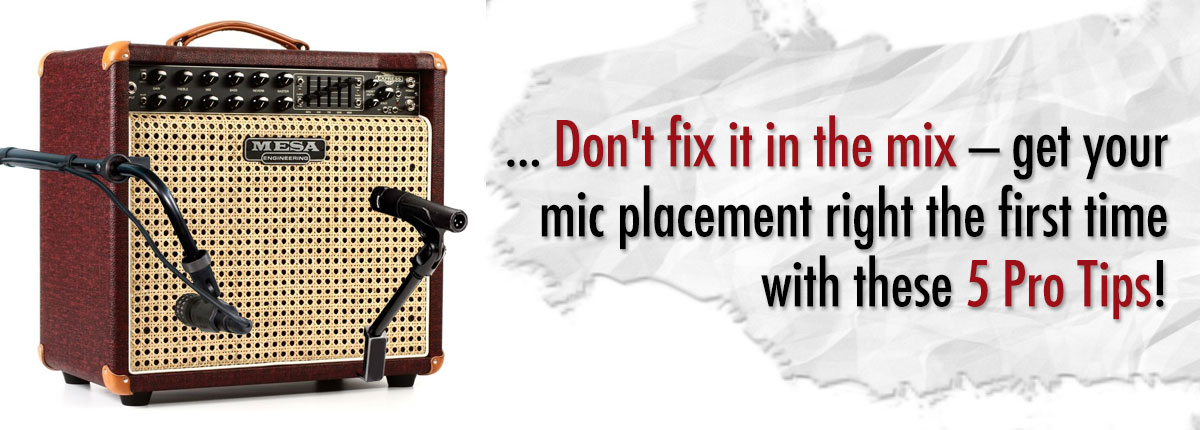
Placing a Single Microphone
Most guitarists who are new to the world of recording will simply stick the microphone in front of the amp and call it a day. However, moving a microphone less than an inch can have a MAJOR impact on the recorded sound. The big question is:
When do you know if you’ve hit the sweet spot?
Well, let’s start with the distance of the microphone from the amp.
The best starting point for a dynamic microphone and an amplifier is about a quarter-inch from the grille cloth. The mic should be placed between the edge and center of the speaker cone, and the capsule should be pointed directly at the speaker’s face.
When you do this, you should note a few things.
- As you move the microphone closer to the speaker’s face, you will get an increase in bass frequencies. This bass increase is due to proximity effect. As you move the microphone further from the speaker’s face, you will get a decrease in bass frequencies. Having that quarter-inch between the microphone capsule and the grille cloth gives us the best of both worlds.
- As you move your microphone closer to the speaker’s center, the mid-range and upper-mid frequencies will become more prominent. Moving the microphone away from the center helps tame mid-range and upper-mid frequencies.
Whenever I use a 57, I’ll often start with the microphone placed between the center and the speaker’s outer edge and slightly tilt it in at a 45-degree angle until it is facing the center. By doing this, you’re able to capture the upper-mids effectively while keeping them far less harsh. Of course, it depends on the amp and guitar I’m using and what sound I am going for. My Danelectro is quite bright, so keeping the microphone farther away from the center provides better balance, whereas my Les Paul may need a bit of help with the mid-range during recording.
Pro Tip: To find your speaker’s center point, you can use the flashlight on your phone to see through your grille cloth.
Using Multiple Microphones
As you become more comfortable with recording your guitar amp, you might want to try adding another microphone to the equation to capture more complex tones. However, it is vital to be aware of phase cancellation when using multiple microphones.
Without getting too technical, phasing occurs when two microphones are not in-sync with one another. Let’s say that you have one microphone placed slightly farther away from the amp than the second. It will take slightly longer for the sound to reach the diaphragm of the second microphone than the first. Check out this video for a better explanation.
When using two microphones, it is best to follow the 3-to-1 rule, which states that any additional microphone that is used to pick up the same signal should be at least three times the distance away from that sound source, to eliminate phasing issues.
Beyond keeping the sound “in-phase,” this technique helps to create a larger sound. In Jimmy Page’s “Heartbreaker” solo, there are a few microphones in the mix. The main one is a close mic, which is dry in your face. The second is a resonant room microphone that was placed a few feet away from the amp. The reason the solo sounds so big is that the engineer took both of those microphones and panned them in stereo to create dimension.
This sound became the sound of modern rock.
The benefit of using two microphones is that you can pick up a wider range of the amplifier. For example, you could place a dynamic microphone in a fashion similar to one in which you place a single microphone to capture the mids and upper-mids, then place a ribbon microphone next to it to capture the lows. Essentially, two microphones could potentially help you capture the full range of your amplifier, providing you with more options during the mixing phase.
Once you record both of the microphones into your DAW, you can mess with the balance of each, depending on the tone you are looking for.
Don’t Fix In The Mix
A trap that a lot of studio newbies fall into is the “fix it in the mix” mentality, which finds musicians carelessly waltzing through the recording phase because they believe they can fix it later. I know this because I did it for years. It can be extremely frustrating trying to “polish a turd,” as they say. Once I began taking more time to get the sounds I wanted during the recording process, my mixes greatly improved.
When you take the time to get the sound right at the source, you’ll have a much better time during the production and mix phases. If not, you’ll spend countless hours EQing, over-compressing, and over-processing to get a sound that you likely still won’t be proud of.
Recording isn’t some mystical art form. Start simple and experiment as you become comfortable with particular techniques. You’ll be surprised at how easy it is to create magic from the comfort of your home studio!