By Ed Malaker
Posted 03/30/2019
Making Single Guitar Pickups
In this article, we’ll discuss making single guitar pickups, and how building them from scratch can be such a rewarding and worthwhile experience. The design is simple and the steps are easy to follow. Another benefit of the design is that winding the coil by hand offers the opportunity of having your pickup sound just as good as, if not better than, the same coil wound by a machine. This means that while your pickup might not look store-bought, it will stand a good chance of sounding every bit as good.
We discussed all the tools we’ll need in the last article — we recommend taking a look, if you haven’t yet. Let’s dive right in and build our first single coil pickup.
Making single coil guitar pickups – The Bobbin
The first thing that we need to build is the bobbin. There are a few pieces that fit together to create the bobbin — this is what we wrap our coil around, attach our magnets to, and attach to the guitar.
You can try to find or create a “homemade” equivalent to these parts, or you can buy each of them separately, or as a kit, from many places online including these:
Mojotone
https://www.mojotone.com/guitar-parts/Strat-Pickup-Parts-List
Tonecraft
https://www.tone-kraft.com/
Making single coil guitar pickups – Flatwork
The first part of the bobbin that we need to buy or create is called the Flatwork. Flatwork usually looks very similar to the image in Fig 1.
Fig 1
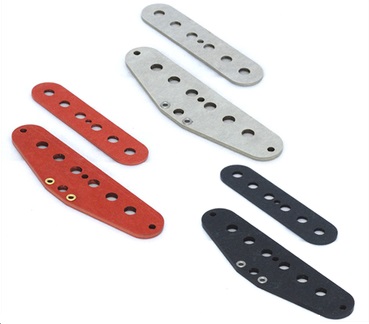
In this image, we’re looking at three sets of flatwork; each color is one set. We will only need one set for our pickup.
The larger piece is the bottom and the smaller piece is the top. Looking at the image below, we can see the holes that will be used to attach the pickup to the guitar (Fig 2).
Fig 2
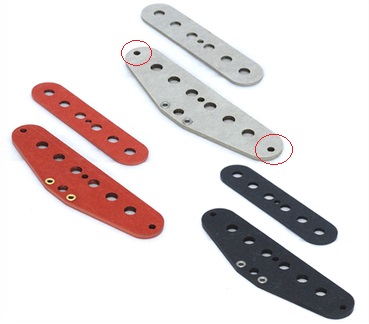
We can also see two metal eyelets where we’ll attach each end of the coil wire. We will attach the larger 2 conductor lead wire to these same metal posts. (Fig 3)
Fig 3
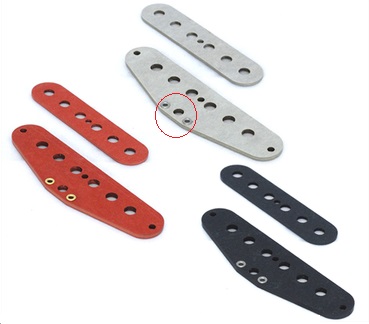
The hole in between the two metal posts is where we’ll pass the two conductor lead wires and bind them to the flatwork, so that the wires can’t move and tug on the two metal posts.
The six larger holes on each piece of the flatwork are for the posts (steel posts or alnico magnetic posts) to pass through. The smaller center hole in each piece is specific to this brand and not is needed in our pickup.
If you plan to purchase your parts, it should be fairly easy to obtain something similar to these images if you follow one of the links above. There will be many slight variations, mainly with the two metal tabs, but just be sure that there is a place to solder both ends of the coil, and that the connection wire can be secured.
Making single coil guitar pickups – Flatwork by Hand
If you want to make these parts by hand, there’s a wide variety of objects that you can use, from craft popsicle sticks to plexiglass. I made a pickup using a flat wood molding for kitchen cabinets. You’ll want to use a non-conducting material, at least until you have an informed reason not to, and you’re going to want to use something that’s not going to warp or crack over time.
Your flatwork will not need to be shaped exactly the same as the image above. It can be square or rectangular, for instance, but it has to fit into your guitar, so it’s going to end up being pretty similar in shape. It’s best to try to trace one of your existing pickups and carefully mark the position of each of the holes that you will need.
The first two holes that we’ll need to drill are the ones in the bottom section of flatwork that connect the pickup to the guitar. Everything else can be worked around and can give your pickup “character,” but if these two holes are wrong, you won’t be able to use the pickup at all. Once you’re positive that you have those holes right, it’s time to drill the six larger holes for the posts in both the top and bottom sections of the flatwork. Let’s hope that you were able to get a good trace; these holes need to line up with each string, otherwise you may get an subpar reading.
When you’re making single guitar pickups, it’s important to keep in mind that many guitars have a slight taper in the string’s width, from the nut to the bridge. This means that the posts will be slightly closer together on the Neck pickup than they will be on the Bridge pickup. When you order your parts, or you are taking measurements to drill your own holes, you will want to keep this in mind.
Another thing that you will want to remember is that the six post holes need to be the exact diameter as the post that you will be placing there. There shouldn’t be any gaps between the flatwork and the posts when the posts are in place, so you will need to drill your holes so they are the exact width of the posts that you intend to use.
The next holes we need to drill into the flatwork are the holes for each end of our coil wire, and the hole to hold the two-conductor lead wire in place. If you ordered your flatwork online, then there is a good chance these holes are already created for you. If you’re creating a homemade pickup, then you have some options available to you.
Keep in mind, when you’re making single guitar pickups, that you’ll need to secure both ends of the coil and the two-conductor lead wire, but the holes do not need to be in the same place as the image above. Many manufacturers use metal clips that you can solder the coil ends and lead wires to. The clip attaches to the pickup’s flatware and doesn’t require any additional holes.
As long as both ends of the coil are soldered to the two-conductor lead, and the two-conductor lead wire is held secure so that you can change pickups without breaking the delicate coil wires, you can do whatever works for your design. Of course, if you handmade flatwork that looks identical to the flatwork in the example image above, you can drill those same holes for your wires.
- Posts
Once we have the mounting holes and the six holes for the posts drilled into the flatwork, we will add the posts to our bobbin.
There are two main types of posts that you can use and your choice will alter the design a little.
- Alnico Magnet Posts
If you purchased your parts online, then you probably saw the option to purchase alnico magnet posts. These posts look a lot like the posts in this image (Fig 4).
Fig 4
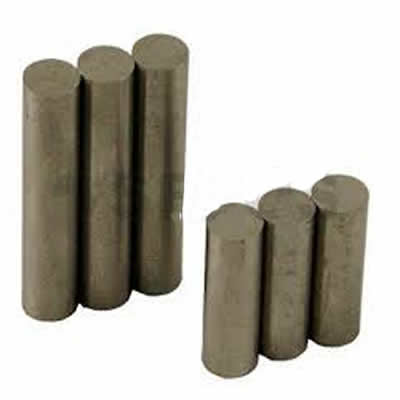
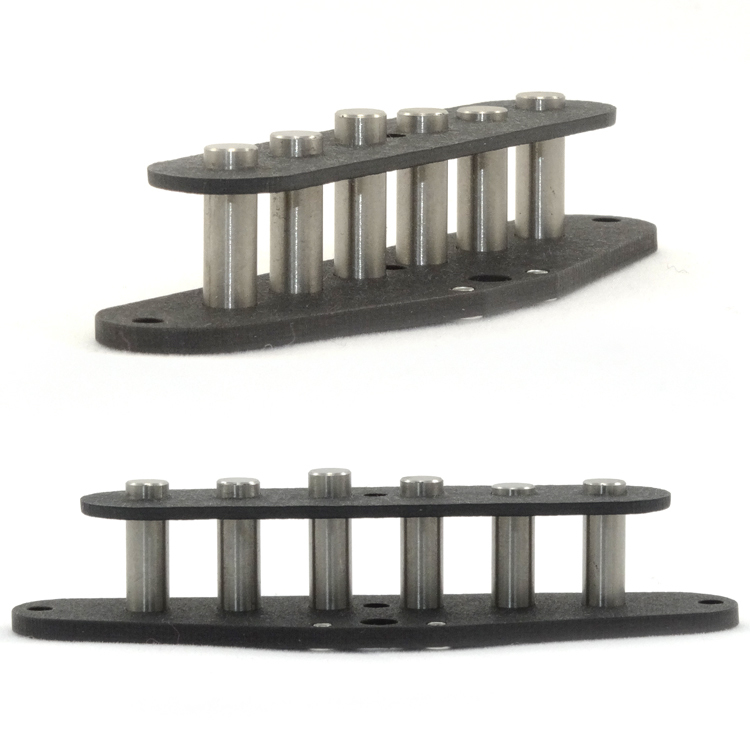
To use these magnets, we’re going to push six of these into the six holes of the top and bottom pieces of flatwork, to form our bobbin. Each magnet should be secure in the flatwork and not fall out or move around. When you’re finished, it should resemble this next image. (Fig 5)
Fig 5

When you’re making single coil guitar pickups for the first time, you don’t need to worry if the magnets are at different heights, like the above image, but just so you know, the taller magnets will be closer to the string and have more output. The height difference of the magnets is called a “stagger.” You might concern yourself with the stagger of the magnets if you feel a certain string was getting drowned out by the others, or if another string was too loud.
Another reason is that the strings follow the neck, so a curved neck would have strings at different heights in relation to a flat pickup. The middle strings would be farther away than the strings on the ends, so you might choose to stagger your pickup so that the magnets for the D and G strings are a little taller.
- Steel Posts
If you’re making your bobbin by hand, it will be much more likely that you will be using the steel post. The steel post is quite often just a machine screw, or something very similar to the next image (Fig 6), but it is possible to buy steel posts that look just like the alnico magnets in the last section.
Fig 6
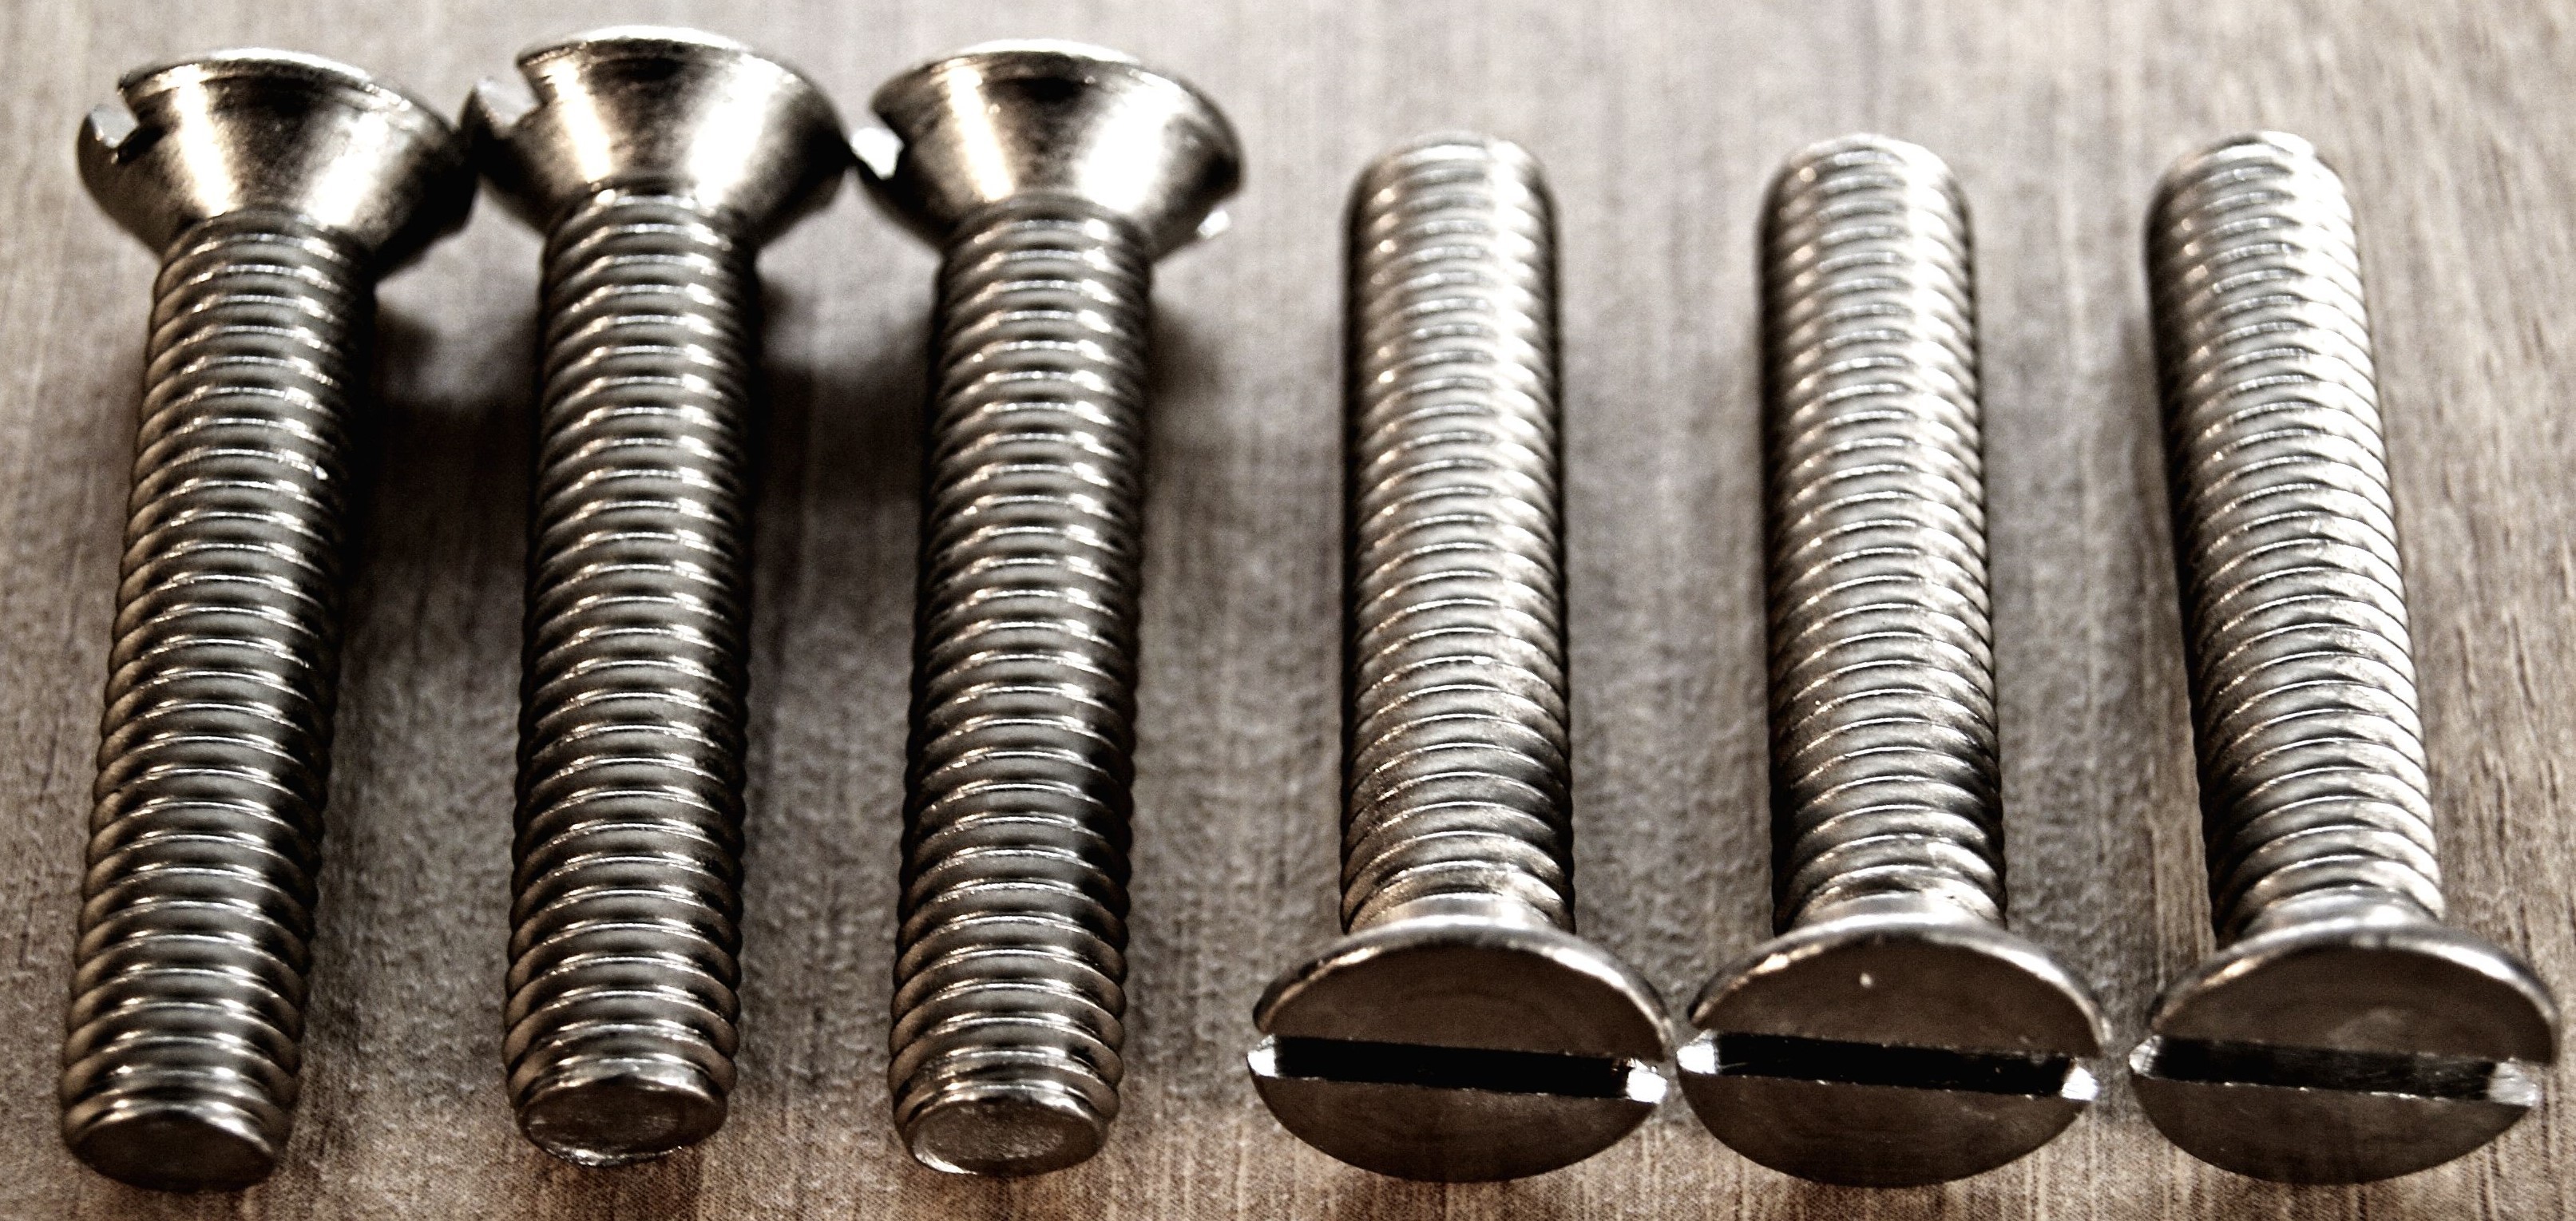
There are dozens of different kinds of screws that you can use. Every possible length, width, and style of head can be found if you look hard enough. The ones that you use will depend on your design, and what you have available. They need to be steel — six of them need to be fitted into the bobbin (one directly under each guitar string), and they shouldn’t be too long or too short. We will need to stick one or more bar magnets on the bottom of the flatwork. If the posts are too long, they could make the magnets wobble or sit at incorrect angles.
Another small detail that we might want to consider is that many pickups come with adjustable pole pieces. If you choose posts that resemble those, someone might get the idea that the posts in the pickup that you build are adjustable, but in this simple first-time pickup they won’t be.
Single coil guitar pickups typically range from a little over a half inch, to a little under an inch and a half tall, with the majority of them being right around one inch tall, including the magnet.
But keep in mind, when you’re when you’re making single guitar pickups, that the homemade ones might get a little taller, depending on what you use for flatwork. Going with a post length of about ¾ inch should be a good start, and you probably want to use the machine screws with the flat bottom and not the type with a point, so that you have more surface for the magnet to stick to.
Push the top piece of flatwork all the way to the top of the steel post. Next, push the bottom piece on, so that the end of the posts are sticking out of the bottom of the flatwork. See what we did with the alnico magnets in Fig 5 for an example.
Fig 5
Once again, this should be a sturdy bobbin with the pieces fitting tightly together, even surviving a drop, without any of the posts falling out or falling. The coil will hold it together a little, but this is the frame of the pickup and it needs to be secure. You might be able to use some glue or tape to help keep things tight, but you can’t be sure how these things will break down over time, and how it could affect the pickup. If this is your first try though, don’t worry about it too much.
Magnets
If you built your bobbin using the steel posts, you will need to use a magnet. You can easily buy magnets online, or at any hardware or craft store. There are hundreds of types of magnets that you can choose from and there are really only a few considerations that you need to make.
You probably want a bar magnet very similar to the one in this image (Fig. 7).
Fig 7
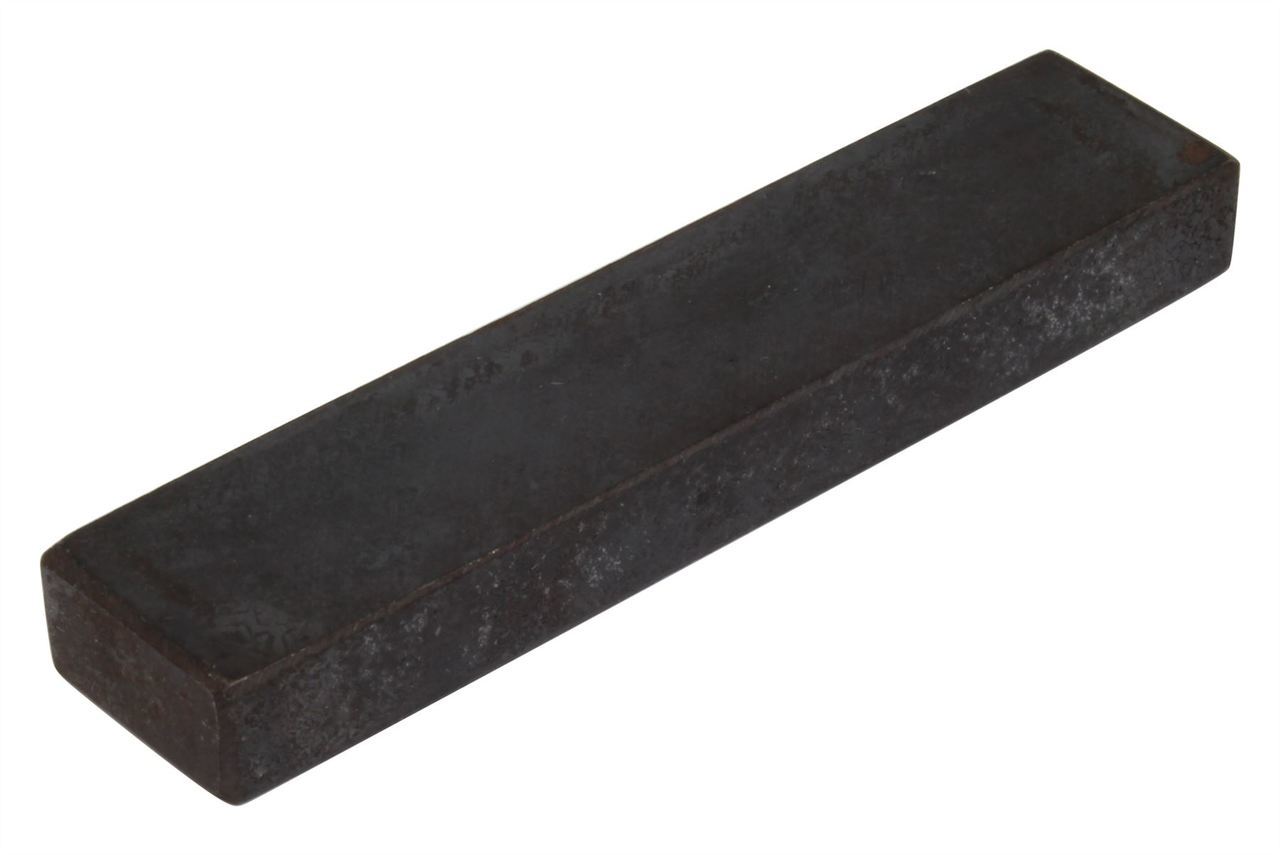
These types of magnets can cover all six posts with just one or two magnets. If you do use more than one magnet, make sure that they are the same type and strength, and that the poles are facing in the same direction when you attach them to the bobbin. I bought several kinds of magnets from the local hardware store and it all worked great. Don’t use any magnets that you can bend — these will probably not be strong enough. You don’t need to use any type of “industrial strength” magnet either; these will probably be too strong.
Remember that you’re looking for a bar magnet with the poles lined up like this image (Fig 8).
Fig 8
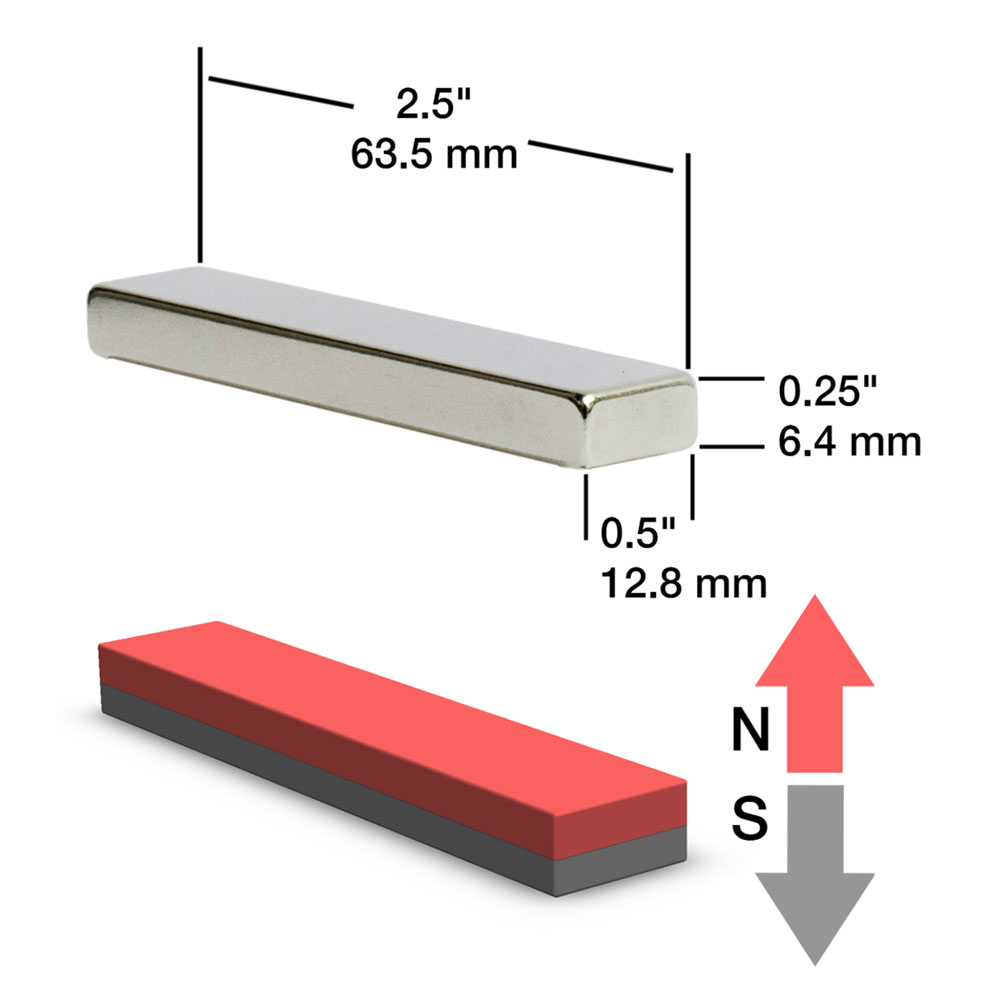
Here, the top half of the magnet is north and the bottom half of the pickup is south. This would result in a bobbin with all six posts having the same magnetic charge.
The next image (Fig 9) displays a similar bar magnet, but here the left side is north, while the right side is south. This results in a bobbin that would have three posts with a north charge, and three posts with a south. We want all of our posts to have the same charge, for this example at least.
Fig 9

Once we have chosen the magnet or magnets that we’ll use, I recommend sticking it to the bottom of the bobbin and then testing the whole bobbin in your guitar to make sure it will fit, and that the posts line up correctly with the strings. This is much less necessary if you have ordered your parts online, but you might want to check the string taper we talked about earlier, and that your posts line up. Once you’re satisfied with the design, your bobbin is finished and it’s time to start winding your coil.
The Coil
The space between the top piece of flatwork and the bottom piece is where we’ll wind our coil.
We begin by winding the end of our wire through and around one of the “eyelets” in the bottom piece of the flatwork, or, if your design uses metal tabs, you should be able to wind the wire around that a few times. You will want the wire to be secure while you wind, and when you solder the lead wire on later.
Before you can wind the wire, you’ll need to remove the coating. If you’re using enamel-coated wire, scrape the enamel off with a screwdriver or knife. If you have a poly-coated wire, melt it off with a soldering iron. And if you’re using a variable temp soldering iron, be sure to use the lowest heat setting. Once the coating is removed, you can wrap the wire and solder it in place.
Now we can begin to wind our coil. Try to wind the coil evenly between the top and bottom sections of flatwork. Try not to pull the wire too tight, but don’t let it be too loose either. You will want to wind a considerable amount of wire around the bobbin, as much as you can wind before the wire begins to bulge beyond the flatwork.
Once you feel that you have enough wire wrapped around the bobbin, you can break the wire from the spool, remove the coating from the last inch or so, wrap it around the other eyelet, and solder it in place.
Once this is done, you can check to see if the pickup works, by using your multimeter. You do this by setting your meter to OHMs. If there are multiple OHM settings on your meter choose the one closest to 20,000 or 20K. Touch the black lead to one eyelet and touch the red lead to the other eyelet. If you get a reading, then your pickup works. If you don’t get a reading, try the next lower OHM setting on your machine, if there is one. But, if you still get no reading, there is some type of problem.
The good news is that the problem is most likely at one of the ends in the coil. Most likely, you didn’t get enough of the shielding removed from the wire to get a good connection. This is a bigger problem if it’s at the beginning of the coil, because trying to remove shielding may break the wire, rendering the pickup broken. If the problem is at the end of the coil and it breaks, you should be able to just unwind it a turn and try again.
Any reading at all means that there is a continuous path from the beginning to the end of the coil, and that it should work. For this example, we don’t really care what the output is, but if you intend to build more pickups in the future, you might want to take note of this number and pin it to the way that this pickup eventually sounds. If you feel this pickup isn’t loud enough, next time you’ll want to pack more wire or use a stronger magnet for a higher reading.
Lead Wire
After confirming the pickup works, connect the lead wires. The lead wires connect the pickup to your guitar. To connect the lead wires, simply solder one wire to each eyelet.
If you are using two-conductor shielded wire, the third (bare), wire is the shield and will be soldered to the ground in your guitar. If you are using steel posts or any other steel in your pickup design, you can wrap or solder bare wire to it and then solder the bare wire to the third wire on the pickup end, to better ground your pickup and better shield it from interference. Just be sure that this wire or any steel do not come into contact with the eyelets.
Once the lead wires have been attached, your pickup should look similar to this image (Fig 10). At the very least, you should be able to identify all the parts in your design. Test the ends of your lead wires with your multimeter again to make sure that the pickup still works.
Fig 10

Wax Potting
The final step in our pickup building process is the wax potting. To wax pot our pickup, we will need to submerge it in melted paraffin wax for at least 20 minutes. If you are using bar magnets, I recommend removing them for the wax potting process. Be sure that you melt the wax safely, and keep the pickup submerged until you no longer see any bubbles. Remove the pickup from the wax, let the excess drip off, and let it cool for a few hours. Test it one more time with your multimeter, and if it still works, install it into your guitar and have a listen.
Completion of Making Single Guitar Pickups
Congratulations on completing your first guitar pickup. I hope that it sounds great!
Next time, we will take a look at the double coil, or “humbucker” design.